 0
0Have you ever wished upon a falling star? I do every time I see one. And unlike wishes on the first star you see tonight, wishes on falling stars have always come true for me. On the nights of August 11th through the 13th, you’ll have the chance not only to make some wishes, but also possibly to photograph a meteor shower during the annual Perseid shower.

Jerry Lodriguss
Meteors are tiny bits of debris that range in size from grains of sand to small pebbles that are left behind in the wake of comets as they orbit around the Sun. This debris burns up when it enters Earth’s upper atmosphere due to friction from its high velocity. The Perseids are the debris from Comet 109P/Swift-Tuttle as it orbits the Sun every 133 years.
This year, a waxing gibbous Moon will be up early in the night, but it sets early, leaving the best hours for catching meteors dark and primed for a good show. At the shower’s peak on the morning of the 12th, roughly 50 meteors per hour should be seen from a dark location.
That morning may also hold an extra treat for observers on the east coast of the United States, as more meteors might be seen as Earth plows into a debris trail left behind by Swift-Tuttle in 1079. If the 1079 debris trail does cause more meteors, they should peak around 4:56 UT, or 12:56 a.m. Eastern Daylight Time on the 12th, just as the Moon is setting. If you can’t catch them that morning, don’t fret, the Perseids have a long peak and should be visible for several days, gradually building to a peak on the 12th.
How to Capture a Perseid
To shoot the Perseids, you don’t need anything more than a camera and lens — although a tripod is helpful. If you don’t have a tripod, you can prop your camera up on a solid surface with a bag full of rice or sand in order to photograph a meteor shower.
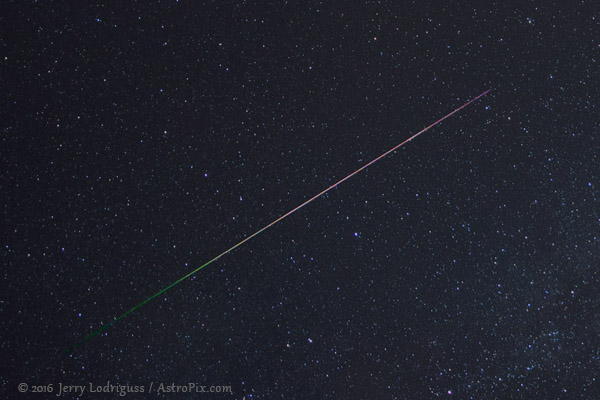
The colors are the result of the composition of the meteoroid and gases that ionize in the atmosphere with the passage of the meteor. They start out green, and change to yellow and then red.
Jerry Lodriguss
- Observing site: Go someplace dark. Use the Atlas of Night Sky Brightness to find a good observing location.
- Lens: Use a wide-angle lens to photograph a meteor shower.
- Aperture: Meteors are point sources that last just a second or two, so recording them is all about your lens aperture. Don’t stop your lens down — use it at its widest aperture! A 16-mm f/2 lens will capture more meteors (and they will appear brighter) than a 16-mm f/3.5 lens.
- Focus: Set the camera and lens to manual focus. Focus on the brightest star or planet in the sky with Live View magnified to 10× and tape the focus ring on the lens so it can’t be accidentally bumped.
- ISO: Use ISO 1600.
- Exposure: Set the camera to manual exposure mode. Take a series of test exposures at 10, 15, and 30 seconds. Look at the histogram for the image on the LCD on the back of the camera. Aim for an exposure where the peak of the histogram is about 1⁄3 over from the left side.
- File Format: Use Raw file format (or Raw + JPEG). RAW format allows you to adjust the color balance much better than the automatic settings saved in JPEG images.
- White Balance: Shoot a custom white balance on the sky itself to remove light pollution.
- Other Settings: Turn off Long-Exposure Noise Reduction (LENR) if your camera has this setting.
- Where to Point Your Camera: Aim your camera straight up — this will probably be the darkest part of the sky.
- Open the Shutter: Use the self timer to open the shutter. If you have a remote release you can skip this step.
- Take a lot of frames. The more you take, the more chance you have of capturing a meteor! Don’t wait until you see one to try to take a picture, that will already be too late! Try to keep the shutter open as much as possible.
Read your camera manual to learn how to set the mode and focus to manual, turn off LENR, use the self timer, display the histogram, and set a custom white balance.
Additional Tips on How to Photograph a Meteor Shower
Bring insect repellent and use it — don’t take any chances with West Nile, Zika, Lyme and other insect born diseases. Bring a jacket — even in the summer it can get cool at night.
If you are not shooting in the desert, you may have to address dew on your lens if you stay out for more than a few minutes trying to photograph a meteor shower. After you tape down the focus on the lens, try wrapping a chemical hand warmer around the lens with a rubber band if you don’t have an anti-dew device for astrophotography equipment.
Advanced Techniques
If you're shooting with a telescope with an equatorial tracking mount, try to frame your shot with an interesting constellation as the background. For example, the Milky Way in Cygnus will be high in the sky this time of year. Then align and stack all of your frames to create a master background. Then go through your images and pick out the ones with meteors and layer them on top of the master background using the Lighten blend mode in Photoshop’s layers window to composite all the meteors into the shot.
If you are shooting on a fixed tripod, try aiming your camera at Polaris. Shoot continuously and combine all of the frames into a single star trail image — again using Photoshop’s lighten layer blend mode. You can also create a time-lapse animation of the stars rotating around Polaris, hopefully with some meteors flashing through the frame.
If the weather cooperates, be sure to get out there and try to capture some Perseid meteors with your camera, and don’t forget to make a wish!


Comments
You must be logged in to post a comment.