 1
1You don't need a PhD to understand noise in astronomical images — here's an introduction to the various sources of noise in astrophotography and how to combat them.
Richard S. Wright Jr.
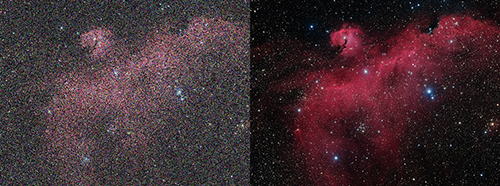
Noise and signal are possibly the two most important concepts to understand when it comes to astrophotography. Essentially, noise is unwanted junk and signal is the pretty stuff you are trying to capture. We want lots of signal, and we want as little noise as possible. Many of the techniques I’ll discuss in this space in the future are about optimizing signal and reducing noise. What we strive to optimize is the signal to noise ratio, or S/N (signal divided by noise). . . and yes, they can be represented by numbers! The higher/bigger/larger the S/N, the higher the quality of your data.
Richard S. Wright Jr.
There are a few well-known sources of noise that we care most about, and we have various processing techniques to combat them. For now, I'll lay a foundation before addressing these sources one by one in more detailed future installments.
Shot Noise
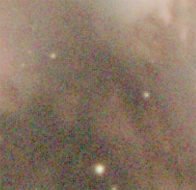
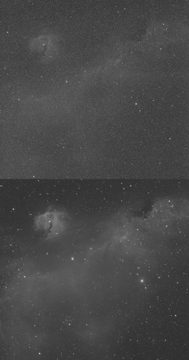
This is the random fluctuation in the arrival of photons as your sensor captures them. Think of a few sprinkles of rain hitting the sidewalk. There’s a splat here and a plop there, leaving a mottled look until enough rain drops have fallen to make the sidewalk uniformly wet. A huge rain shower, on the other hand, will douse the sidewalk immediately. Light falling on your image sensor behaves pretty much just like this. With just a little light, you end up with a very uneven, splattered look — In the vernacular of the peasantry, we might call this appearance “grainy” — until the detector slowly builds up enough signal. The more light you have, the more quickly you’ll obtain a nice, smooth, uniform image. Our primary weapon for this kind of noise is to take longer exposures and stack images.
Dark Current Noise
Richard S. Wright Jr.
The reason we cool our cameras is to control this noise source. Even with no light shining on it, an image sensor will accumulate signal from the thermal energy (i.e., heat) in the chip itself. This adds an offset to the signal for every exposure. But it's not a simple offset — the dark current has the same kind of random fluctuations as shot noise. I’ve seen this noise source referred to as well as dark shot noise, or thermal noise. Regardless of what you call it, it’s noise, and we don’t want it. Contrary to many sources on the web, subtracting a dark frame doesn't wholly remove this noise source, it only removes the offset. To reduce this noise source, you need to stack many frames and/or cool your camera. Stay with me for what dark frames do…
Read Noise
This noise or uncertainty is due to your camera's electronics. As each pixel value is being read out, a few extra electrons are lost or gained randomly, causing the readout value to vary a little from the actual captured signal rate. Read noise has the most impact on faint signals. Unlike other noise sources, read noise is independent of exposure time, meaning you pay a fixed price for read noise for every frame, regardless of whether it’s a 2-second exposure or a 20-minute exposure. Other than obtaining improved electronics, the best way to defeat read noise is to ensure that you expose long enough during a single exposure that the faintest feature you want to record has signal well above the read noise.
Fixed-Pattern Noise
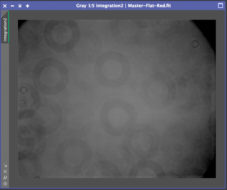
This kind of noise comes in two flavors, Dark Signal Non-Uniformity (DSNU) and Photo Response Non-Uniformity (PRNU). Dark and Bias calibration frames are the tools we use to fight DSNU, while flat-frame calibration takes care of PRNU. While some imagers will skip flat frame calibration if they don’t have dust bunnies or significant vignetting, we’ll see that PRNU cannot be defeated by stacking alone, and under certain circumstances you really don’t want to ignore it.
Noise Math
Except for read noise, all of these noise sources increase along with the signal. The longer you expose, the more signal you have, but also the more noise you accumulate. Fixed-pattern noise sources grow proportionally to the signal, and we can use calibration frames to remove them.
Shot noise is typically (but not always) our biggest source of noise. The trick with shot noise is that it goes up much slower than the signal, so the signal eventually swamps this noise source in comparison. We can compare the two using the signal-to-noise ratio. To be mathematically correct, you don’t actually drive the noise down; you are increasing the ratio of the signal to the noise. Splitting hairs? Maybe.
Richard S. Wright Jr.
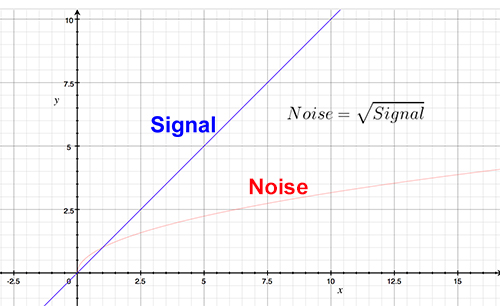
There's a simple mathematical relationship to how fast signal grows relative to noise: The noise increases with the square root of the signal. This makes a pretty graph doesn’t it? You can see that as the signal grows linearly (the straight line), the noise is quickly trailing off. Alas, we are shooting some pretty faint targets and it often takes a good while to get as much signal as we need to overpower the noise. This is why it's important for us to understand all the sources of noise in our images and how best to combat them.
To be continued…


Comments
Mike
April 20, 2018 at 7:37 pm
Nice write-up Richard. You have a very understandable way of explaining things!
You must be logged in to post a comment.
You must be logged in to post a comment.