 7
7In astrophotography, to dither means to shift the pointing of the telescope slightly in random directions between exposures. This allows hot and cold pixels, cosmic ray artifacts, and fixed pattern noise, and even satellite or airplane trails to be removed during the stacking process. Here’s how it works.
Hot pixels, which are individual pixels that look brighter than they ought to, lie in the exact same place in every exposure. By moving the pointing of the telescope, dithering shifts the stars to a slightly different place in each frame. Later, as you process your images, you’ll align and stack individual frames based on the stars in each image. This shift places the hot pixels in a different place in every frame. The Sigma rejection stacking method, available in most astronomical image-processing programs, applies a mathematical algorithm to examine every pixel and discard outliers that are very different from the average in your group of images. This means that if you have 10 frames and a hot pixel is only showing up in one particular location on a given frame, the algorithm replaces it with an average from the other frames. For the Sigma algorithm to work, you need a minimum of 10 frames.

How to Dither
Back in the days of film, I used an SBIG ST-4 autoguider, and I manually triggered a cable release for every exposure. I used to dither by turning off the autoguider, manually moving the scope a little bit with the hand controller, turning on autoguiding again, and finally starting another exposure. I did this painstakingly all night long.
Thankfully, in today’s modern digital world we can automate many processes in astrophotography. We use a computer to control the telescope mount, imaging camera, and autoguider. The software that controls these different pieces of hardware enables them to communicate with each other to get the job done properly. Programs including AstroPhotography Tool, BackyardEOS, or BackyardNIKON can work with PHD2 for autoguiding. Or you could use Sequence Generator Pro with either PHD2 or MetaGuide. High-end software including MaximDL integrates all these functions.
Your camera-control software does just what I did with the ST-4: it pauses the imaging sequence between exposures and sends a dither offset to the autoguider program, which then passes the command on to the mount control driver, which moves the scope. The autoguider software re-acquires the guidestar and begins guiding, and your camera-control program then starts the next exposure.
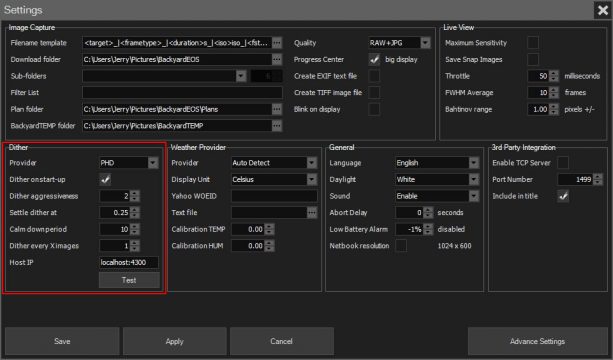
The aggressiveness setting controls how far the mount pointing will move between exposures. You may want to increase this value a bit more if you are using a DSLR or one-shot color CCD camera to compensate for the 4-pixel Bayer color filter array overlaid on the detector. The same idea applies if the optic you’re guiding with has a longer focal-length than your imaging scope, which might happen if you’re shooting with a telephoto camera lens on top of your normal telescope. Without a big enough shift in pointing, your pixel offset will be too small to make a difference when stacking the results.
If you aren’t guiding, and in some cases even if you are, you may notice your stars moving between frames from polar misalignment or flexure between your guidscope and imaging scope. You might think you can use this natural drift for dithering. Unfortunately, this generally won’t work. Dithering needs to be in a random direction each time to be most effective, and drift from polar misalignment or flexure is usually in one direction, so you’ll end up with smeared pattern noise appearing like dark and light streaks in your stacked result.

Also note that dithering is not the same thing as drizzling. Drizzle is a technique that improves the resolution of undersampled images. It was originally developed for the Hubble Space Telescope, where the optics resolved more detail than the size of the CCD pixels on the WFPC2 camera would allow.
Professional astronomers have a saying: “dither or die.” It may not be quite that dire for amateur astrophotography, but dithering will improve your images tremendously, increasing the all-important signal-to-noise ratio and removing artifacts like hot pixels and satellite trails, as well as even compensating for temperature mismatches between darks and lights shot with an uncooled DSLR.
About Jerry Lodriguss
Jerry Lodriguss has been an amateur astronomer and astrophotographer since 1972. He worked professionally for more than 30 years as a photojournalist and sports photographer. Today, Jerry is an author, photographer and contributing editor to Sky and Telescope magazine. Check out Jerry's images and astrophotography at http://www.astropix.com.

Comments
damianvines
December 12, 2019 at 11:48 pm
Curious... who actually wrote this article? There are too many exact similarities in these, just FYI. There’s no date on his so I can’t tell. https://astrobackyard.com/dithering-astrophotography/
You must be logged in to post a comment.
Jerry LodrigussPost Author
December 13, 2019 at 6:45 am
I can state, unequivocally, that I, Jerry Lodriguss, wrote my Sky and Telescope Column without any reference to Astrobackyard.
I've been doing this for more than 40 years, probably longer than Astrobackyard has bee alive.
Jerry
You must be logged in to post a comment.
Greg-Parker
October 8, 2021 at 11:15 am
If you read the Astrobackyard article through - he actually gives a link to Jerry's Sky & Telescope column.
You must be logged in to post a comment.
AstroboyCA
October 12, 2021 at 10:21 pm
The Wayback Machine keeps a history of a web page and changes made over time. It is obvious Astrobackyard's original version was a blatant plagiarism of this article.
You must be logged in to post a comment.
TDunnavant
June 23, 2022 at 4:46 pm
The Astrobackyard writer is a credit to the community, named Trevor Jones.
I read Trevor's dithering article after reading the comments on Jerry's article. They both are valuable contributions. As Trevor states as part of his credit to Jerry, this article provides an excellent description of the "what" and "why" about dithering. Trevor casts his article in a bit different direction, discusses some different tools, and provides some personal examples to illustrate the benefits of dithering.
I think that characterizing his contribution as "blatant plagiarism" is using way too strong a language.
After all, fellows, how many ways can you describe what dithering is all about? There are only a few ways to do so and get it right.
You must be logged in to post a comment.
damianvines
December 16, 2019 at 4:19 pm
I have no doubt Jerry. I figured as much. Thank you very much for your reply. Kids these days.
You must be logged in to post a comment.
karlp295
July 1, 2024 at 2:06 pm
I do respect Trevor Jones, but the author of this article is very well known for his contribution to astrophotography. However, as has been said Trevor tries to cover this in a different way.
I hope that one day I may have had some contribution to astrophotography and anyway I wanted to throw my hat into the ring.
https://astroimagery.com/techniques/imaging/astrophotography-dithering/
How helpful is this page to the discussion?
You must be logged in to post a comment.
You must be logged in to post a comment.