 2
2Photographing the Sun can be perfectly safe, as long as you take the proper precautions. You can use these techniques to photograph the November 11th transit of Mercury.
Photographing the Sun is not usually the first idea that pops into your head when you hear the word astrophotography. But why not? The Sun is, after all, a star — the closest one to our planet. It’s sobering to think that our Sun is an average citizen of the celestial host we see overhead each night. It's just a bit more up close and personal.
Richard S. Wright Jr.
Although there are several methods for photographing the Sun, let's focus this month’s technical discussion on white-light solar imaging. White-light solar photography means that any filtering we use is intended to reduce the amount of light, rather than isolate any particular wavelength (such as when using a specialized solar hydrogen-alpha filter).
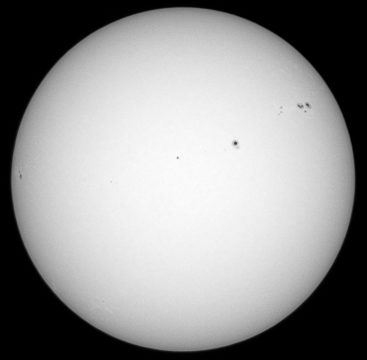
White light solar imaging does a great job of showing sunspots and facula, and is the easiest and most economical method you can use to photograph next month’s transit of Mercury on November 11th. Hey, you didn’t think I just pulled this topic out of a hat did you? White light is really what the Sun looks like assuming you could look at it without going blind. Most any color camera, such as a DSLR or mirrorless camera can capture a pleasing white light image, so you can use pretty much any camera you already have.
Solar photography is easy but great care must be taken when pointing any telephoto lens or telescope at the Sun. I don’t need to tell you, it’s really hot and it hurts just to look directly at it! A big light-gathering optic captures all that energy and focuses it down to a smaller area. I’ve often said in astrophotography that more light is always better . . . this might be the one time I'm wrong! Focused, unfiltered sunlight will almost immediately burn or melt anything at the focal plane. This includes camera shutters, sensors, your hand, or God forbid, human eyeballs.
Richard S. Wright Jr.
When imaging the Sun, the trick is to simply reduce to a safe level the amount of light from the Sun that is reaching your sensor. Many of the cameras damaged during the 2017 solar eclipse were the result of bad advice — some had stated that a strong neutral density filter on the front of the camera lens would sufficiently reduce the light entering the lens or telescope. This is not only wrong, but extremely dangerous.
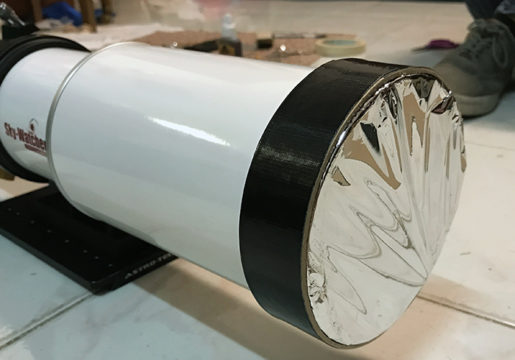
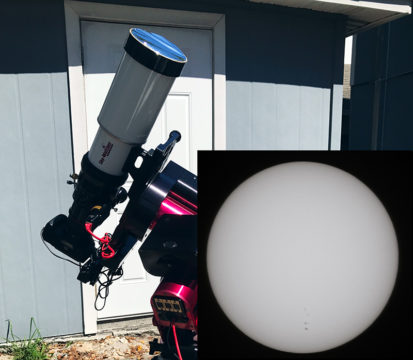
There are several inexpensive white-light filters that fit over the front aperture of your telescope or camera lens. My personal favorite is Baader AstroSolar film. Any of these certified solar filters will reduce the amount of light entering your optical system by 99.999% — a 100,000× reduction in intensity — and make photographing the Sun a safe and easy activity, similar to photographing the Moon.
Years ago, I purchased a bulk roll of AstroSolar film to make my own customized solar filters. Taking care not to damage the material, you can make a full-aperture filter with the film material for your camera lens or telescope with a little cardboard and tape. Craft night! You can also use it to make safe solar glasses or filters for your binoculars. I simply used a rubber band to hold the foil over the front of a telephoto lens, and it worked great.
Richard S. Wright Jr.
Most of my tips for imaging the Moon apply equally to white-light solar photography, such as locking up the mirror in your DSLR. A Sun-specific tip is to bring a light-blocking blanket along to put over your head. Out in bright sunlight it's very difficult to see the LCD on the back of your camera. When shooting the Sun, it's best to bracket your exposures, so you can ensure that at least one of them is properly exposed. It's also better to underexpose a bit, as it's very easy to lose contrast on sunspots or facula features. Trust the histogram — the more spread out it appears the better, even if it's a little darker (more to the left) than where you think it should be.
Photographing the Sun can be done safely, and cheaply, but be sure and have a sober respect for what you are doing. Like playing with fire, a moment of carelessness or inattention could end in disaster. When using a front aperture filter, be mindful of the wind as well as curious pets or children, who have no idea how important that little bit of shiny foil is. Stay safe, have fun, and good luck on November 11th!
About Richard S. Wright Jr.
Contributing Editor Richard S. Wright Jr. is a software developer by profession specializing in computer graphics technologies at LunarG Inc. Richard is also a consulting engineer and imaging specialist for Software Bisque. A lifelong amateur astronomer, Richard first experimented with a webcam and black-and-white film images of the Moon in the 1990s, and he subsequently became hopelessly addicted to astrophotography. Currently, he seeks treatment at his dark sky camp/observatory in Okeechobee, Florida, whenever he can. Check out his online photo gallery.

Comments
Rod
October 15, 2019 at 11:55 am
The Mercury transit affords an opportunity to measure the solar parallax, thus the astronomical unit. In 2016, citizen science projects accomplished this, "A School Competition on the computation of the solar parallax using observations from the Mercury Transit of 9 May 2016 - Results and Discussion", https://ui.adsabs.harvard.edu/abs/2017EGUGA..1913160Z/abstract
The November issue of Sky & Telescope reports this will take place again -Sky & Telescope reports that citizen science groups will be conducting solar parallax measurements that allow the calculation of the astronomical unit, i.e. distance between Earth and the Sun using the Mercury transit. It is called Citizen TOM (Transit of Mercury) Project, see page 49.
You must be logged in to post a comment.
BobW
October 20, 2019 at 4:50 pm
Nice article. I built similar Baade filters for use at the 2017 total eclipse, viewed in Nebraska.
But I do want to add one small thing re safety and equipment. Many of us interested in photography and astronomy have equipment that has "extra" light inputs. The biggest would be the viewing window on a twin-lens reflex camera, but any camera that has a separate finder (so basically any non-SLR) has this somewhat. You probably wouldn't be wanting to use that extra light path, but its still there and dangerous! Since you aren't using it, you can simply cover it completely.
And I will underline your warning about the wind: During my pre-eclipse testing, my main filter did blow off once. I was not looking through a finder, but the un-dimmed sun can also damage the internal parts of a camera: I was lucky. (Anybody remember how in good old 35mm rangefinder days you had to worry about burning holes in shutter curtains?)
You must be logged in to post a comment.
You must be logged in to post a comment.