 0
0Here’s how you can add a personal element to your solar eclipse photography.
Total solar eclipses are without a doubt one of the most spectacular astronomical events that celestial mechanics has to offer. To stand within the shadow of the Moon is a life-changing moment for almost anyone who experiences it. From my very first total solar eclipse on August 11, 1999, I longed to capture that fleeting moment forever. But typical eclipse photography left me with the feeling that something was missing.
Then it struck me — what was lacking in typical eclipse pictures was the human presence. So I set out to combine the beauty of a solar eclipse with the joy of the experience.
Solar Eclipse with a Twist
What I had in my mind wasn’t the usual wide-angle photo of the backs of people gathered in the foreground and the eclipsed Sun above. Nor did I plan a “selfie” with myself or another close to the camera and the eclipse being a minor component of the composition.
Instead, I envisioned placing a person at a similar scale to the Sun and Moon, ideally integrating the two subjects. This required the model to be far from the camera, captured through a long telephoto lens. However, I didn’t want the subject to simply be near the event. My vision was very clear: to capture a person during totality interacting with the eclipse itself in a single exposure. Such a picture would establish an intimate connection between the event, the witnesses, and the location where they are experiencing the eclipse.

Eugen Kamenew
It’s All About Location
In order to achieve my vision, the position of the eclipsed Sun had to be relatively low to the horizon. This meant I had to find a location along the path of totality where mid-eclipse occurs not long after sunrise or before sunset. The requirement greatly increases the chance of being clouded out, since I’d be looking through much more of Earth’s atmosphere than when witnessing the event high in the sky — the low perspective meant clouds hundreds of kilometers away could scuttle my plans. Usually, eclipse chasers prefer a geographical location mid-way along the path of totality where the event occurs high in the sky, which also produces the longest duration of totality.
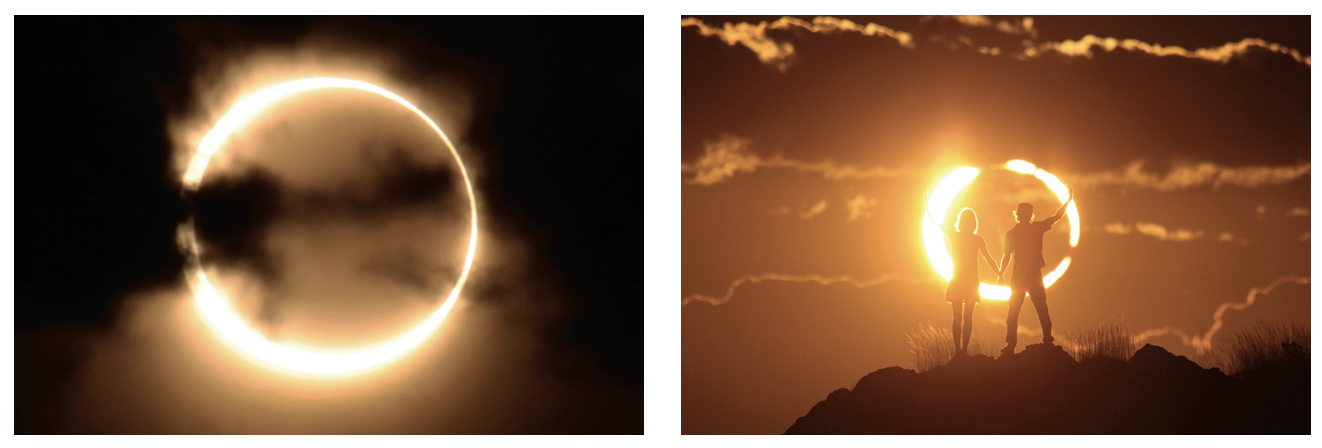
Identifying the ideal location to execute my plan proved challenging. Roughly 70% of Earth is covered by water, so most eclipse tracks begin or end above oceans. I instead searched for an eclipse where the shadow path either began or ended on or near land. The eclipse of May 10, 2013, afforded my first opportunity, with totality occurring during sunrise. Unfortunately, this eclipse was annular rather than total. Nonetheless, I saw it as a good opportunity to test my vision. The Moon’s antumbral shadow would land in Western Australia, with a relatively wide path of about 221 km (137 miles). Normally when chasing an eclipse, I’d try to get as close as possible to the central line. Since the Moon’s shadow was racing from west to east over the Australian desert, it was easily accessible via the Great Northern Highway 95 that runs north to south. Along this route someone on the eclipse central line would experience exactly 4 minutes and 4 seconds of annular phase. Unfortunately, I wasn’t able to find any suitable hills to position my model within the proper line-of-sight at this location.
Through further location scouting, I found an excellent spot at Radio Hill Lookout in Newman, Australia. This was near the northern limit of the path of annularity, about 121 km from the central line, which meant that annularity lasted just 1 minute and 51 seconds. That meant that I’d be sacrificing 133 seconds of annularity, and the lunar silhouette wouldn’t produce a perfect solar ring. No matter — this was still acceptable for my goal.
I planned to position a couple within the lunar silhouette so that they would appear to be embracing the ring of fire. Since the Sun’s apparent diameter is about 1⁄2°, I had to position my models approximately 200 meters away so that perspective would make them appear small enough to be framed within the ring of annularity.
Eugen Kamenew
Displaced Sun
Shooting an event so low in the sky turned out to be a challenging experience. The eclipse began with the Sun 13.4° below the horizon. Just 3 minutes after sunrise, 2nd contact occurred with the Sun only +0.6° above the horizon. One minute later the Moon was at its maximum point within the solar disk, and the Sun’s altitude was only +0.8°.
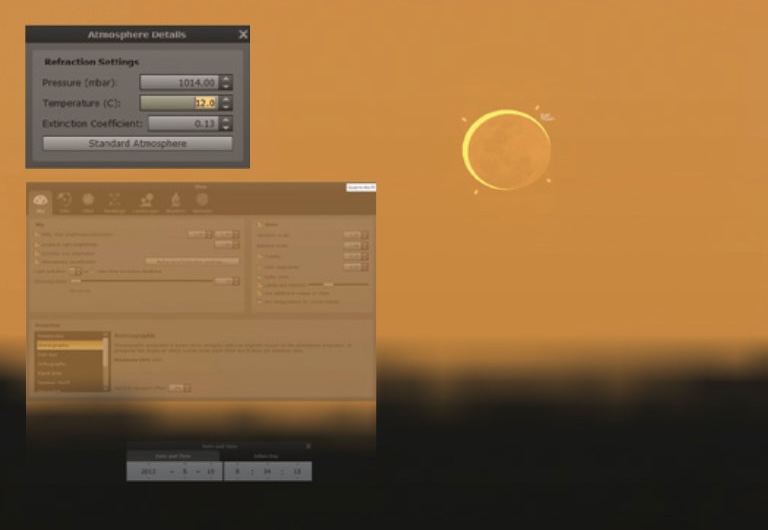
An additional problem I needed to consider when calculating the shot’s precise time and location was atmospheric refraction. At such a low elevation, the atmosphere that sunlight was passing through bent the light, displacing the Sun’s apparent altitude. The exact amount of this displacement varies with barometric pressure and air temperature. Just above the horizon, atmospheric refraction typically causes the Sun to appear higher by slightly more than its own diameter. But at a point only 1° above the horizon, this “lift” is reduced to slightly less than the Sun’s apparent diameter. So taking refraction into account was very important for my project. I used the planetarium software Stellarium (stellarium.org), input the barometric pressure, temperature, and extinction coefficient in the Atmosphere Details menu to simulate refraction, and determined exactly where and when I needed to be to get the shot.
Eugen Kamenew
With my models Sarah Ponceblan and Gregory Sabatier patiently waiting for the unusual sunrise, some clouds near the horizon appeared that threatened to ruin the project. Just in time, they dispersed enough to reveal the ring of fire.
At the time, I was shooting with a Canon EOS 5D II full-frame DSLR paired with a Sigma 50-500-mm f/4.0-6.3 APO lens unfiltered at maximum zoom. This permitted a lot of free space around the Sun to include some of the surrounding landscape. I stopped down the lens to f/9 to increase its depth of field, as I was focused on my models rather than on the distant eclipsed Sun. As a result, an appealing bokeh effect bloated the Sun and edge-illuminated clouds. I also set the camera to ISO 1000 with a fast shutter speed of 1/5,000 to greatly reduce the potential for blurring due to wind or my models’ movements during our brief opportunity.
While shooting this eclipse, I decided not to employ a solar filter on the telephoto lens. This could have been potentially dangerous had I looked at the Sun through the camera’s viewfinder. I avoided this problem by using Live View to frame the shot, only looking at the Sun on the camera’s rear screen. While this still risks damage to my camera’s sensor, it was a risk I was willing to take — cameras can be replaced, while my eyesight cannot. Using a solar filter would also require much longer exposure times, potentially blurring my subjects. Additionally, solar filters impart a color cast to the scene. These days, using a mirrorless camera such as those offered by Canon, Fujifilm, Nikon, and others would be an even safer option, as the camera always provides a video readout of the detector on its LCD screen. Keep in mind there still is a high risk of permanent damage to the sensor.
Eugen Kamenew
Eugen Kamenew
Take II: A Hybrid Solar Eclipse
My test proved that framing figures within an annular solar eclipse was possible in a single exposure, giving me high hopes that the same principle would work for a total solar eclipse. An excellent opportunity to try it out arose later that year.
On November 3, 2013, a rare hybrid solar eclipse was to end while setting over Eastern Africa. This event began over the Atlantic Ocean at sunrise as an annular eclipse but transitioned to a total eclipse as the narrow path crossed and set over the continent.
In this case, being near the centerline of totality was important for the sake of time. Because the Moon only appeared slightly larger than the solar disk, it cast a path of totality just 14.3 kilometers wide near the end of the event. The farther from the centerline, the shorter the duration of totality I would see, and I needed as much time as possible.
I hunted for my location using the NASA eclipse website (eclipse.gsfc.nasa.gov). Here I could virtually “fly” over a map of the path of totality. Clicking on a location along the eclipse path presented the information I needed to triangulate my exact position. During the maximum phase of totality for the location I chose in Kenya, the Sun would have an altitude of +12.9°.
Planning with Google Earth Pro
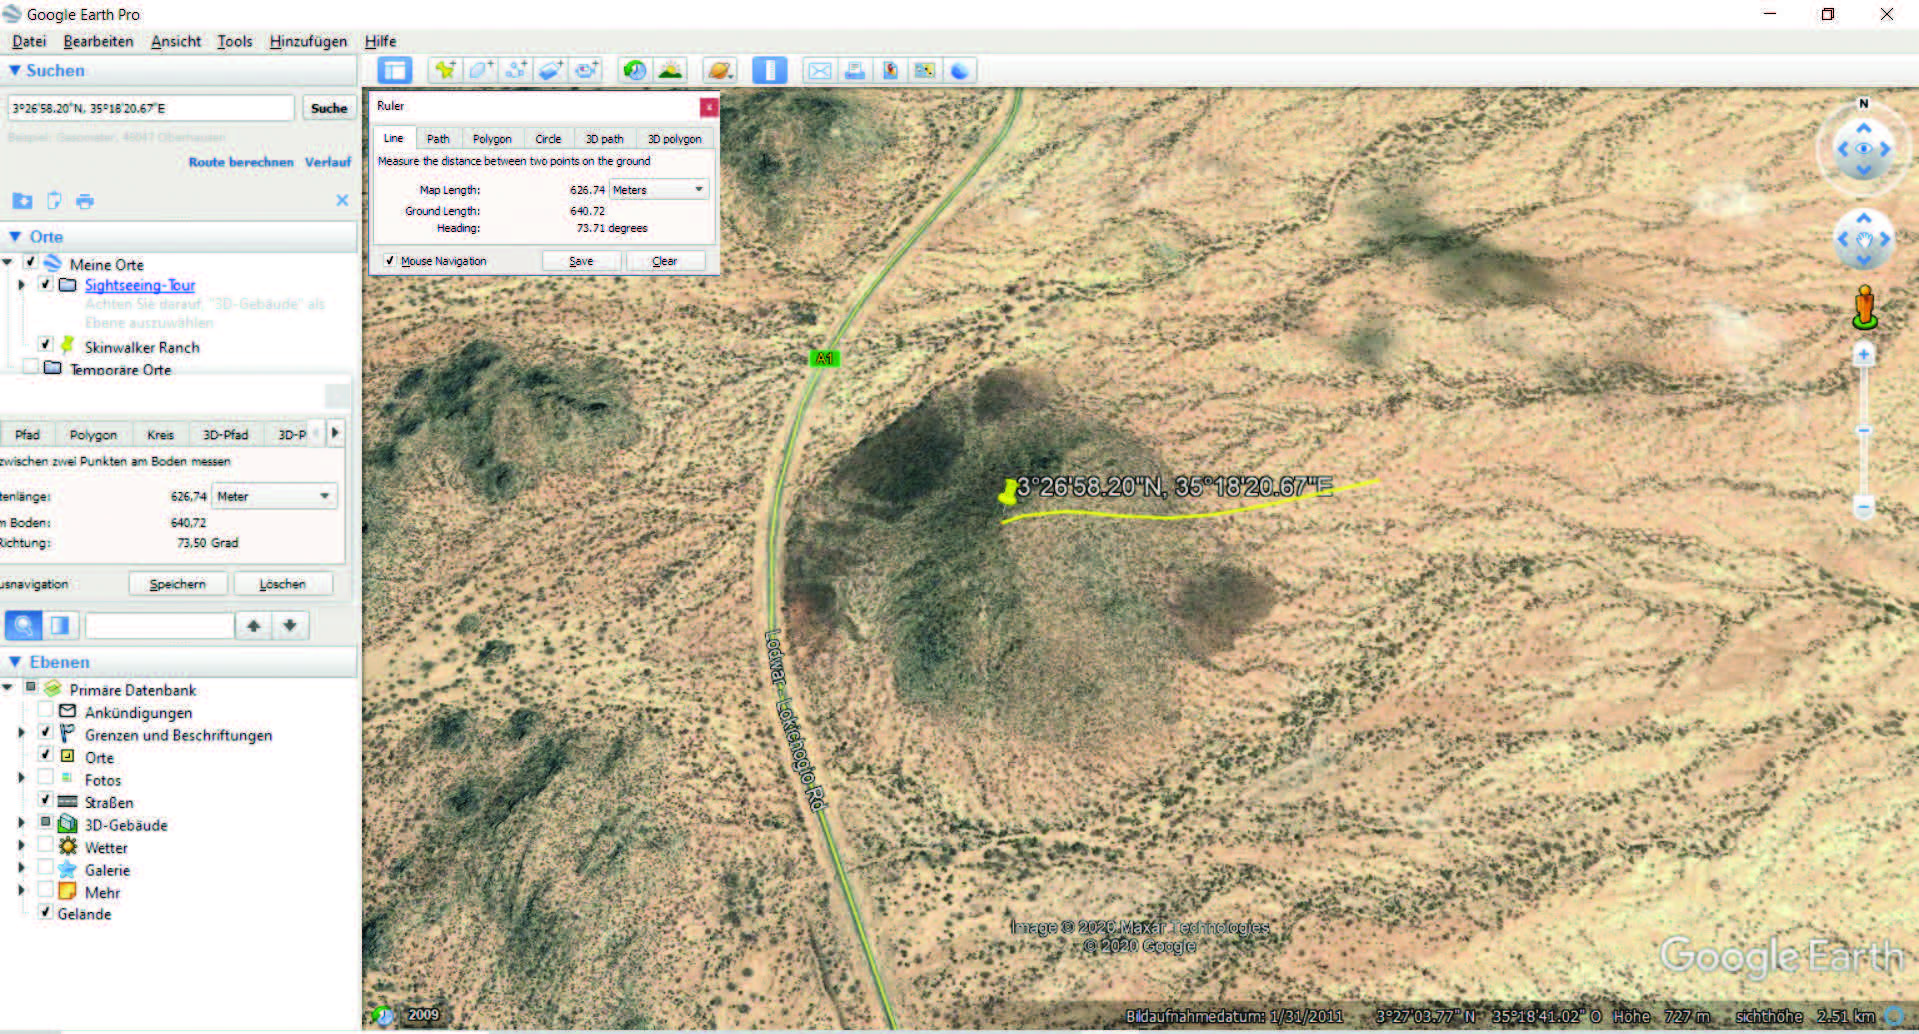
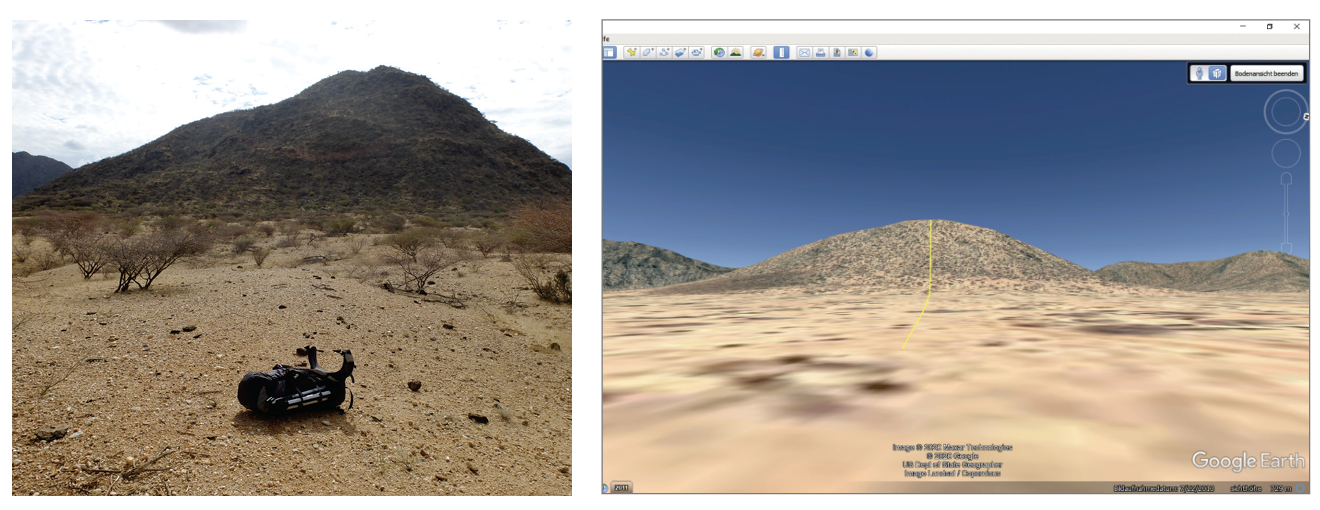
Still, the NASA website doesn’t give any topographical information, so I had to switch to Google Earth Pro (google.com/earth/versions) to obtain detailed information on places that I’ve never physically visited before. Using the geographical coordinates of my chosen site taken from the NASA website, I searched for a tall hill that would put my model at an altitude of 12.9°. I succeeded in locating one just 500 meters (1,600 feet) south of the central line and approximately 140 meters higher than the surrounding terrain. That meant that a straight-line distance from photographer to the photo model would be approximately 627 m.
At the time of maximum eclipse, the Sun would be at an azimuth of 253.5°, so I needed to be at a 73° azimuth angle to the hill. Using the Ruler tool in Google Earth Pro, I plotted the precise position between myself and my model. Note that this work can be done more easily using several smartphone apps, including PhotoPills, Planit Pro, SkyView, or Sun-
Surveyor, or using the website The Photographer’s Ephemeris (photoephemeris.com/en).
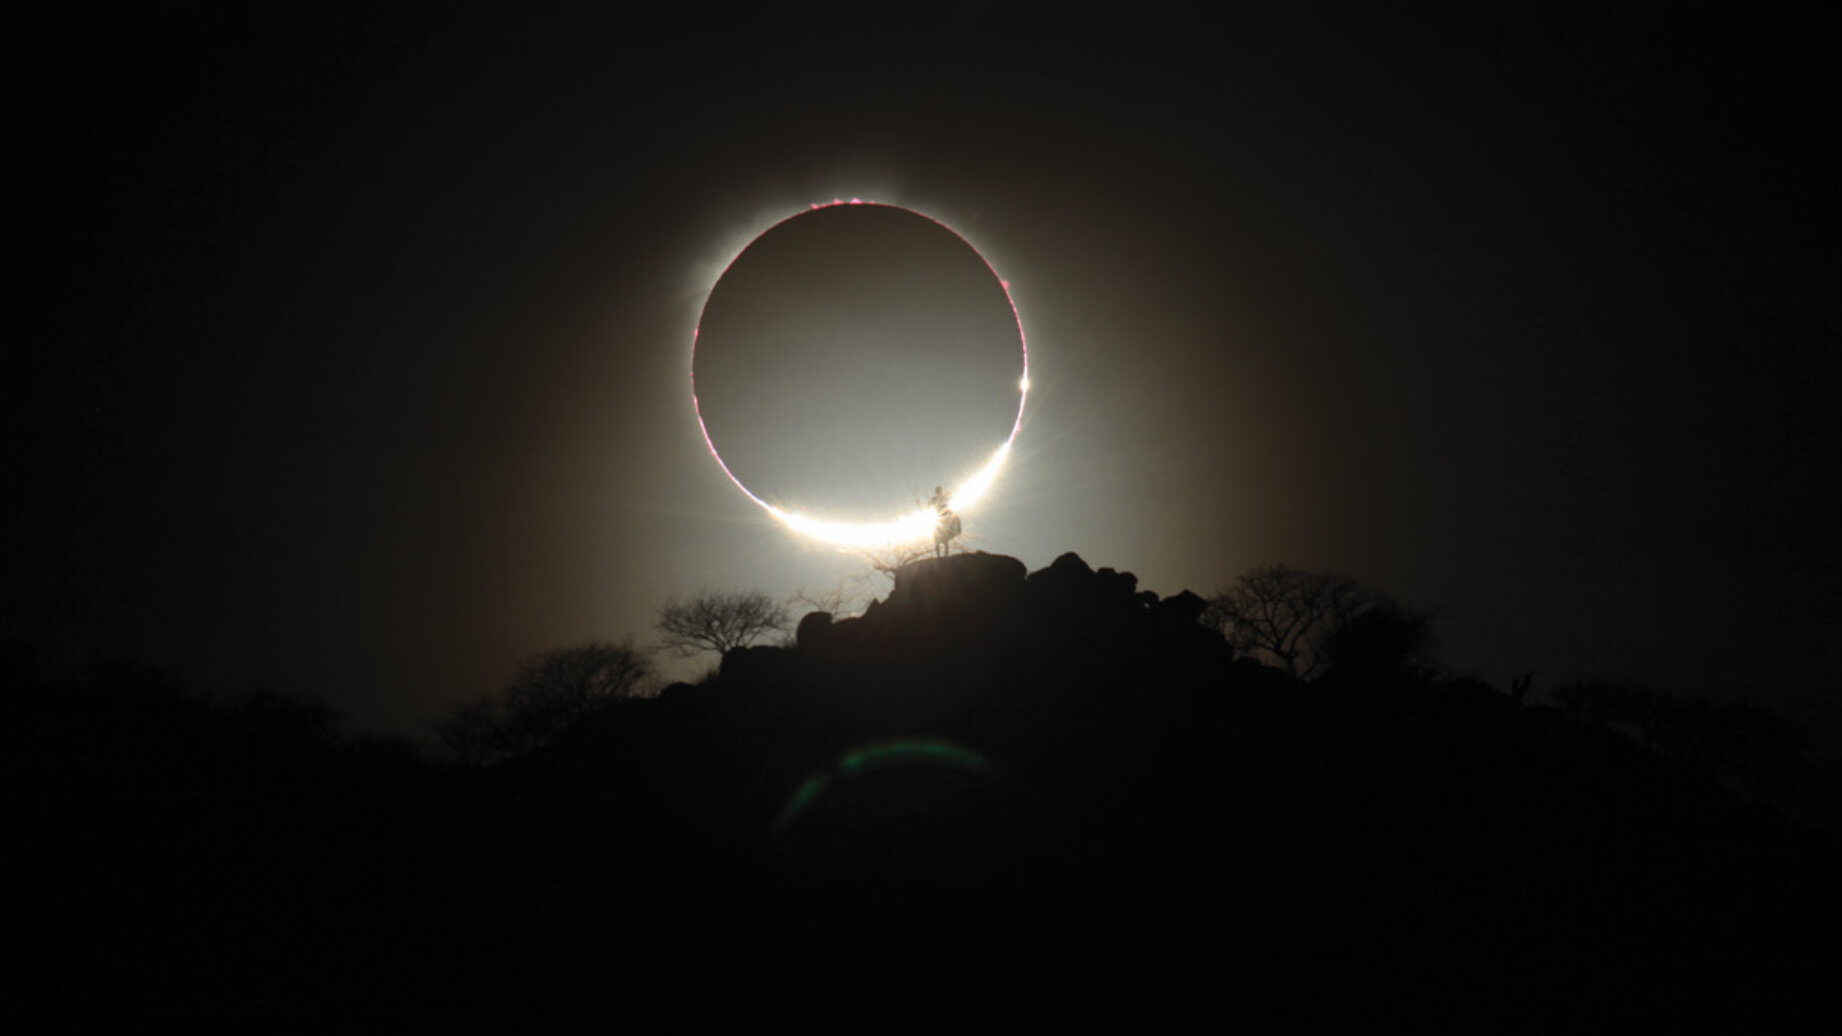
Another Eclipse Photography Success
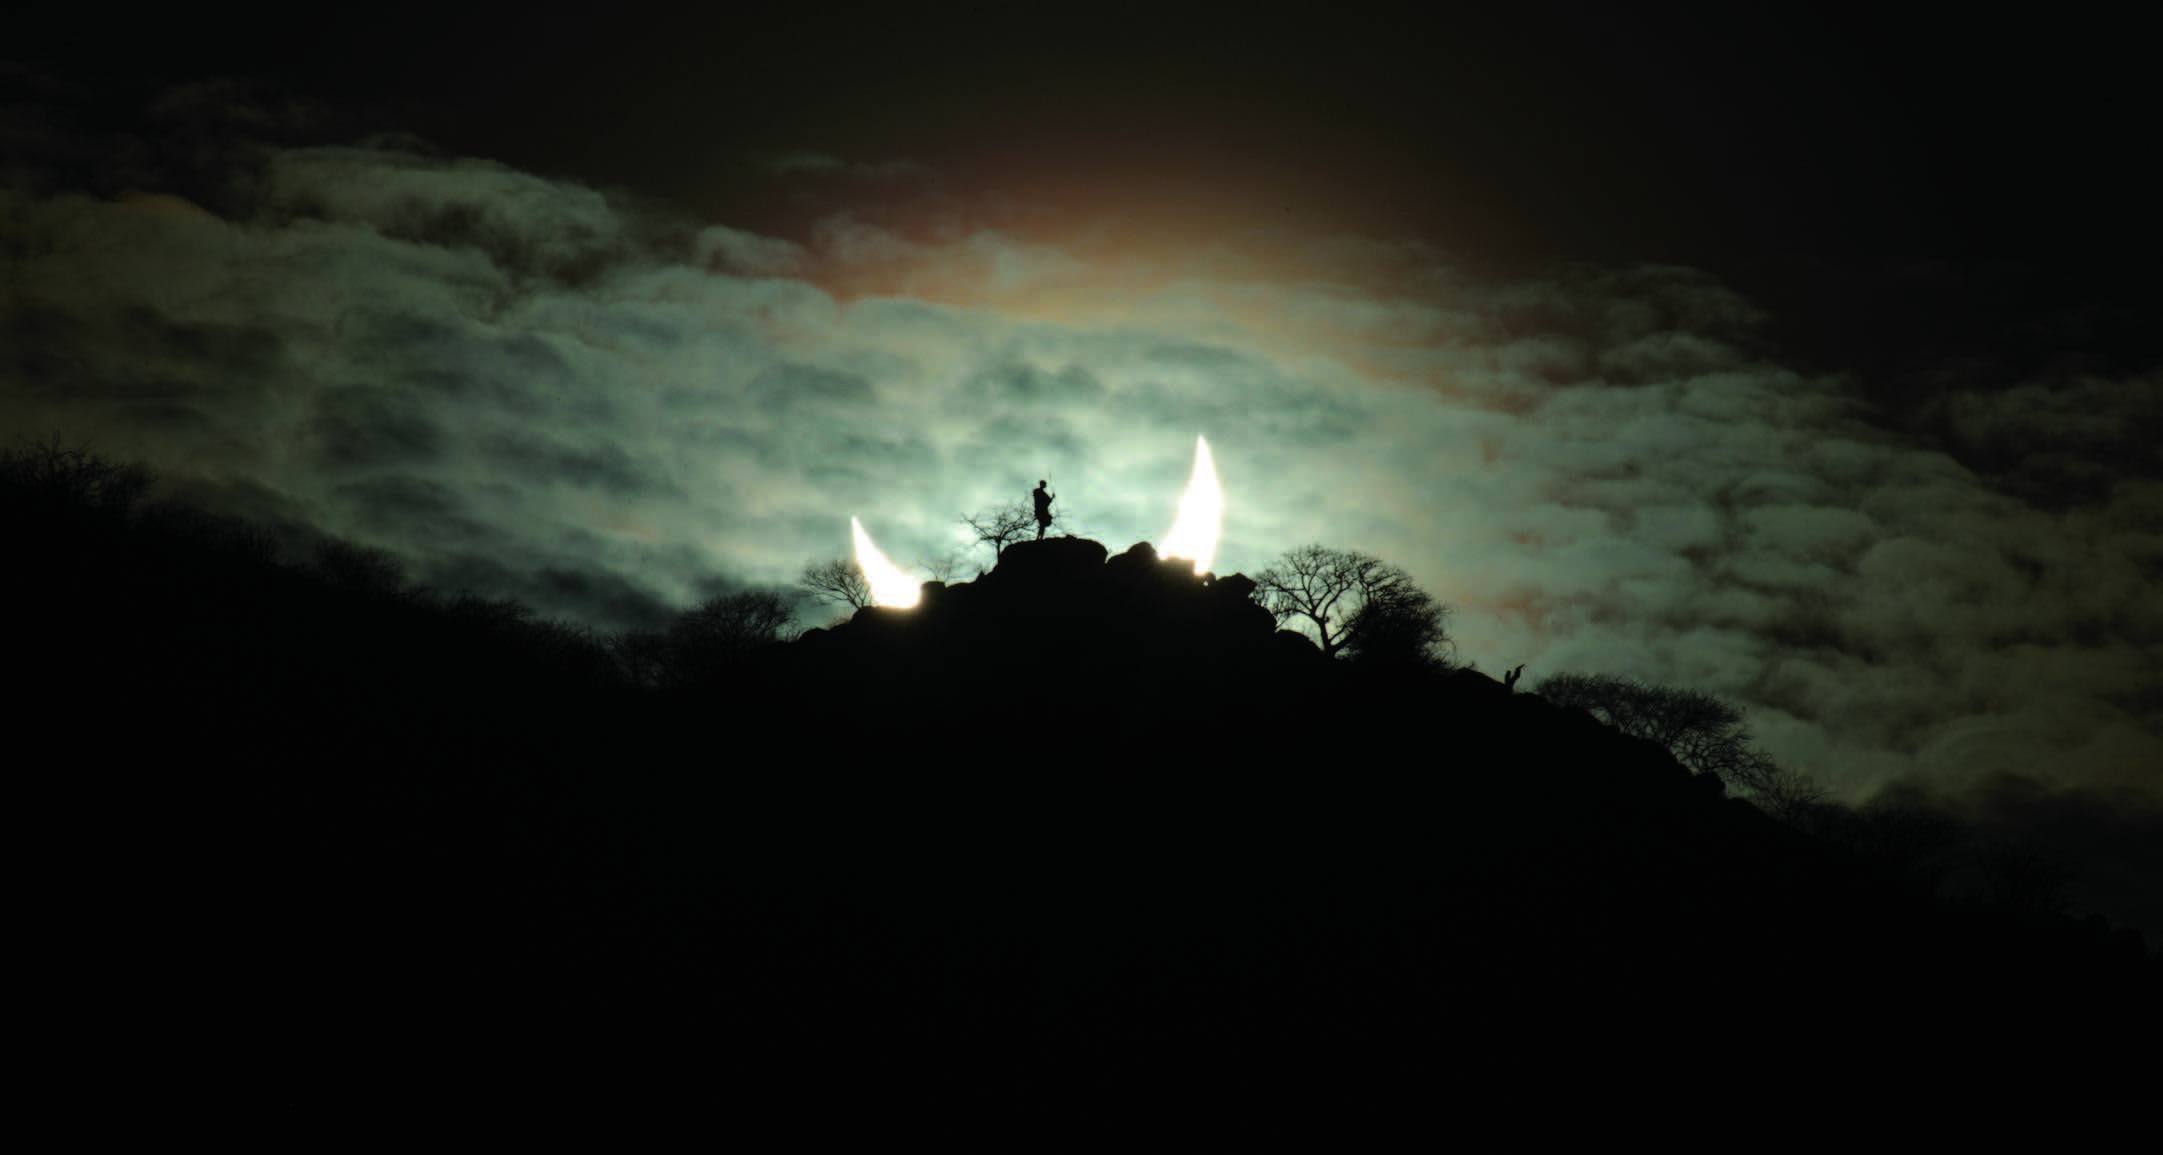
On November 3, 2013, my model Peter Ekai Nakua, was standing on that hill, patiently awaiting our 16-second opportunity. The moment was so surreal that had I not photographed it, I wouldn’t have believed it was possible. I was firing the shutter of my Canon 5D MarkII as many times as I could. This time, I chose an aperture of f/16 so that the depth of field ensured both my model and the eclipsed Sun were in focus. I also used a lower, 400 ISO and a shutter speed of 1/800 second with the same Sigma 50-500-mm zoom.
My resulting image displays a whole spectrum of phenomena in a single frame. On the top of the frame, several pinkish prominences ring two-thirds of the lunar silhouette, while Baily’s Beads are seen at the 3 o’clock position. Peter bisects the diamond ring effect. The ghostly inner corona crowns the image, and a detached prominence is just visible at the 1:30 position.
From this moment, I knew how I’d approach eclipse photography ever after. I would find creative ways to establish an intimate connection of the event using the place and individuals unique to each landfall of the lunar shadow. I encourage others to forge their own path in depicting the fleeting moments of totality.
This article originally appeared in the September 2021 issue of Sky & Telescope.
About Eugen Kamenew
EUGEN KAMENEW is an official Fujifilm X-Photographer residing in Germany. Visit his website at www.kamenew.net to see more of his work.


Comments
You must be logged in to post a comment.