 1
1Despite its name, luck has nothing to do with "lucky imaging." The technique is a powerful tool for crisp, clear astrophotography. Here, we show how to use lucky imaging for the Moon.

Richard S. Wright Jr.
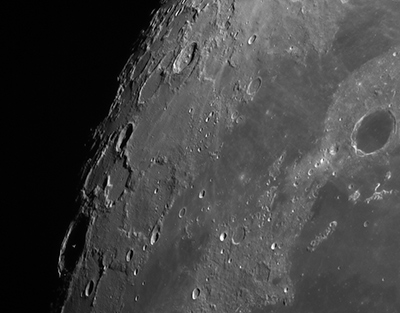
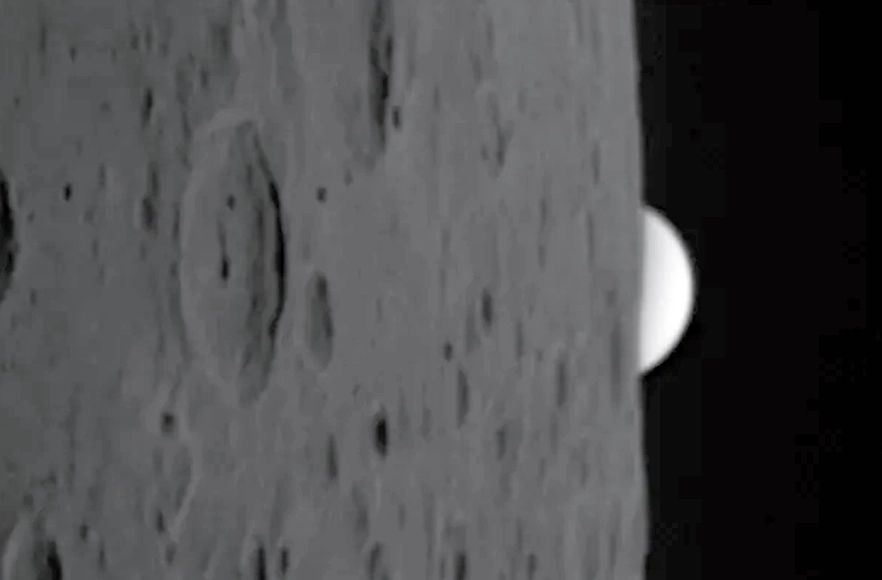
This month we are going to take lunar astrophotography one more step and talk about a widely employed technique for high-resolution images of the Moon called lucky imaging. This technique is used to record hundreds or even thousands of images over a short timespan in order to capture some images when the seeing is momentarily steady. Lucky imaging isn't just useful for the Moon — everything here applies just as readily to the planets and even high-resolution images of the Sun (through appropriate filters, of course).
Even with very fast exposures, the atmosphere is still seething. No matter how fast your shutter speed, you may still shoot blurry or distorted images. However, there are fleeting moments of stillness where your target comes through exceptionally clearly. For these tiny fractions of a second, an image can be recorded at a very small pixel scale, often as small as 0.1 arcsecond per pixel. How can we grab an image during this fleeting window of opportunity?
Richard S. Wright Jr.
What we can do is play a statistics game, similar to casting a wide net in fishing: If we take as many images as possible — say, hundreds or thousands of them — very quickly, we can employ special software that analyzes all of those frames and picks out just the sharper images. Unless seeing is especially bad, there will always be a few good images that are usable. We can even combine, or stack, these images like we do with deep-sky photos to get smoother images with very little noise. Really smooth images are important, and I’ll circle back around to this in a bit.
The Setup
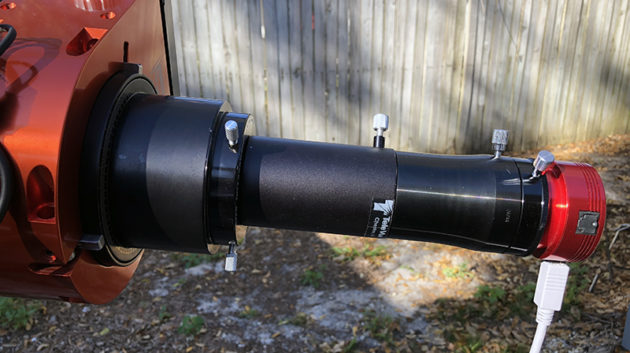
For this kind of work we want long focal lengths and small pixels (Very much unlike deep-sky astrophotography). This often yields extraordinarily slow-focal-ratios we’d normally run screaming from, such as f/30 or more. For really bright objects such as the Moon, this doesn’t hurt us nearly as much as you’d think. I use a large reflector (a 12-inch Newtonian), or even my 6-inch refractor which does a great job with a 2X or 4X Barlow or Tele Vue Powermate installed.
A high speed “video” camera then completes the ensemble and we capture video files consisting of as many frames as possible. USB 2.0 can work, but USB 3.0 is often preferred as it allows more frames to be collected as quickly as possible. Either color or monochrome cameras will work nearly as well, and while I prefer to image the planets with a color camera, for the Moon I like to stick with monochrome, as the Moon is fairly monochromatic anyway.
Richard S. Wright Jr.
The two programs I use for recording video files are FireCapture and SharpCap. I recommend that you save your files in the .SER file format rather than .AVI, since AVI is often compressed. Even when AVIs are RAW, most programs don’t know how to display them properly. SER files, on the other hand, store uncompressed raw data with greater than 8-bit depth.
My own preference is to always shoot at my camera's maximum bit-depth to yield the greatest dynamic range – especially on the Moon. Many astrophotographers who produce images far better than mine may disagree and prefer to use 8-bit depth so they can collect more frames in less time for later processing. The video frames are combined and stacked into an image with far more than 8-bits, so there’s merit to this approach. As the cooks say, sweeten to taste. If using SER, there aren’t many programs outside of astronomy that know what to do with them, but you can download a free SER player here.
Speaking of dynamic range, you'll want to change the exposure time or frames-per-second, rather than the camera's gain setting, to adjust brightness. For bright objects such as the Moon, if you increase camera gain, you’re really just sacrificing dynamic range. Changing exposure time or frames-per-second, on the other hand, will give you a little more of an edge when trying to get those faint details in dark areas on the Moon without blowing out the highlights of nearby crater rims.
Richard S. Wright Jr.
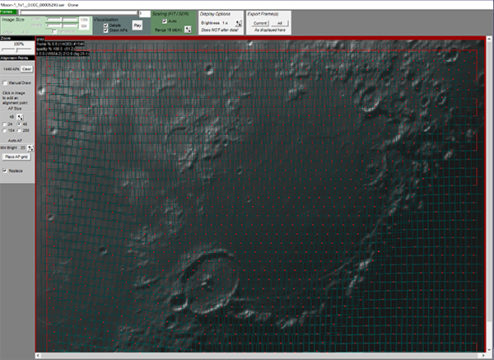
Once you’ve captured a few thousand frames, you'll need a program that will pick out the sharper images and combine them for you into a final very smooth and clean image that you can then sharpen and tweak. The one I use most often for this is Autostakkert!. RegiStax is also a great option.
You could simply pick the sharpest frame from all of your images, and then perhaps tweak it a bit with Photoshop using levels and curves to increase contrast. For better results though, you can combine a few hundred or more sharp frames, so that with careful sharpening you can bring out some of the finer details. The image has to be smooth before you can start sharpening up the details, otherwise you’re sharpening noise and image artifacts can begin to take on the appearance of features that simply aren’t there.
Another important feature of both AutoStakkert and RegiStax is the alignment process. Atmospheric turbulence is not uniform and like trying take a photo at the bottom of a swimming pool — even if the sharpest image is very clear, it may still be distorted in varying degrees around the frame. By setting dozens (or hundreds) of alignment points, sophisticated algorithms will attempt to warp all of the images in the stack to match. Combining hundreds or thousands of images like this, gives a reasonably accurate representation of the lunar surface.

Richard S. Wright Jr.
Most lunar imagers use both Autostakkert! and RegiStax in their workflow, because Autostakkert! does not include robust sharpening tools. RegiStax has a powerful multi-radius sharpening tool based on wavelets that works wonderfully well. I’ve heard wavelets referred to as voodoo, but it’s a standard multi-resolution image analysis technique and there’s quite a bit of science behind it.
My final step is to bring the image into Photoshop. I like to have a lot of good tools in my toolbox, and for my way of thinking Photoshop gives me the best control when I start tweaking contrast with curves and levels. Of course, you may also want to watermark your image too because by now after all, you’ve put a lot of work into this.
About Richard S. Wright Jr.
Contributing Editor Richard S. Wright Jr. is a software developer by profession specializing in computer graphics technologies at LunarG Inc. Richard is also a consulting engineer and imaging specialist for Software Bisque. A lifelong amateur astronomer, Richard first experimented with a webcam and black-and-white film images of the Moon in the 1990s, and he subsequently became hopelessly addicted to astrophotography. Currently, he seeks treatment at his dark sky camp/observatory in Okeechobee, Florida, whenever he can. Check out his online photo gallery.

Comments
John
May 18, 2019 at 7:12 pm
I'd also suggest using PIPP to work its magic grading individual images as well as concatenating multiple image files together. I'll often take a few thousand frames several times, then let PIPP select the best in each file before processing in AutoStakkert and Registax. Now, I sure wish my images were as good as premier imagers out there!
You must be logged in to post a comment.
You must be logged in to post a comment.