 0
0Here’s a different approach to recording deep-sky targets over natural and urban landscapes.
Marybeth Kirczenski
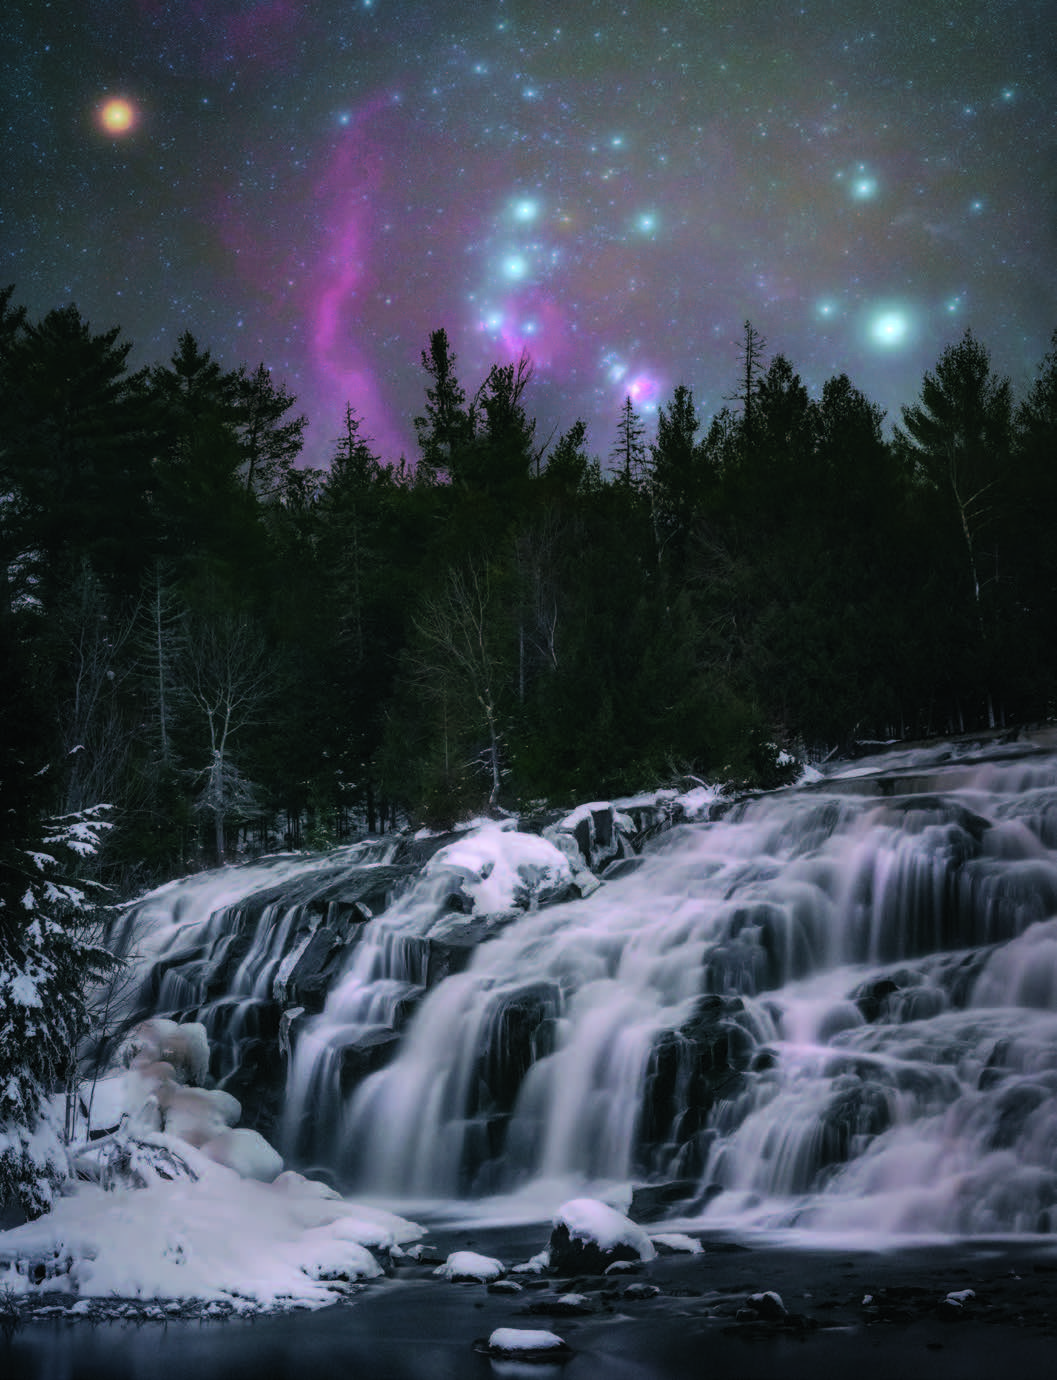
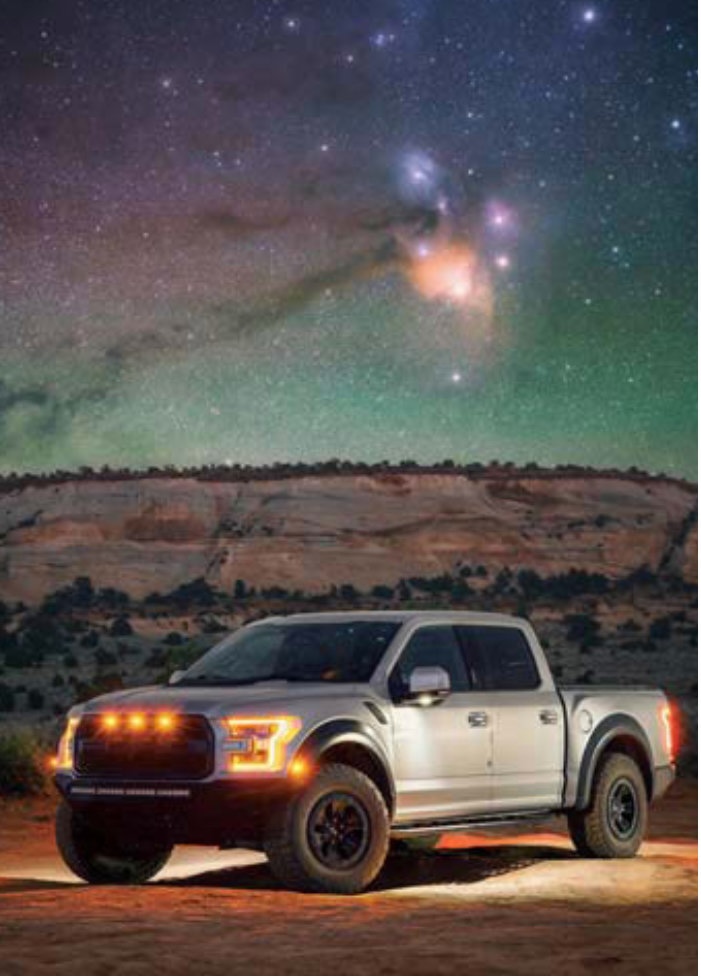
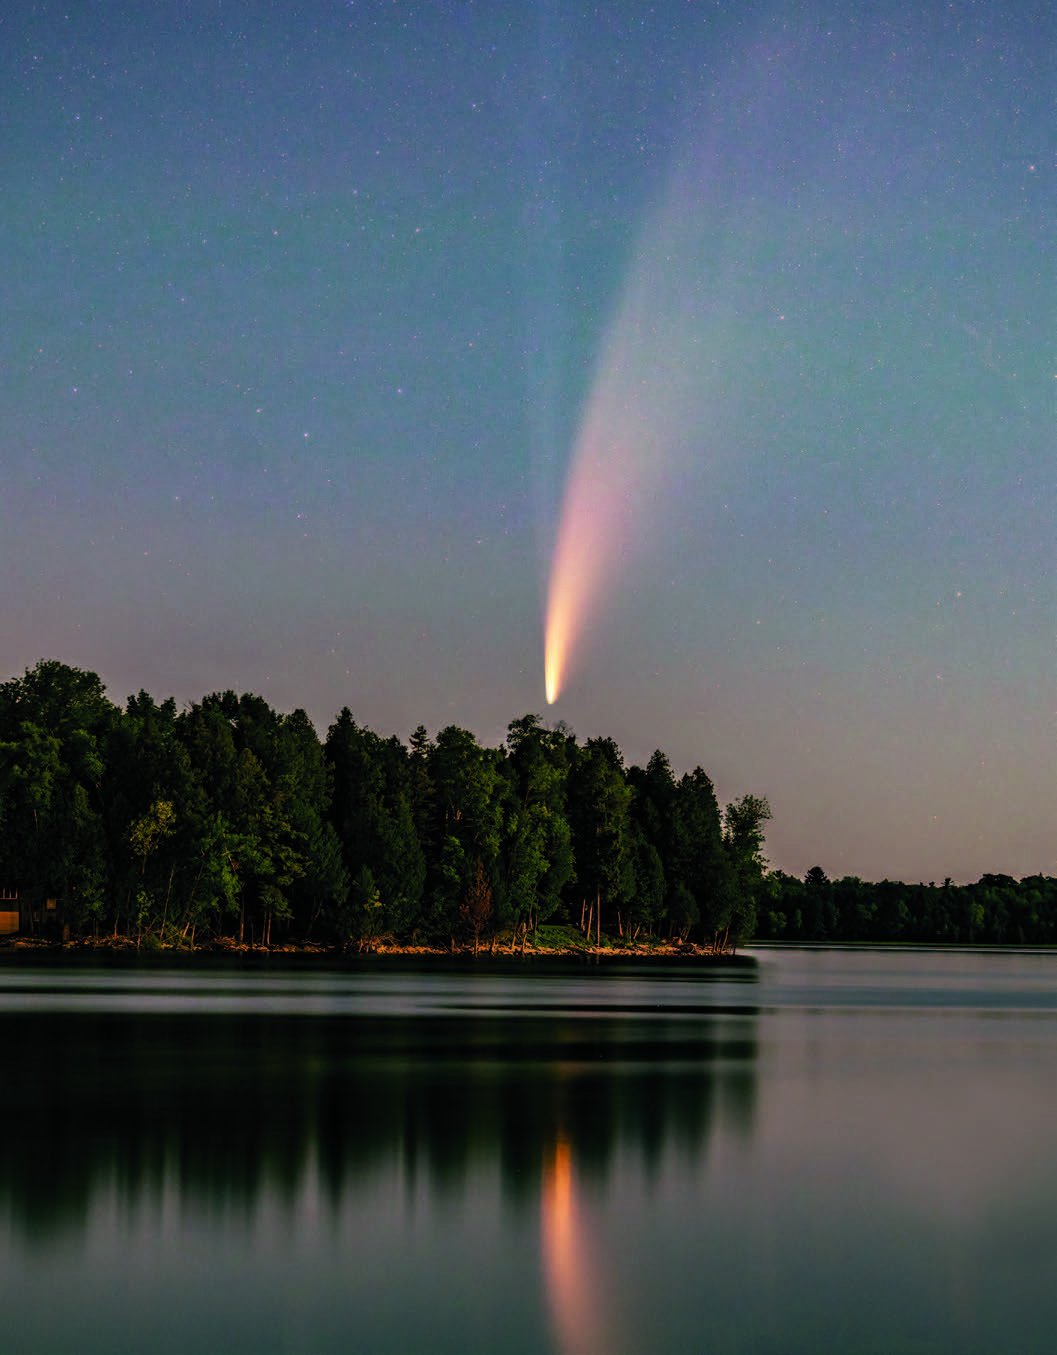
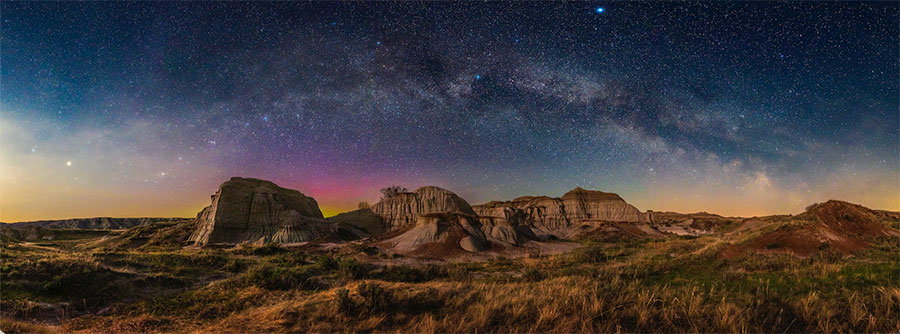
Who among us hasn’t been inspired by the beauty of the Milky Way standing high above a picturesque horizon, or marveled at detailed close-up images of nebulae, galaxies, and other deep-sky objects? Both kinds of scenes have a wonderful appeal, but have you ever thought of what happens when you combine a close-up view of a deep-sky target with a photogenic landscape? This is the kind of imaging known as deepscape astrophotography.
Deepscapes blend detailed telephoto shots of deep-sky objects aligned with interesting subjects on the horizon. Ever stumble across one of those “big Moon” photos? This is essentially what a deepscape accomplishes. A telephoto lens exaggerates the size of the main subject compared to objects closer to the photographer — an effect known as lens compression. While some photographers prefer to shoot a single exposure to create a deepscape photo (see the February 2020 issue), these shots can also be a mix of exposures in order to maximize detail while minimizing noise — much like more conventional deep-sky astrophotography. The technique described here is also helpful when shooting urban deepscapes under light-polluted conditions.
Marybeth Kirczenski
The difference between a deepscape and a fantasy image is that the scale and location of all elements in the finished photograph are true to that specific location and optic. In other words, all parts of a deepscape are shot with the same camera and lens at the same location, preferably on the same outing. The final result brings those distant objects closer to the viewer, creating an intimate connection between the land and sky. However, when it comes to deepscapes that include faint nebulae, the process is a bit more involved than a snap of the Moon. Here’s how I do it.
Tools of the Trade
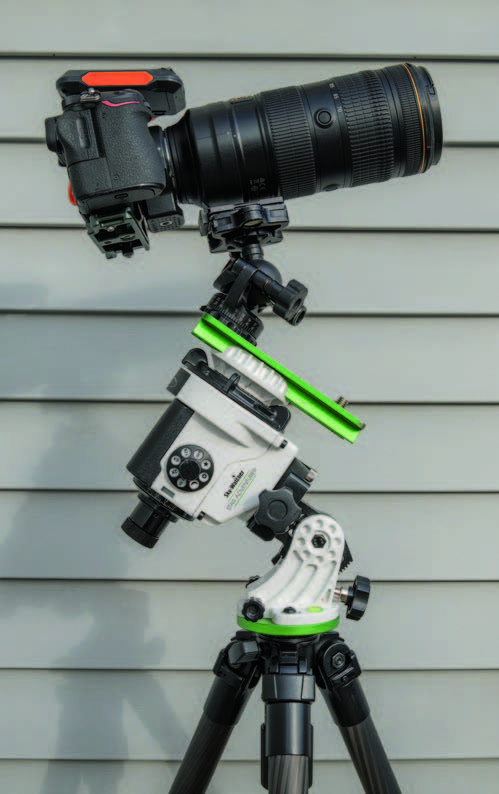
In order to photograph your target and the landscape below, you’ll need more than just a camera and a tripod. Recent model DSLR or Mirrorless cameras are recommended, though older units can work well too. Cameras that pick up emission nebulae are best suited to the task. My favorites are the Canon EOS Ra, Nikon 810a, or the newer Nikon D850. Other cameras modified for deep-sky imaging are also a good choice (like my Nikon Z6), though try to search for newer models, as they have much lower noise at high ISO settings than older ones.
Marybeth Kirczenski
In addition to a camera, you’ll need a good, fast telephoto lens. The lens speed is important because you want to be able to capture as much nebulosity and as many stars as possible in a fairly short exposure. Fixed-focus lenses tend to perform best, though high-end zooms work great, too. Avoid cheaper zoom lenses, as they often are slow and become slower the more you zoom in (for example, a 75-300-mm kit lens ranges from f/3.5 to f/5.6), which requires more exposure to get a good result. I often shoot with a Nikon Z6 and Nikkor AF-S 70-200-mm f/2.8E FL ED VR lens, which retains its photographic speed throughout its zoom range. Additionally, this lens holds its zoom position nicely and does not slip.
Next, you’ll need a good tracking mount and sturdy tripod. I prefer the Sky-Watcher Star Adventurer for its high-payload capacity compared to similar star trackers, though other models (like the latest Vixen Polarie) also work well. Having the ability to add a counterweight is beneficial, particularly if your lens is fairly heavy. Choose a sturdy tripod — don’t skimp here, because you’ll want your setup to hold steady even in a strong breeze. I use a carbon-fiber model from Sirui to keep down the weight, as I often hike some distance to my photo sites.
Other necessary gear includes a sturdy ball head so that you can compose your photo without being limited to the axis of your tracking mount. Since you’ll be recording exposures of about a minute or more, you’ll also need a shutter release cable or even an intervalometer if your camera doesn’t have one built in. The best option is a wireless intervalometer or cable release, so that you don’t accidentally tug the camera while firing off your exposures.
It’s All in the Plan
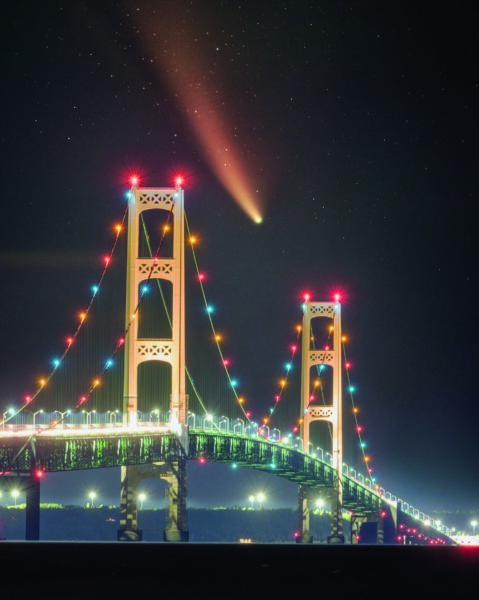
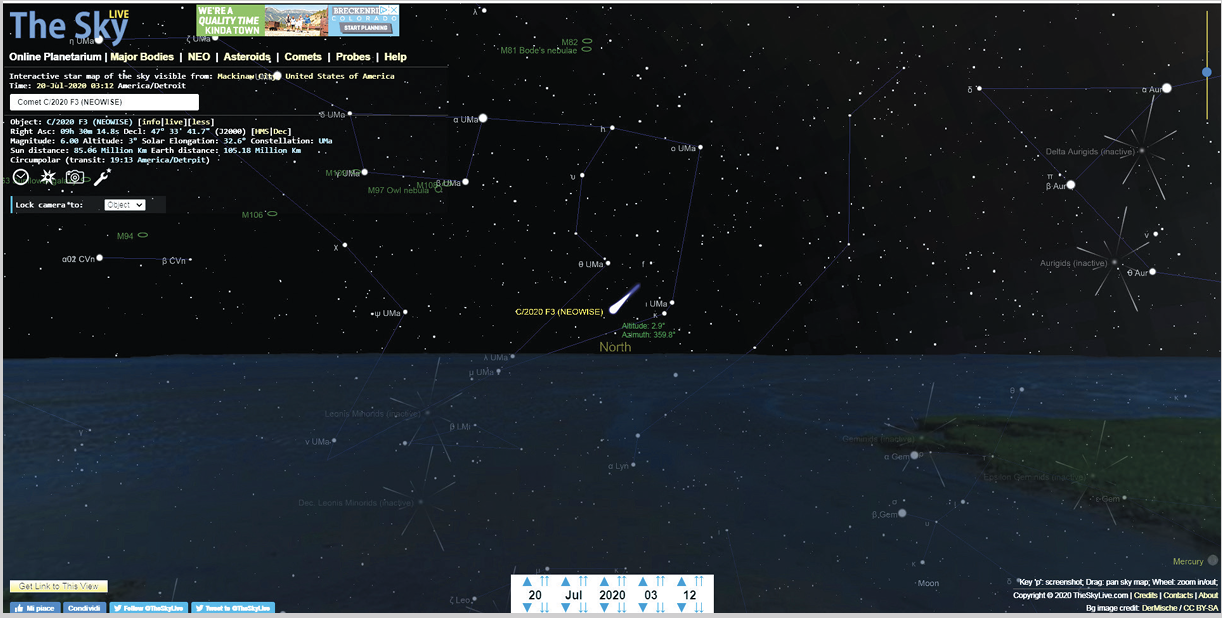
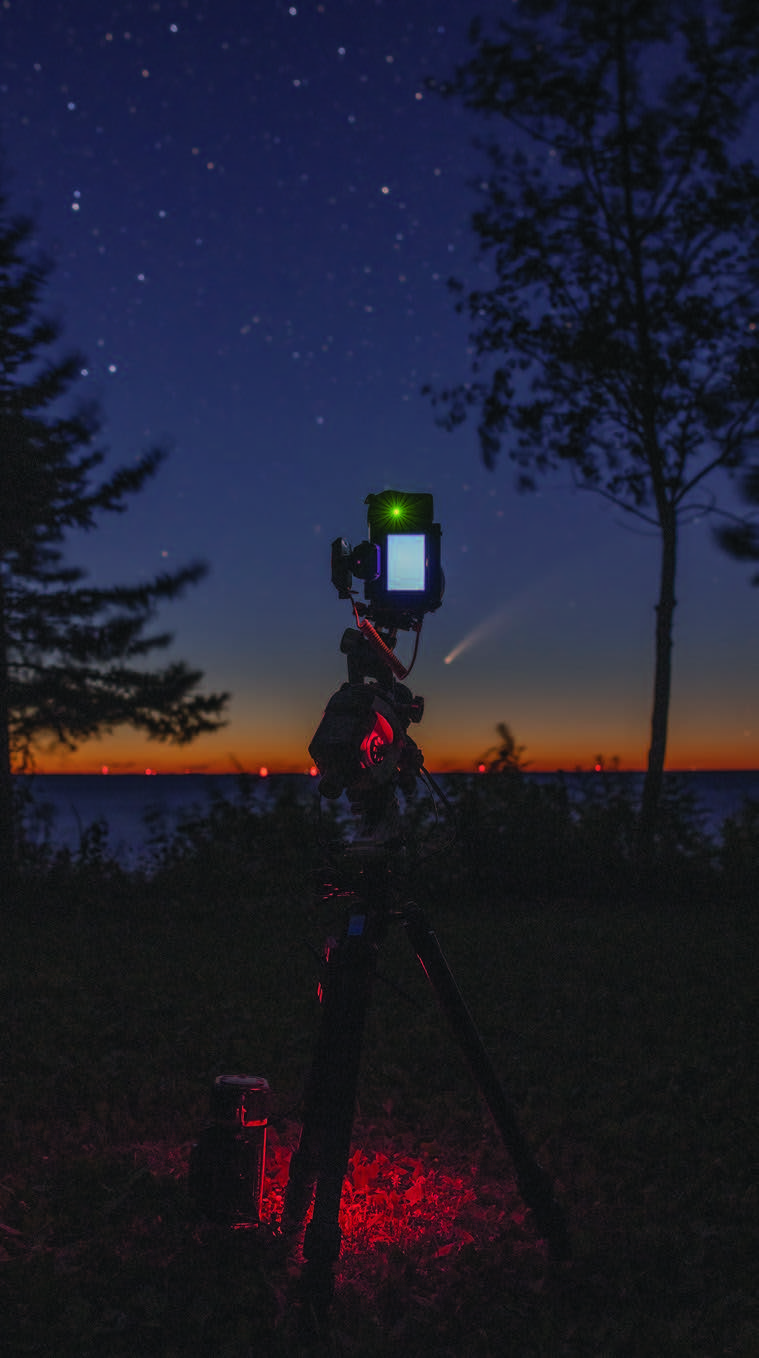
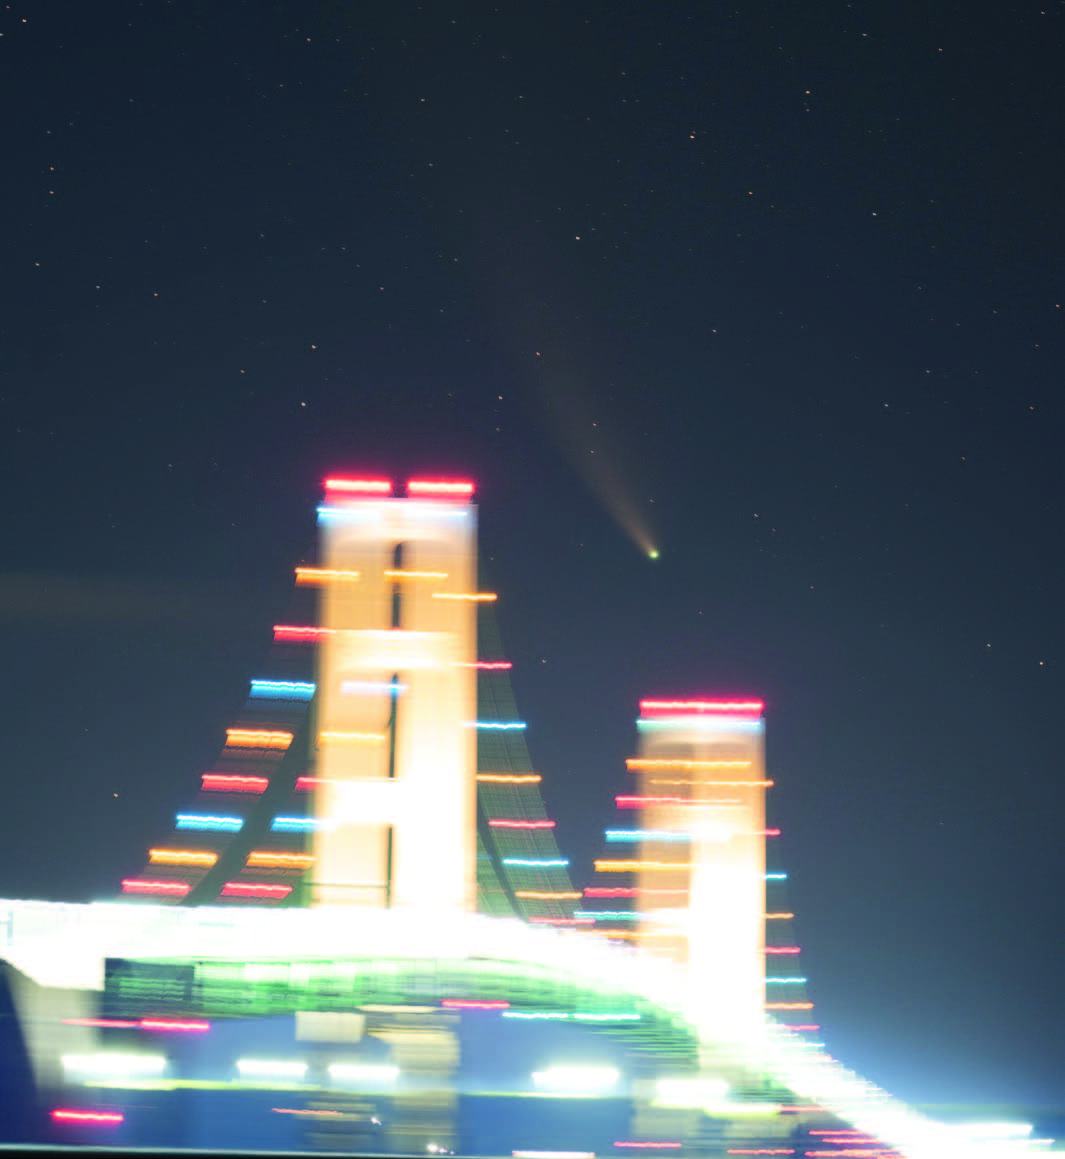
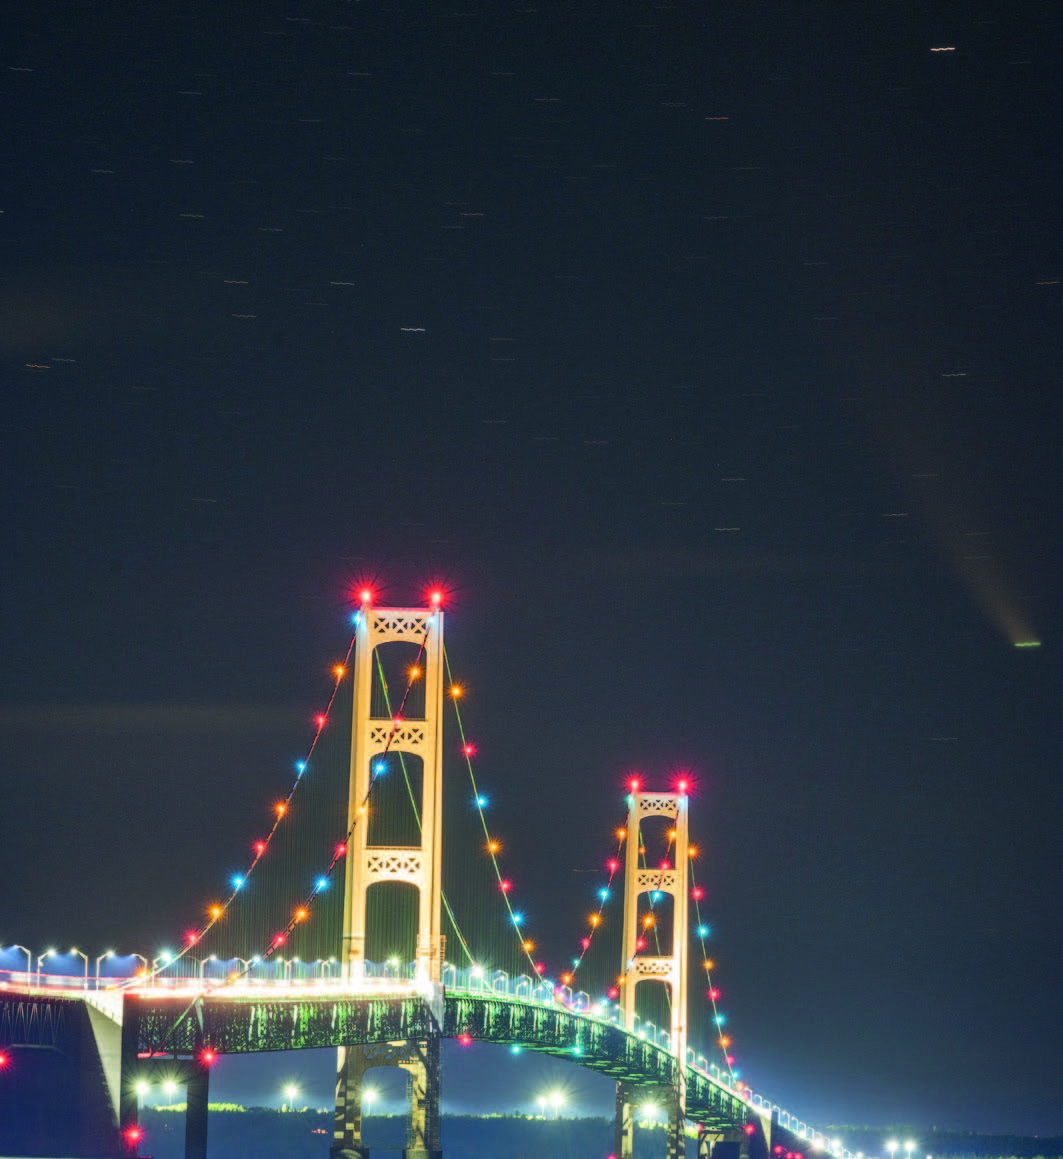
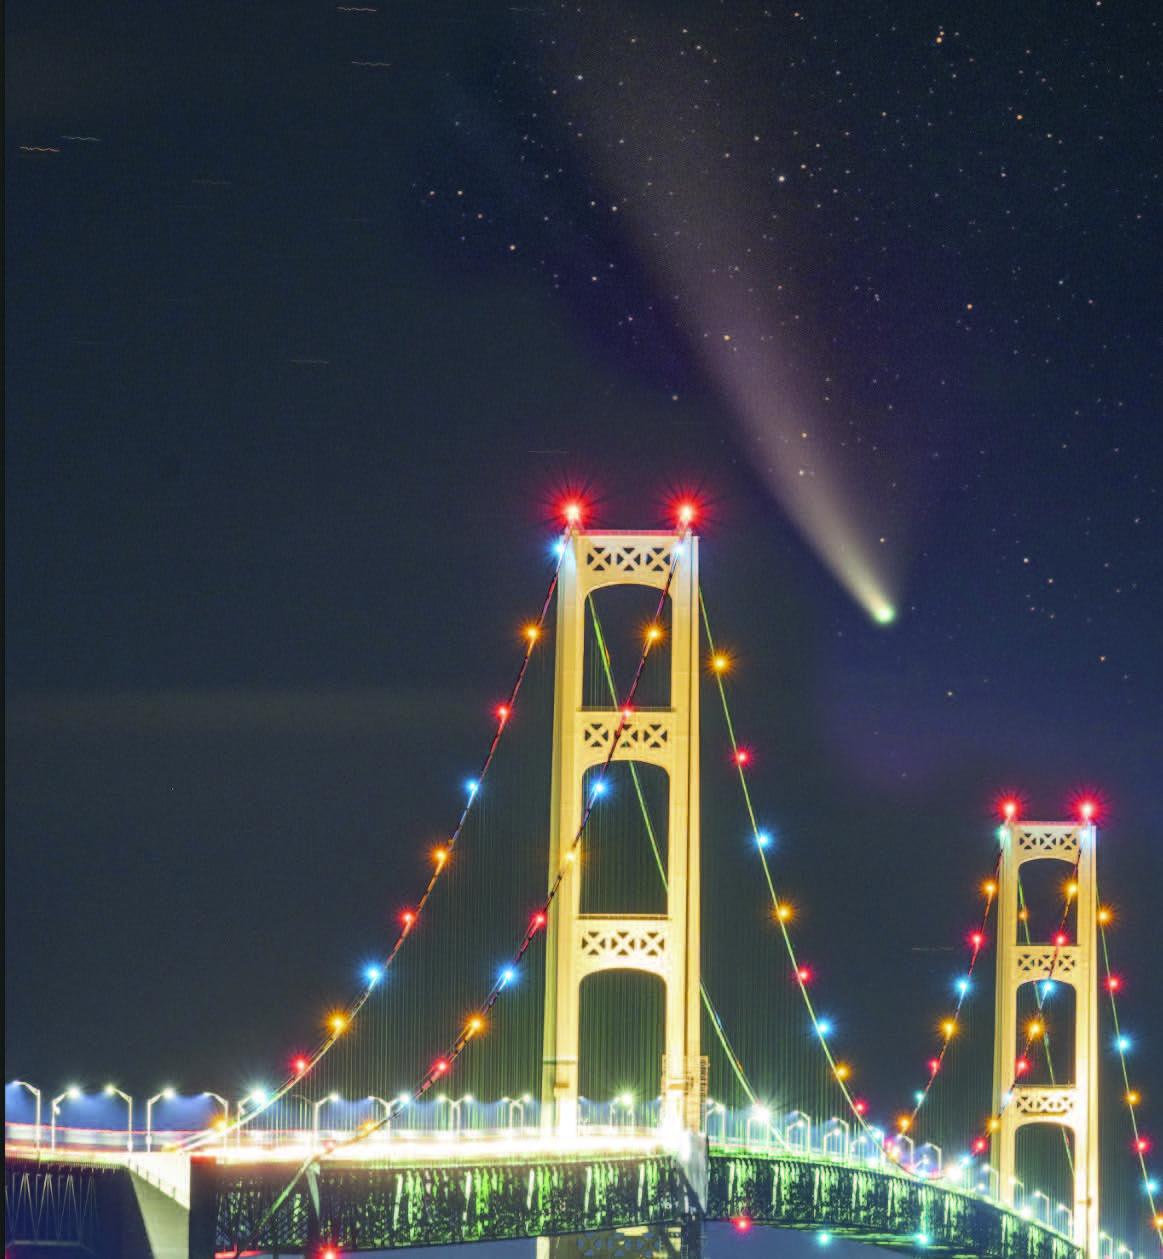
Once you have your gear, you need to plan your shots. You’ll want to know where your chosen target will be relative to the landscape or structure you hope to record it with. For example, last July Comet NEOWISE (C/2020 F3) presented several great deepscape opportunities. Since the comet was passing through the north, low to the horizon late at night, I thought it would be pretty cool to capture it above the Mackinac Bridge, which connects the two parts of the state of Michigan. A shot like this requires careful planning, because it deals with a small field of view. Add in the ever-changing position of the comet, and it becomes even more challenging to compose the photo. Luckily, there are tools available online and smartphone apps to help pre-visualize your shot. I used the free online planetarium program The Sky Live (theskylive.com) to plan this image and figure out when the comet was lowest to the horizon from my chosen location.
The Mackinac Bridge spans from north to south as seen from Mackinaw City, and I wanted to frame the comet between the towers of the suspension bridge. Additionally, I had to take into consideration the altitude of the comet from where I planned to photograph — I didn’t want it too far below the bridge, or too high. According to the app, there were only a handful of days in which this alignment would be the best. I decided my best opportunity was on July 20th, when the comet would appear precisely due north at about 3:12 a.m.
Next, I had to figure out if the landscape portion of the scene worked compositionally. For this, I turned to the smartphone app PlanIt Pro (yingwentech.com). This fantastic tool lets you pre-visualize a shot with astonishing accuracy. The app features constellation overlays, which are invaluable for both nightscape and deepscape photography. And while the app doesn’t include transient objects like comets, its star charts, combined with the position noted in The Sky Live, allowed me to know the comet’s precise location. On this particular morning, NEOWISE was passing just below the Big Dipper, which was helpful because its stars are visible even with the bright lights of the Mackinac Bridge.
To use PlanIt Pro, you first have to “pin” the exact location where you plan to set up. Use the search feature to narrow down your area, then hold your finger on the spot until a red pin appears. Next, touch the camera icon, and you’re ready to set the focal length of your lens so the app can display your camera’s field of view. Do this by tapping the lens value under Focal Length and inputting your lens. Using my zoom lens, I start with the wide-angle number to get my bearings, then I “zoom in” to the focal length I plan to use in the next step.
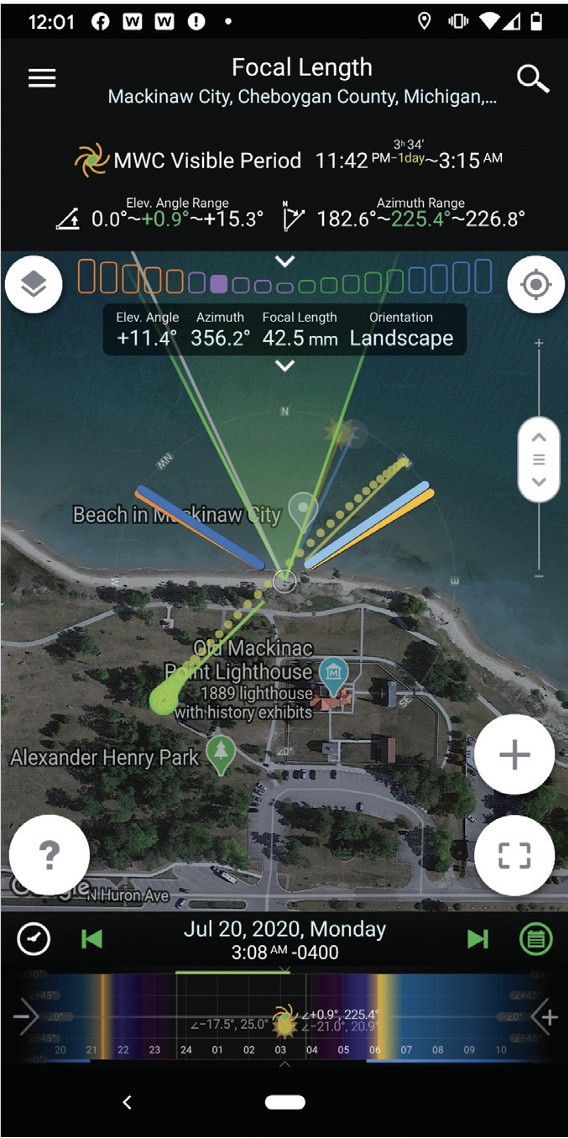
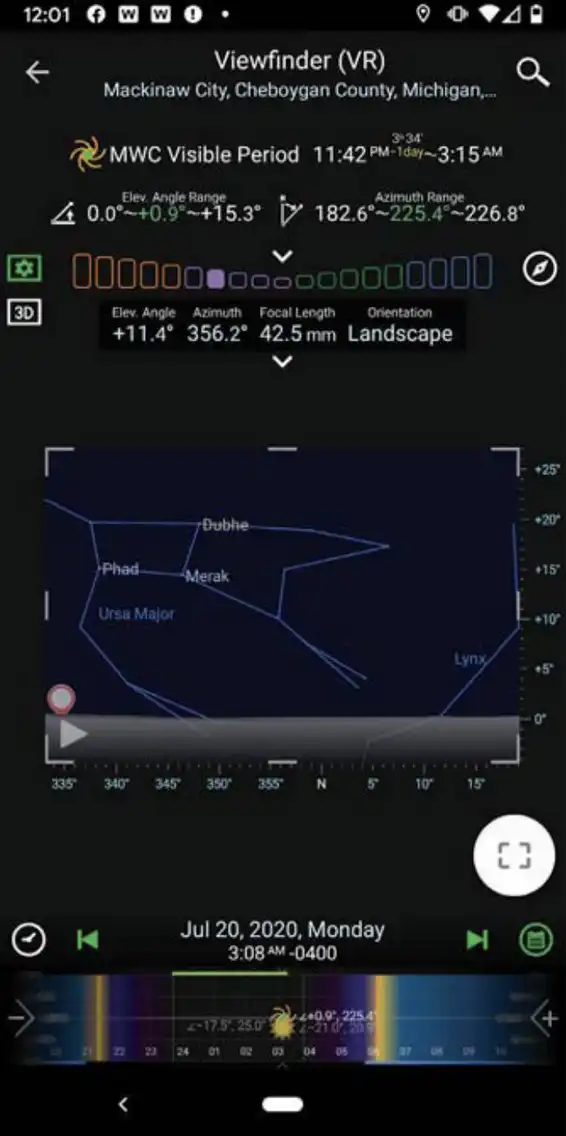
With the lens set, tap the top left corner of the app to open the Ephemeris Features and select Night Photography > Stars and Star-trails. The view will return to the overhead map view. Touch the name of a star at the top of the screen, and you can change the listing from Major Star to Constellations and activate the constellations you’d like displayed. After that, touch the bracketed box on the lower right of the screen and select Viewfinder (VR). You should now see the major constellations, which will help you pinpoint where your subject will be in relation to the horizon. You can zoom in by spreading apart two fingers on the screen — this changes the focal length setting. The app also will load elevation maps, so you can see if there’s a tall hill or mountain in the way (not a problem in Michigan).
Once you’re comfortable with the scene, continue to adjust the time setting to pinpoint the period with the best alignment between your target and foreground. Be sure to save your plan, as you’ll need it to open it again when at your chosen location.
Executing the Plan
Now you can head out to take your photos. Be sure to leave plenty of time, because you’ll need to perform an additional
action with PlanIt Pro to nail your composition once you arrive on location.
Once onsite, open your saved plan to find your predetermined shooting spot (the app uses GPS to show you exactly where you are compared to your pinned location). Next, click on the bracketed box again and select Viewfinder (AR). This is the “augmented reality” function of the app, which first requires you to snap a picture in the direction of your composition. This will be overlaid on the view so you can refine the plan of when your target will be in the exact spot for your image. Follow the app’s instructions to take the foreground image.
With the location shot in the app, simply scrub through the time and check the constellations that are projected into the view. Do they still line up as in your original plan using the Viewfinder (VR) setting? If so, then you’re good to go! If not, you may have to adjust your location slightly.
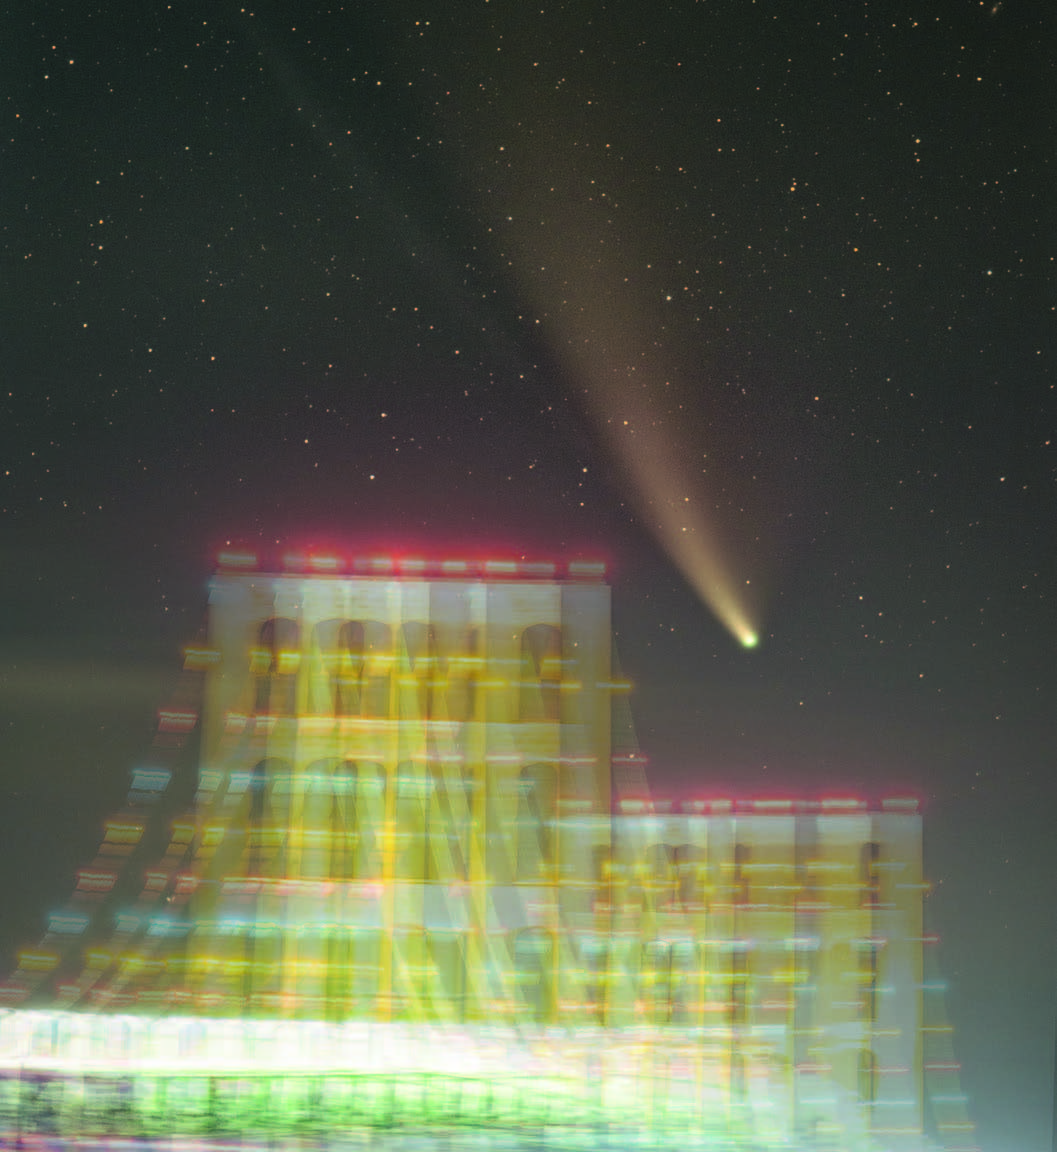
When you’re satisfied with the view, set up your equipment, polar align your star tracker, and wait for the big moment. For NEOWISE, I fired off six 2-minute, tracked photos as the comet moved between the bridge’s towers. Seeing that icy snowball show up on the camera’s viewscreen was nothing short of amazing! After recording the tracked exposures, I turned the drive off and took a few stationary images of the bridge. This particular night was quite windy, so I took several frames to ensure at least one was acceptably sharp.
Putting It All Together
Once you’re back home with all your photos, you can load them into your computer and combine them into your composition. In my workflow I utilize a few programs, including Adobe Lightroom and Adobe Photoshop, plus PixInsight for image stacking.
I begin by opening all the RAW images in Lightroom, where I perform initial adjustments, such as white balance, some exposure adjustments, and matching the color casts between each exposure as closely as possible so that they blend well. I then save each image as a 16-bit TIF file.
Next, I’ll move on to the foreground picture. I process this in Lightroom the same way as with the tracked images, but depending on the lighting I may use a single shot or stack a few images to reduce noise in underexposed areas. In the case of my Mackinac Bridge photo, I only needed a single frame due to the bright lights on the structure, which permitted a good exposure.
With the basic adjustments completed, I then move on to combining the tracked shots. I open all the guided frames in PixInsight and align and stack them into the “master” deep-sky picture to be blended with the stationary foreground shot. Once completed, I then open both the master sky shot and the foreground in Photoshop.
There are several ways to align the tracked shot with the foreground. I usually try Photoshop first (File > Scripts >Load File into Stack . . . ). This script saves the time of copying and pasting the stationary shot onto the tracked and stacked image. Next, the two layers need to be aligned. Photoshop has a script for this, too — Edit > Auto-Align Layers . . . , which often works well. But if it doesn’t, I manually shift the stacked image into place by selecting the top layer in the Layers palette and nudging it into place with the arrow keys.
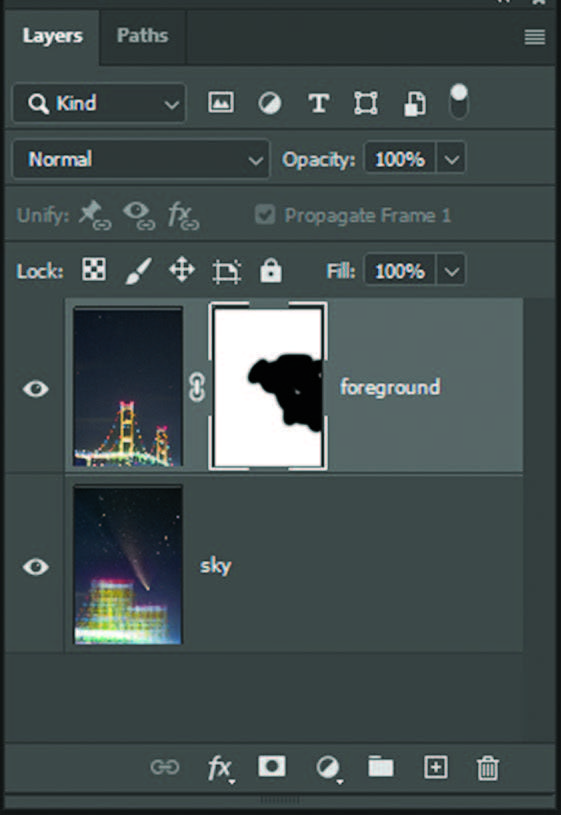
Now that the two images are aligned, it’s time to blend them together. I do this with a layer mask. At the bottom of the Layers window, I click the white square with the gray circle in the middle. I then select the Brush Tool from the tools palette (make sure your color is set to black) and then simply “paint” the area I want to mask out of the top layer. Adjust the hardness setting of the paintbrush tool to make a smooth transition from the top layer to the background. And voila! The tracked and stacked image surmounts the stationary landscape.
I may perform additional adjustments, such as matching the brightness and color along the border between the two layers. This is easy to do while the image still retains its individual working layers. Depending on how complex the foreground is, you may also need to spend a crazy amount of time masking, especially if there are lots of trees. These are the basic steps, but every deepscape tends to be a little different, requiring some modifications to the process.
Combining Tracked and Stationary Images
The technique described here works just as well for multi-panel mosaics and panoramas, giving that wide-angle “nightscape” feel with more details than can be recorded in a single image captured with wide-angle lenses. Like most astrophotography, the sky and your creativity are the only limits.
With this basic technique, you can get out and deepscape most anywhere that presents interesting juxtapositions of large, bright nebulae, galaxies, star clusters, and the occasional comet above interesting foregrounds. Your subject matter is endless once you master these basic techniques and develop a workflow that works best for you. With today’s equipment and the power of the digital darkroom, imaging the sky has never been easier — so get out under the stars and deepscape the world!
This article originally appeared in the June 2021 issue of Sky & Telescope.
About Marybeth Kiczenski
MARYBETH KICZENSKI photographs the night sky from rural and urban locations around the Great Lakes region.


Comments
You must be logged in to post a comment.