 0
0Master the basics of the most popular astronomical image-processing software.
Ron Brecher
Deep-sky astrophotography is a hobby that requires mastering several skillsets. The mechanical know-how needed to record good deep-sky data doesn’t necessarily overlap with the skills required to turn all those data into beautiful images. In fact, these days, you don’t even need to acquire your own image data — you can buy time on a finely tuned telescope located under dark skies. You can even work with images acquired by NASA observatories like the James Webb Space Telescope. But regardless of where and how our photons are gathered, it takes powerful image-processing software — and an understanding of how to use it — to turn those ones and zeroes into dazzling portraits of nebulae, star clusters, galaxies, and the occasional bright comet.
I have some good news and some bad news. The bad news is there is no “Astronomy Picture of the Day” button in any
software I’ve seen — you really have to work the image data carefully to produce a nice result. The good news is that it doesn’t take many steps to get there. And while there is a host of software you can use, among the most popular for amateurs today is PixInsight, or PI.
This program operates on any platform and is written by astro- photographers for astrophotographers. It uses a modular, open-architecture system that encourages users to develop their own add-ons and scripts, which in turn fosters the growth of a large online community to share these improvements. PI can cover most any task you’ll likely encounter in astronomical image processing. And while it was developed with a focus on deep-sky imaging, it has many tools to improve lunar, solar, and planetary images. Here are some basic processing steps that I use that will illustrate the program’s utility.
The Main Controls
Knowing your way around the PI workspace is essential to getting the most from the software, so it’s worth spending some time learning its user interface before you start working on your pictures in earnest. There’s a free, 5-part video series to help show you the ropes at https://is.gd/PIprimer.
However, if you just want to get straight to using the program’s tools, you’ll find them grouped in subfolders within the PROCESS pulldown menu located at the top of the screen. You can also display an alphabetical list of all the processes by selecting PROCESS > All Processes. Users can combine several of these into another type of command called scripts that are listed within the SCRIPT menu, which is also subdivided into several groups. A script executes a sequence of tasks, automates complex operations, or other- wise extends PI’s capabilities.
You’ll also find some useful tabs along the left side of the workspace. The Process Console reports the progress of any actions being executed and lists warnings or errors if encountered. The History Explorer stores and displays everything done to an image and allows you to quickly go back to a previous state if needed. Double-clicking a process name in the History Explorer opens that process with the settings that were used.
Data Reduction
The first step in converting a set of raw data into a finished photo — an exercise known as data reduction — uses the WeightedBatchPreprocessing (WBPP) script. WBPP is a little like the conductor in an orchestra made up of various PI processes, telling each one what to do and when to do it. For example, the script creates one master image per color filter from all the individual sub-exposures and calibration frames. It then completes all the data-reduction steps for your light exposures, including calibration and alignment before stacking them into a single image ready to be worked up into a pretty picture. The WBPP script examines each image and ranks it by quality to use the most data from the best sub frames, with less contribution coming from the lower-quality images included in the stack. The subframe image quality is evaluated by measuring each image’s signal-to-noise ratio as well as the full-width, half-maximum (FWHM) parameter that examines the size and shape of stars.
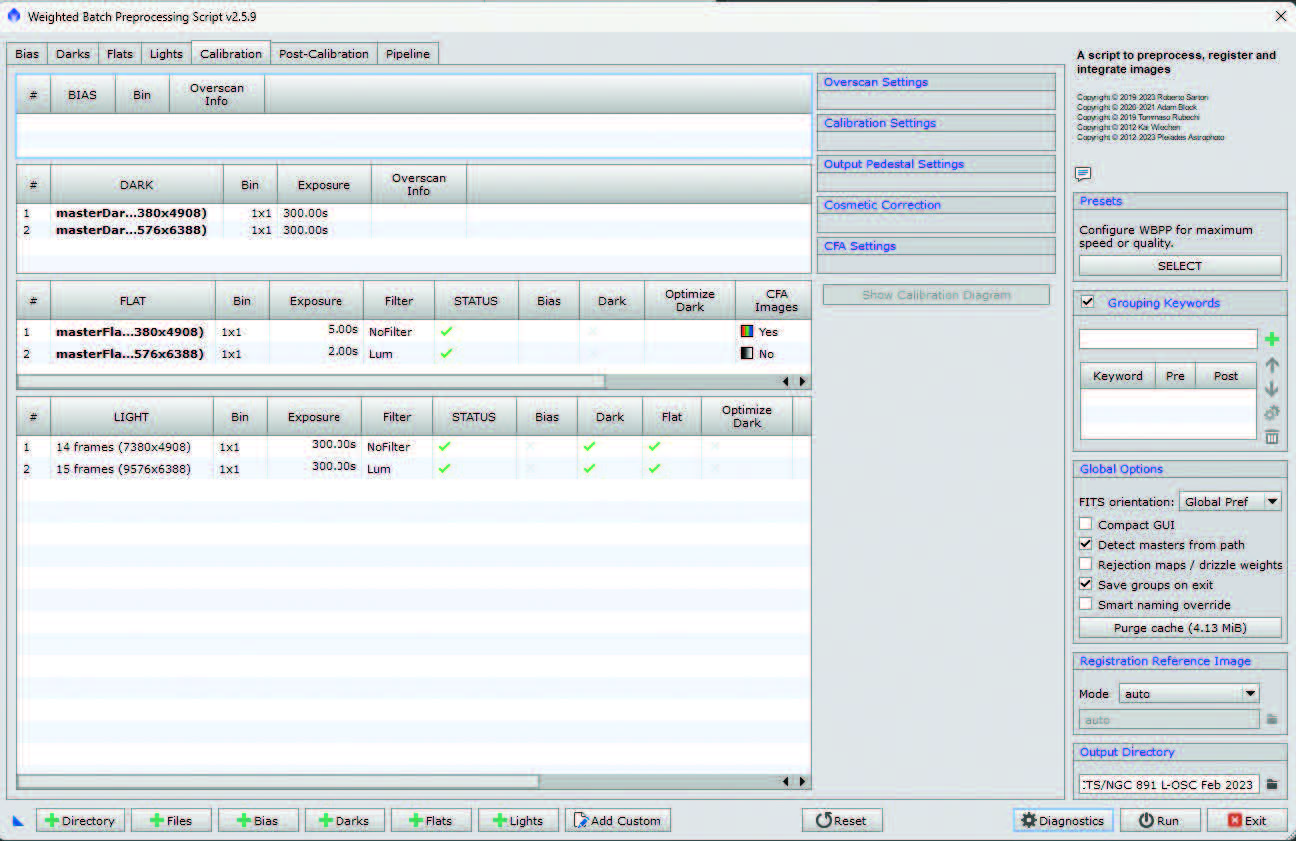
To use the WBPP script, launch it and then load all your calibration and light frames using the +File or +Directory buttons at the bottom of the script window. The program will automatically put the files in the proper locations in the script window using the information recorded in each file’s FITS header. (You can inspect the FITS header of an open image using FILE > FITS Header). If your acquisition software doesn’t write this information into the FITS header, load the files using the Add Custom button at the bottom of the script window and input the details manually. You’ll need to verify the settings on each tab and specify an output folder. When ready, run the script; it’ll warn you of any potential issues before running.
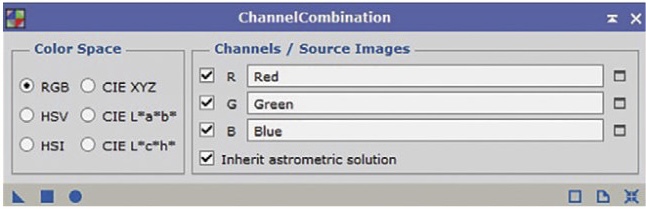
Once the master frames are all generated, you’re ready for the next step. Note that color images may come from using a color camera or can be made by combining red-, green-, and blue-filtered monochrome images. In the latter case, you’ll need to combine the filtered shots into a color image using the ChannelCombination process, where you’ll assign each filtered master file to its proper channel.
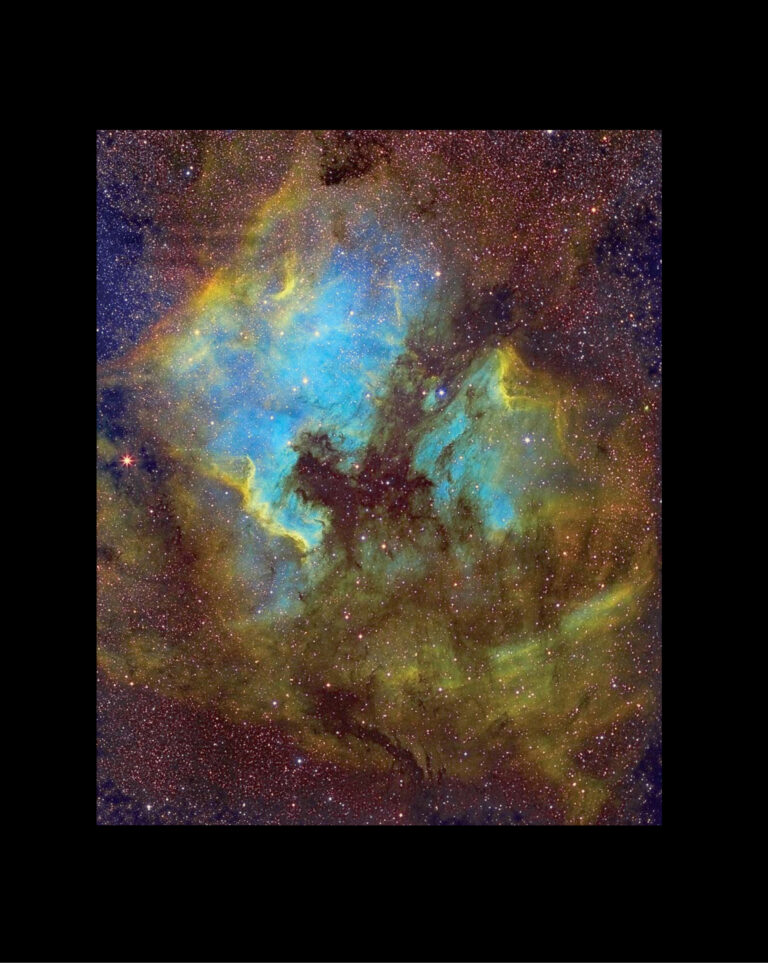
Ron Brecher
While your camera’s files will most likely be in the FIT format (or RAW files from DSLR cameras like CR2 or NEF), PixInsight saves images as Extensible Image Serialization Format (XISF) files by default. This format saves more information about the processes applied to the file than other types. Still, the software can open and save files as FIT, TIF, PNG, BMP, JPG, and more.
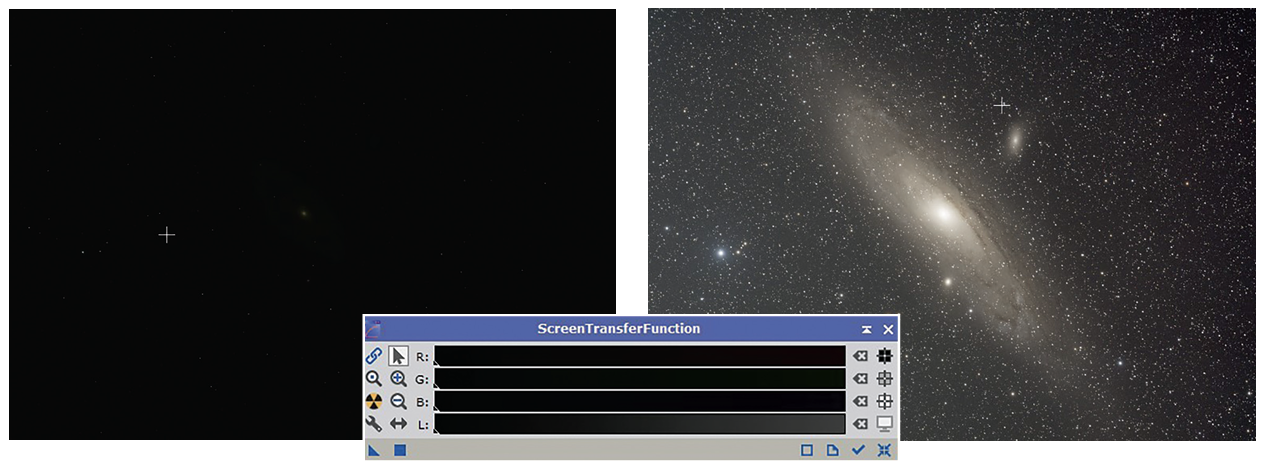
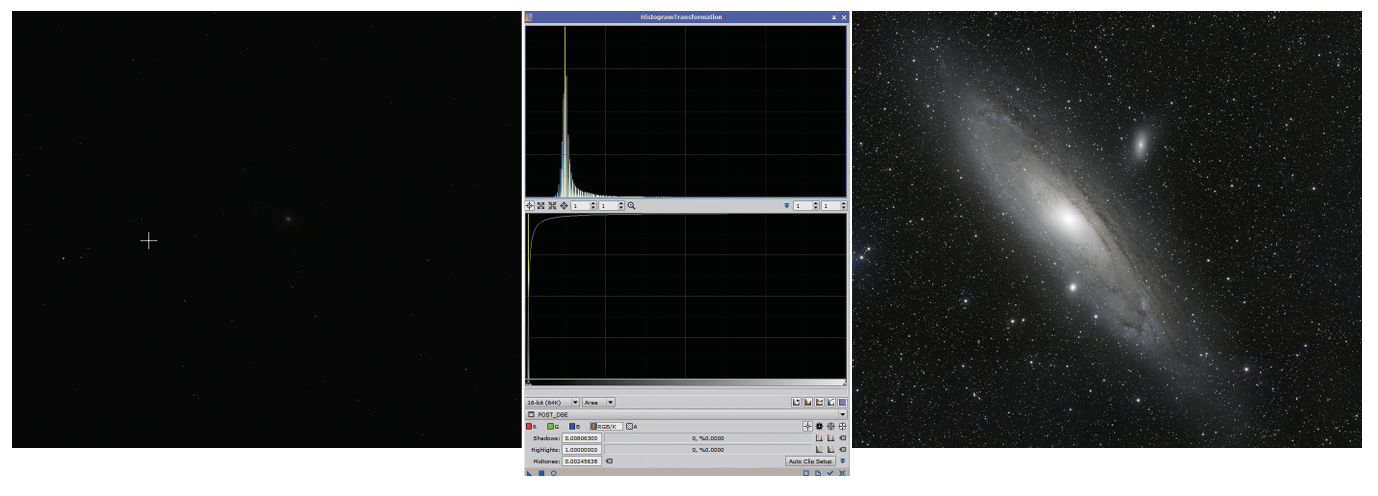
As with most any unprocessed deep-sky image, the raw frames or reduced masters generated by WBPP appear virtually all black, with a smattering of bright pixels marking the location of the brightest stars. This is normal — the images aren’t actually black, they’re just very, very dark because your monitor can’t display the full range of brightness present in the images. This is simply a result of the data being in a linear state, meaning that the brightness of each pixel is proportional to the number of photons that fell on it.

Ron Brecher
Visualizing Raw Data
Many of the early steps in deep-sky image-processing are applied to linear files. To make an image that shows the wealth of detail you desire, you’ll need to selectively brighten the image while preventing the brightest pixels from becoming saturated and keeping the background dark. This stretching process results in a non-linear image that displays subtle differences in brightness and hue. Most of the final finishing in image processing is done on images after stretching.
However, linear images don’t display very well, making processing decisions tricky. Enter one of PixInsight’s most helpful features, the ScreenTransferFunction (STF) found at PROCESS > Intensity- Transformation > ScreenTransferFunction. STF brightens and applies contrast and color balance to the displayed image without changing the underlying data. You can apply STF by pressing Ctrl + A (or Cmd + A on a Mac), but you’ll need the process window open to finesse its settings or to reset it. It’s important to reapply the STF tool each time you make a change to the image for it to display correctly. (When using the tool on color images, be sure to uncheck the chain-link icon at upper left of the process window until after you’ve balanced the color as described later.) It’s well worth reading the tool’s accompanying documentation, available by clicking the document icon at the bottom right of the process window.
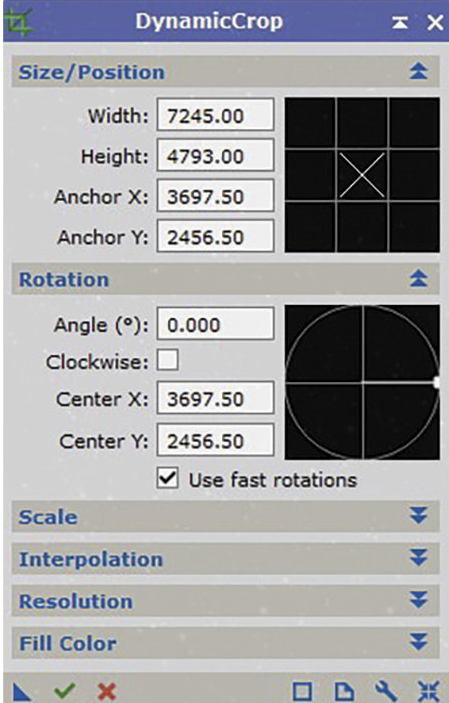
The next steps in my basic linear workflow involve removing unwanted signal from my images. I start with a DynamicCrop process to eliminate any edge artifacts that could negatively affect the picure, such as non-overlapping areas due to dithering or other pointing differences when shooting my target over multiple nights. This is accomplished using PROCESS > Geometry > DynamicCrop. In the process window enter the size you want to crop to in the Size/Position section, and the angle of the crop in the Rotation section. You can also make these adjustments by manipulating the preview of the crop with the mouse. When ready, click on the Execute (green checkmark) button at the bottom left of the process window.
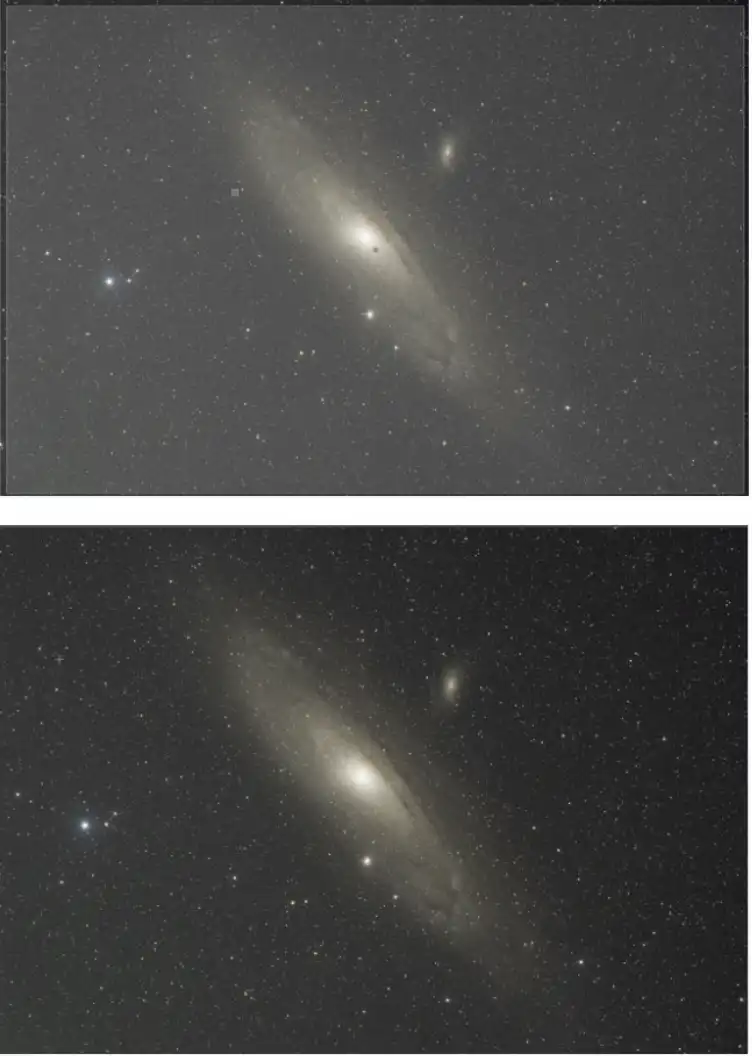
With a nicely framed image in hand, I then perform another STF stretch to check the image for gradients — uneven field illumination, often due to moonlight or light pollution. Imperfect flat-field calibration can also add gradients to your image. Fortunately, there are two powerful processes in PI to tackle this problem. AutomaticBackgroundExtractor (ABE) works reasonably well, with little or no adjustments. When activated, you’ll need to specify the type of correction to make and whether the ABE should replace the current image or generate a new image.
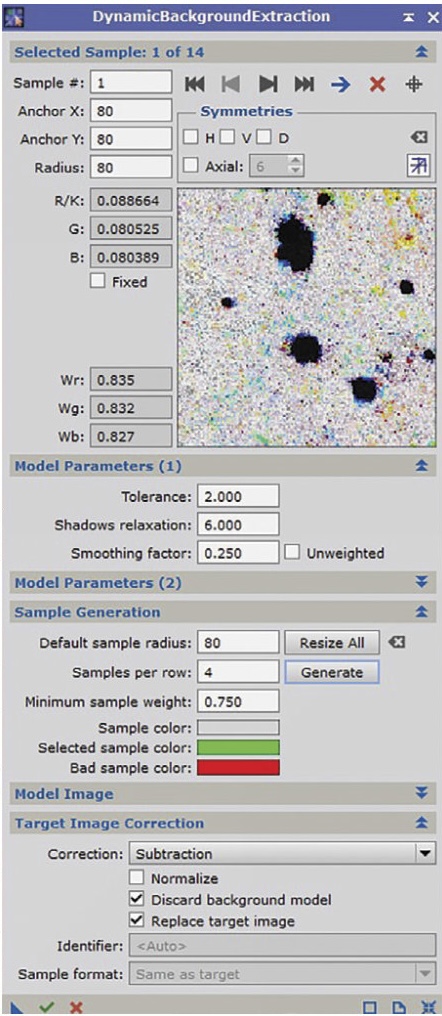

The more complex DynamicBackgroundExtraction (DBE) tool produces superior results compared to ABE. I highly recommend investing the time needed to master DBE, since most deep-sky images will have some gradients, and DBE can remove them effectively. DBE requires you to place points (called samples) in the background regions of your image. It then builds and applies a background model. Since gradients are large-scale, just a few sample points will do. In this window, I typically increase the Tolerance to 2.0 and the Shadows Relaxation setting to 6.0 in the ModelParameters (1) section. Then I move down to the Sample Generation area and change the Default sample radius to between 50 and 100 pixels and the Samples per row to 3 or 4 in order to get a good estimate of the background. This typically produces a dozen or more sample points, which results in a good representation of the gradient I want to correct.
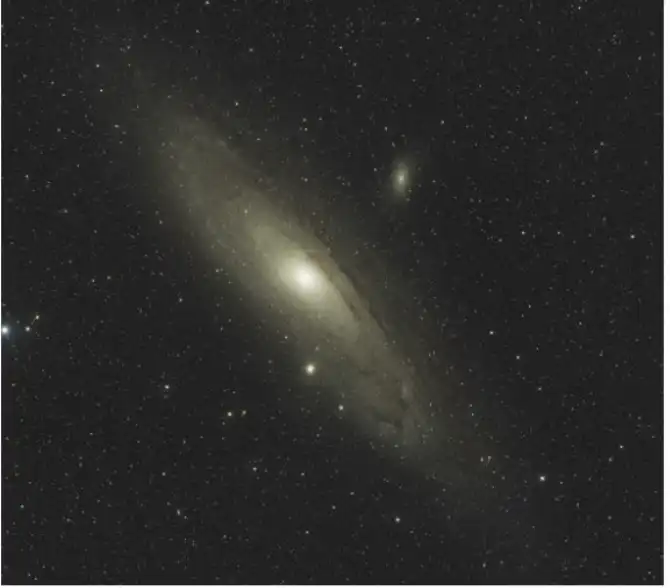
With gradients addressed, I then move on to establishing the image’s color balance. PixInsight’s ColorCalibration process works very well on RGB or natural-color images. To use this process, I specify the location of a background region, which is used to color-balance the darkest pixels in the image. It then discerns the location of stars in the image and uses them as the White Reference. Here I’ll click Alt + N (Option + N on a Mac) to enter New Preview mode and define a small preview containing just background sky. I then set this preview as the Reference image in the Background Reference section and click the square at the bottom left to apply the process.
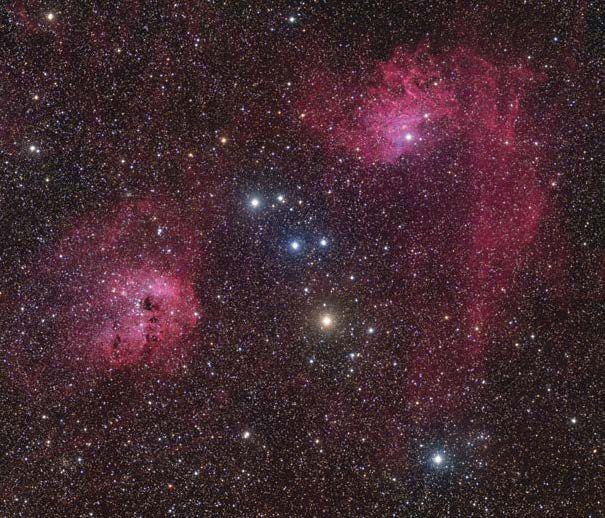
Ron Brecher
Ron Brecher
Ron Brecher
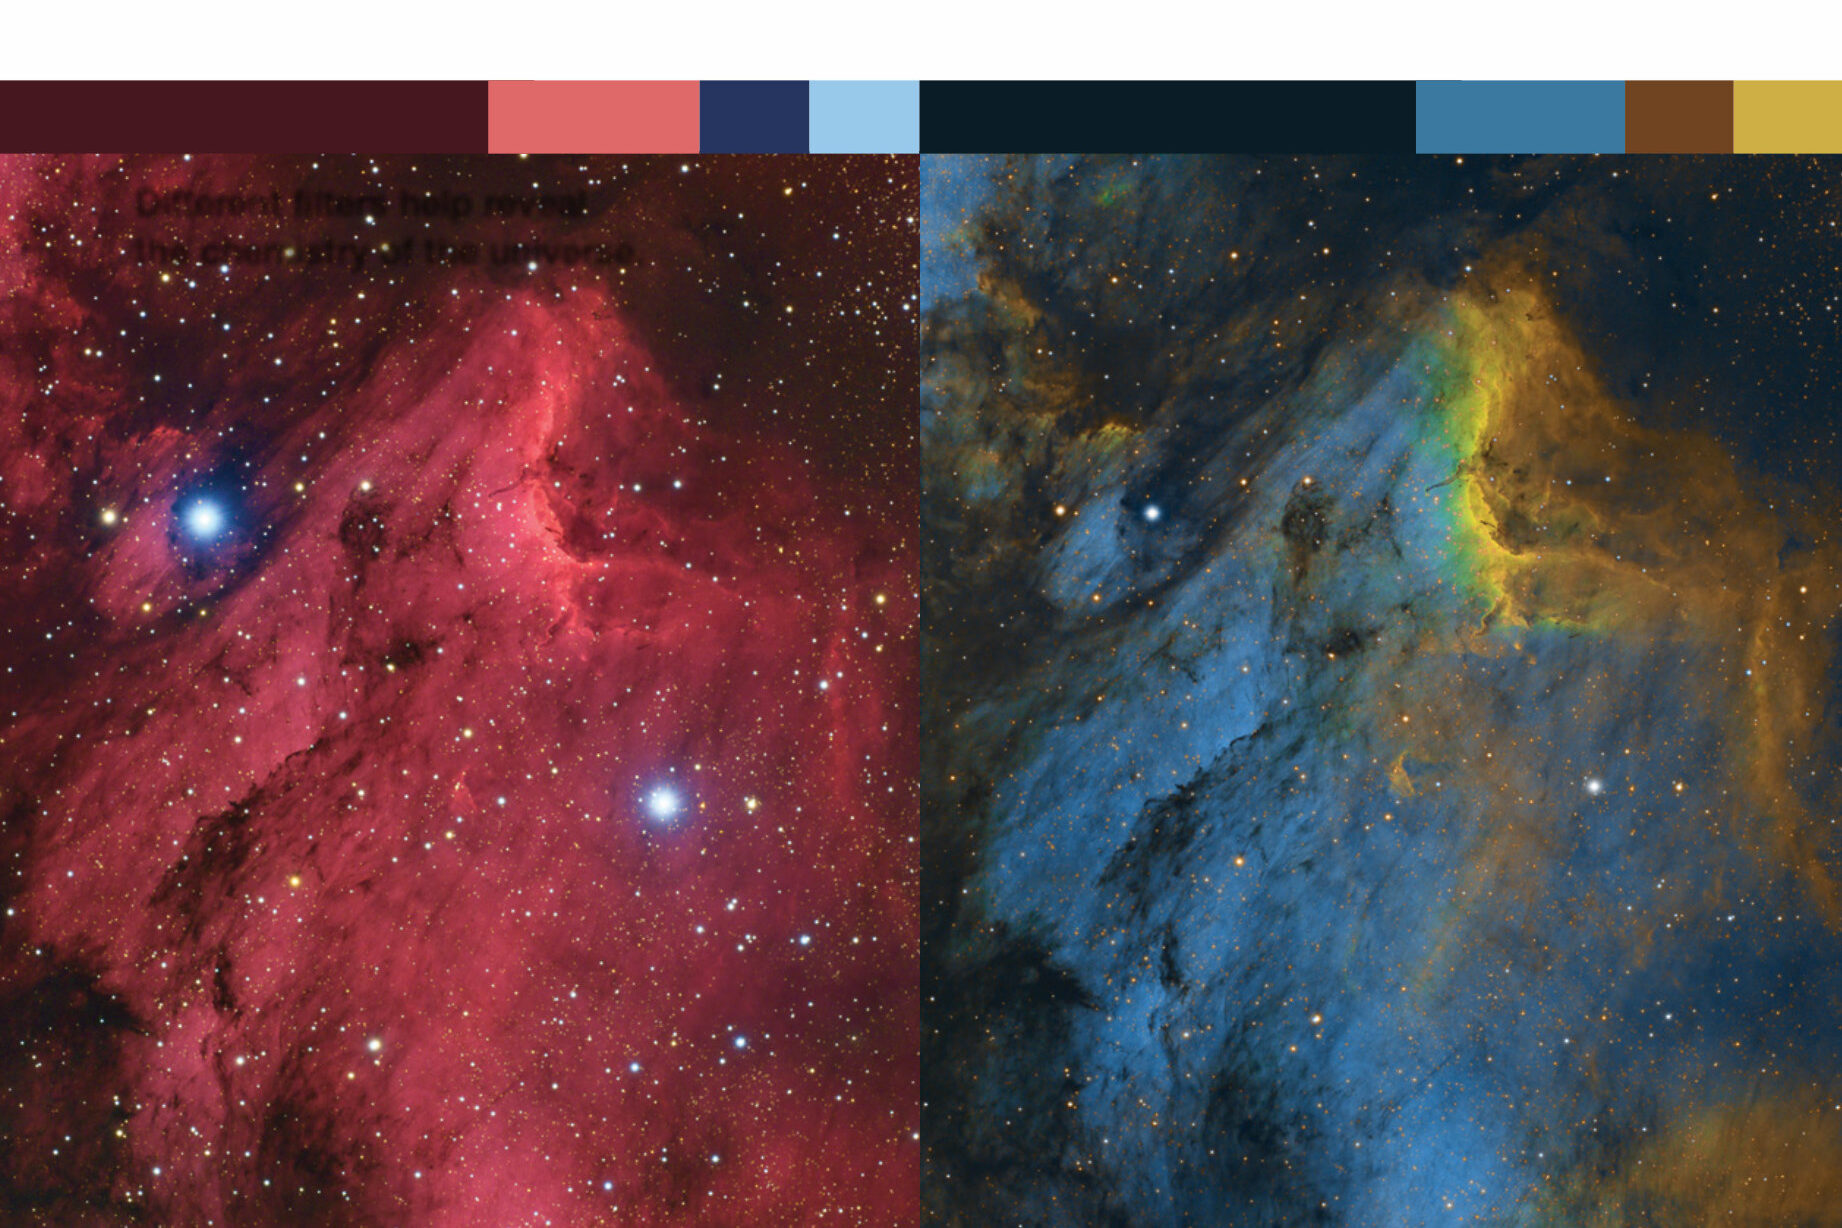
After balancing the color, be sure to invoke a STF with the chain-link icon at the left of the process window activated in order to link the color channels. Narrowband images also require adjustment to obtain a pleasing color palette. However, color balance with representational color is fairly subjective and can be approached differently (see the June 2022 issue).
The last step before non-linear stretching is to address any unsightly noise in the image. All deep-sky images contain some noise, and it tends to be most visible in the darkest regions of the picture. PixInsight includes several noise-reduction tools that are fairly complex to operate, so I prefer Russ Croman’s NoiseXTerminator (NoiseXT) available at https://is.gd/NoiseXT ($59.95). This plug-in works better than any other method and is extremely easy to use. Once installed, you’ll find it under PROCESS > NoiseReduction.
Non-linear Processing
With the linear processing steps now complete, I can apply a permanent stretch to make the image non-linear. This is done using the HistogramTransformation (HT) process in conjunction with the STF process. First open STF, click on your image, and then click Ctrl + A. Next, copy the settings by clicking and dragging the New Instance triangle at the bottom left over to the bottom bar of the HT window. You can then adjust the shadow and midtone sliders to suit your taste, and then apply to the image by clicking the square button at the bottom left of the process window.
If you’d rather perform this task manually, the adjustments are made in the HT window using the sliders in the lower graph, while the predicted result of the stretch will be displayed in the top histogram. I begin by moving the midtone slider to the left until I start to see the histogram peak move away from the left side of the graph. Then, using the scroll wheel on my mouse, I’ll zoom in on the bottom graph and adjust the shadow slider. I move it to the right, where the histogram begins to rise steeply. At this point ensure the STF is turned off by hitting the Reset button at the bottom-right corner of the STF window. Next, open a Real-Time Preview by clicking the open-circle icon in the bottom left of the HT window. While looking at the preview image and the histogram, I’ll adjust the midtone slider again to achieve the look I want. I then click the square Apply button at the bottom left, and in moments the result is displayed.
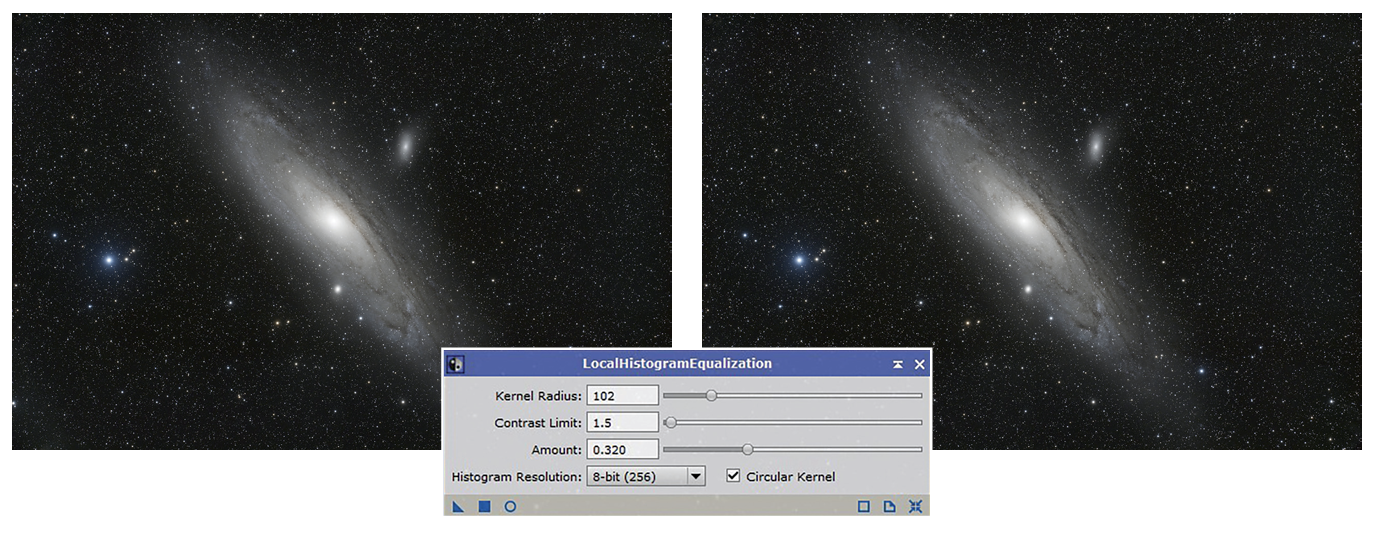
After stretching, there are many additional enhancement options in PixInsight. Most astrophotographers make further adjustments to the brightness, contrast, hue, saturation, and sharpness. These steps can turn a good image into a great one. Boosting contrast is particularly important and is performed with the LocalHistogramEqualization (LHE) process. This tool is very powerful, so it requires a light touch. The Amount slider adjusts how much contrast boost is applied. Be aware that, particularly when using a small kernel radius, LHE can generate artifacts that appear as dark rings around stars, which require masks and other more advanced techniques to prevent.
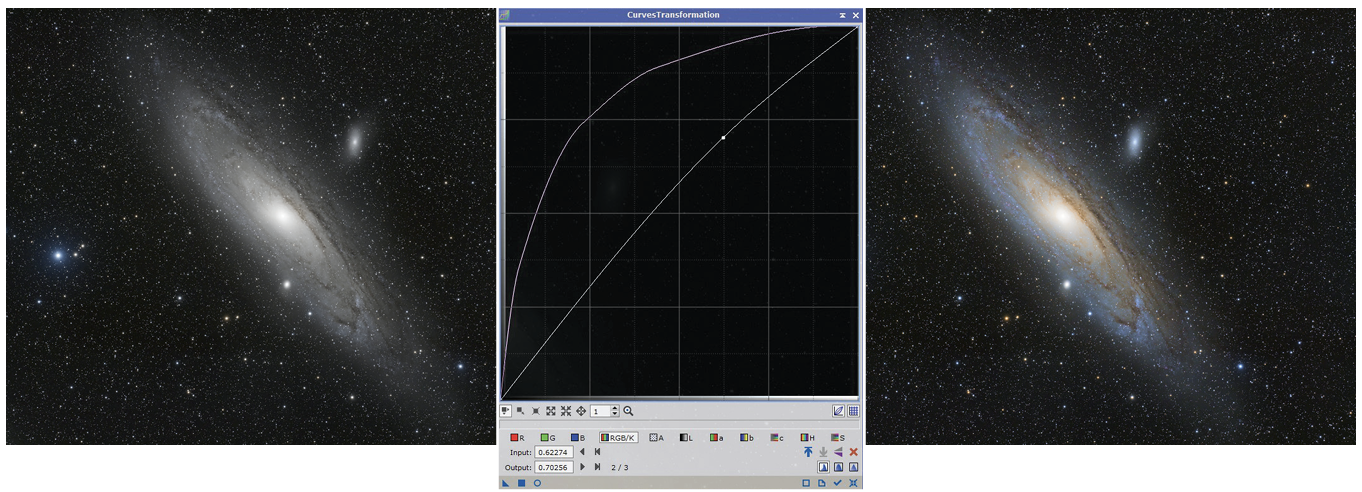
I often finish up with the CurvesTransformation process, adjusting the RGB/K (which controls brightness and contrast) and Saturation (S) curves.
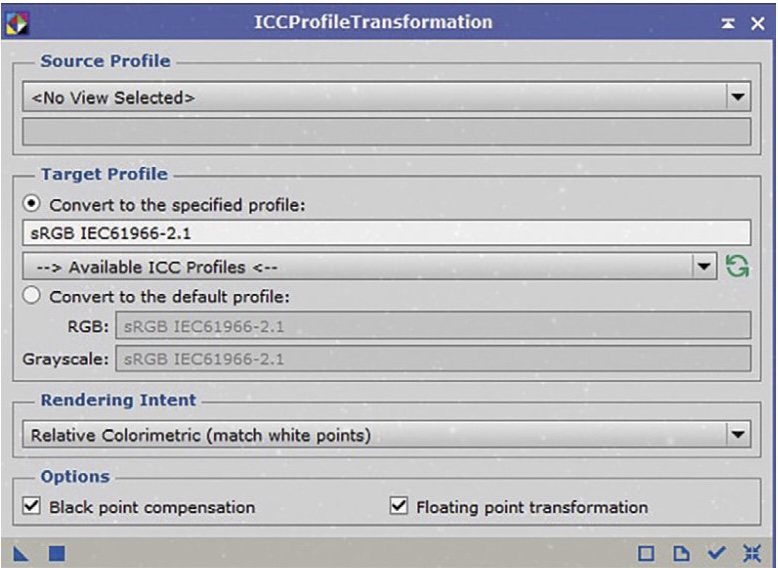
Finally, when I’m ready to share my image with friends, it’s helpful to embed a color profile in the JPG file. This tells web browsers and devices like printers and monitors how the colors in the image should be displayed. I use the ICCProfileTransformation process to ensure that my shared JPG images contain the sRGB color profile that is widely used by default.
In Closing
PixInsight is one of the most popular software packages for processing just about any kind of astronomical image. It’s extremely versatile, though it takes some time to familiarize yourself with its collection of hundreds of processes and scripts — not to mention all the additional scripts and processes developed by other users. Beginners can get good results by setting the simple goal of mastering the user interface and the tools described above. As your skills improve, you can add other processing steps, but the ones I’ve highlighted will likely always be at the center of your workflow.
This article originally appeared in the June 2023 issue of Sky & Telescope.
About Ron Brecher
Contributing Editor RON BRECHER often hosts PixInsight image-processing workshops. Visit his website at astrodoc.ca.


Comments
You must be logged in to post a comment.