 3
3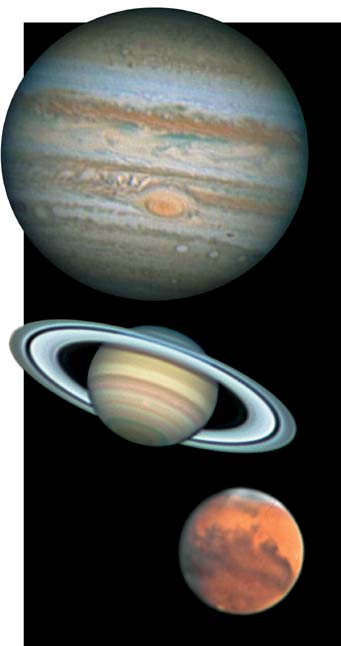
Capturing the planets has become relatively easy, thanks to the webcam. But extracting the most detail from the raw images produced at the telescope takes patience and skill, not to mention the tools available today for your digital darkroom. Author Don Parker created these stunning portraits of Jupiter, Saturn, and Mars using webcams, a 16-inch Newtonian telescope, and the techniques he describes here.
Donald C. Parker
Over the past five years, a tremendous resurgence in amateur planetary astronomy has taken place. This is due in large part to the simple, inexpensive webcam, which has enabled amateurs armed with modest telescopes to produce images of the planets that rival those captured with large professional instruments (S&T: October 2005, page 115). The secret of the webcam’s success is that it can produce images with very short exposure times, perhaps one-tenth of the durations required with conventional cooled CCD cameras. This means that webcams can “beat the seeing” — with planetary imaging and capture sharp images during fleeting moments of atmospheric tranquility.
Unfortunately, there’s a downside. Webcam frames are noisy when compared to those from cooled astronomical CCD cameras. But because signal increases directly with exposure, whereas noise increases only as the square root of exposure, you can stack lots of frames to produce an image with a much higher signal-to-noise ratio than that of any individual frame.
It typically takes hundreds or thousands of webcam images stacked together to achieve an acceptable result. And not every frame you record will be worth keeping, so before you stack images you need to weed out the blurry ones. Sorting and stacking thousands of images manually would be about as much fun as undergoing root-canal surgery! Thankfully, there are computer programs available today that will do this job of planetary imaging automatically.
The primary goal of planetary imaging is to tease out as much fine detail as possible without introducing spurious artifacts. Careful image processing using the tools of the “digital darkroom” is every bit as important as acquiring high-quality webcam frames in the first place if you want to produce highly detailed and scientifically useful images. I frequently employ several different programs and planetary imaging to process my images, because no single program yet contains all the tools I find necessary.
Planetary Imaging 101: Selecting and Stacking
RegiStax 6, available as a free download, is one of the most powerful and widely used programs for planetary imaging techniques including sorting, registering, stacking, and sharpening webcam images. Sean Walker described its key functions in his review of version 3 in the December 2005 issue, page 94. Like him, I find I can produce excellent planetary imaging results by using the program’s default settings but even better results if I exert some manual control.
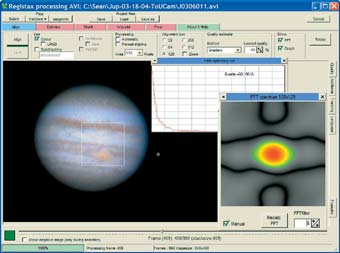
Figure 1: (Click on picture for a larger image.) Using RegiStax”™s alignment tools can be a daunting task for the uninitiated. By selecting an average–quality frame from an AVI file and increasing the FFT Spectrum radius value, higher accuracy can be achieved during the initial alignment.
Donald C. Parker
After opening an AVI file from my webcam, I first select a reference frame of average quality, as this tends to produce the best alignment compared to using an exceptionally sharp one. If I recorded my target on a night of average seeing, I’ll use an Alignment box that encompasses the entire planet’s globe, selecting a frame near the middle of the movie to minimize rotation artifacts and choosing the Quality Estimate Method Local Contrast. If the seeing was good during the movie clip, I’ll instead choose a smaller Alignment box centered on an interesting planetary feature, such as Jupiter’s Great Red Spot or an albedo feature on Mars, for my registration point. I then select Gradient as the Quality Estimate Method. Once I’ve chosen my alignment point and Quality Estimate Method, a window opens that displays the FFT (Fast Fourier Transform) Spectrum of the registration point. I usually end up with a better stack if I decrease the radius of the FFT filter, so that it displays a larger target area than with the default setting (Figure 1).
RegiStax allows the option of dark-frame and flat-field calibration. If I used a color webcam to record my target, it’s important to convert the flat frame to monochrome before applying it, or else the results will be unusable.
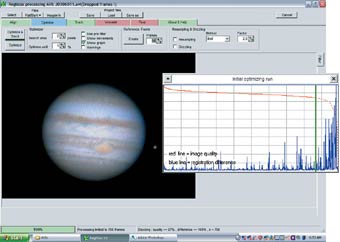
Figure 2: (Click on picture for a larger image.) Once the first alignment is completed, the results are displayed as a graph with two lines representing quality (red) and registration (blue). If the lines intersect, go back a step and decrease the FFT Spectrum radius, then repeat the alignment process.
Donald C. Parker
At this point, I initiate the Align command. After a few minutes, RegiStax will display the results of the Initial optimizing run, showing two lines in a window: a red one representing image quality, and a blue one displaying the registration difference between each frame. I try to end up with two roughly horizontal lines, though this isn’t always possible (2). If the lines intersect closer to the left of the graph, I may adjust my earlier settings and repeat the alignment routine.
Once I’m satisfied with the initial alignment results, I move the slider at the bottom of the screen toward the left to exclude the poorest frames and select the Limit option, which brings me to the Optimize menu. Here I choose the Reference Frame menu, and change the Frames option from the default of 50 to between 200 and 300. Once I press the Create button, RegiStax combines the best frames within this limited selection to create a smoother reference image for use with the remaining frames. At this point I sharpen this image with the Wavelet filter before reintroducing it to the remainder of the process. I then save the image both with and without the Wavelet sharpening, because occasionally this small stack ends up superior to the final result made with additional frames, especially if the seeing was poor during the original video recording (3).
Figure 3: When choosing the Create Reference Frame option, save the resulting raw stack for future use.
Donald C. Parker
I sometimes skip the Optimize command and proceed directly to the Stack tab. Occasionally I’ve found that the post-optimization images have serious artifacts, especially if the seeing was less than favorable. Usually a few frames were grossly misaligned; these appear as a ghost image when the image’s contrast is stretched.
In the Stack menu, I open the Stackgraph tab at the bottom right and exclude any remaining poorly aligned frames by moving the Difference Cutoff slider down and the Quality Cutoff slider toward the left — RegiStax isn’t perfect, so some lower-quality frames usually sneak in. As I adjust these settings, the percentage of these frames decreases. I find that stacking 800 to 900 frames is optimal; a larger stack tends to obscure finer details, while noise begins to dominate if too few frames are combined. Finally, I initiate the Stack command.
After stacking is complete, I click the Wavelets tab. Before adjusting the Wavelet sliders, I first reset them so that no sharpening is applied, then save the image as a 16-bit TIFF file. If I decide to reprocess the image at a later date, I can bring this “raw” stacked file back into RegiStax without having to repeat the alignment and stacking routines. If I used a color camera to record the image, it most likely displays color fringing caused by atmospheric dispersion. Here I utilize the RGBshift function noted in Walker’s review. When a satellite of the subject planet is in the field, I process the entire AVI movie a second time, registering only on the moon, and save this image as a separate file to add later in Adobe Photoshop.
Now that I’m ready to sharpen the image, there are a few self-imposed limits I apply to my processing to ensure I don’t add artificial detail to the picture through oversharpening. I limit the aggressiveness of the Wavelet filter based on various factors such as image quality, number of frames in the stack, and the type of detail I hope to resolve.
Wavelet Sharpening

Figure 4: (Click on picture for a larger image.)
Donald C. Parker
The Wavelet filter in RegiStax is controlled by six sliders and three settings. From 1 to 6, the sliders affect detail at lower spatial frequencies, corresponding to features of larger angular size. The first two settings are located above the sliders. Initial Layer raises or lowers the Wavelet filter’s highest frequency. Step Increment increases or decreases the range of frequencies. The final setting is located at the top of the screen, titled Wavelet. When you click this tab, a window with a grid of numbers appears, displaying the setting of the filter itself. By raising the central number, I can achieve better results than with the default setting of 50. Like all my other decisions, this will be dictated by the quality of my stacked image; if the movie was recorded under outstanding conditions, I may start by raising the center frequency to 1,200, and then see how this affects my image by raising the first slider. Lower numbers translate into lower frequencies and smaller steps between the 6 layers (4).
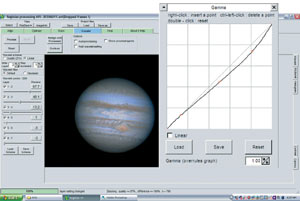
Figure 5: (Click on picture for a larger image.)
Donald C. Parker
When I’m comfortable with all these settings, I move the slider of the first wavelet layer as far as possible to the right before noise becomes objectionable. Then I move on to the second and perhaps the third wavelet, until I’m satisfied with the results. I only use the lower frequencies when the seeing is particularly poor, or if my target was very small, such as Uranus, Neptune, or perhaps Mars far from opposition. During these steps I use the Gamma and Histogram functions to enhance contrast, avoiding clipping the high pixel values. I find the Brightness and Contrast functions tend to clip the brightest and darkest areas of the image, so I avoid using them (5). Finally, I save the sharpened result as a 16-bit TIFF file.
Deconvolution
Although I may be finished with RegiStax, additional planetary imaging processing often can improve my image further. I next open the wavelet-sharpened image in MaxIm DL. Here I rotate and resample the image, as well as apply a few iterations of deconvolution. I prefer to perform the rotation and resampling here rather than in RegiStax, because MaxIm uses a powerful bicubic algorithm that interpolates neighboring pixel information to create a smooth resized image. I find these modifications should be done before further processing, because resampling at the end of my routine usually results in a softer final picture. I usually resample my images to about 150% of their original size, which seems to produce a smoother final image and helps me to avoid overprocessing.
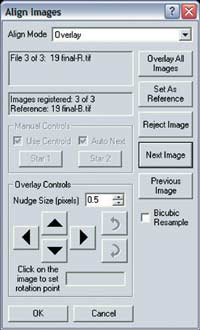
Figure 6
Donald C. Parker
If I used a color camera, I split the image into its red, green, and blue (RGB) components, then manually realign them on a surface feature rather than on the limb using the Process > Align pull-down menu and align using the Overlay option (6). In addition, I sometimes use one of the monochrome color channels that displays the most detail and use it as a luminance image. This is often the red channel, so the resulting color combination will actually produce an "RRGB" image. If I used a monochrome camera, I convert the individual R, G, and B images to monochrome (RegiStax saves all TIFF files as color images), align them on a surface feature, and color combine them.
At this point, I again save the image as a 16-bit TIFF and make a duplicate for further processing with a deconvolution filter. I generally use the Lucy-Richardson filter in MaxIm DL (Filter > Deconvolve), choosing the Extract by Mouse Click option in the Noise Extraction Tools and selecting 16 background points to map the noise level of the image. My next step is to manually input a PSF (point spread function) Radius to properly apply the deconvolution (7).
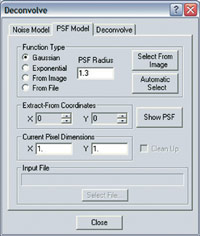
Figure 7
Donald C. Parker
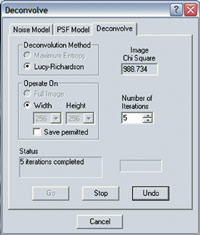
Figure 8
Donald C. Parker
Most deconvolution algorithms require a point source to be sampled directly from the image to get an accurate reading, but photographs of the planets are exposed for too short a duration to record stars. I specifically use MaxIm DL because it allows me to input my own PSF radius and experiment until I find one that works well. Generally I select a PSF radius between 1.0 and 2.0 pixels, then apply two iterations of deconvolution (8). The Lucy-Richardson algorithm has an advantage over unsharp-mask sharpening in that it can bring out fine details while suppressing noise. This routine should be gently applied, however. I often achieve good results by repeating the process a second time using a different PSF radius.
Once I’m satisfied with these planetary imaging results, I save the file (again as a 16-bit TIFF) with a new name and open it in Adobe Photoshop CS2 for final adjustments such as color balance, saturation, and noise reduction if needed. I generally touch up the image’s brightness, contrast, and color balance by making a Curves layer. Again, I try to avoid clipping the histogram. Finally, I carefully inspect the image for detail and grain. If necessary, I’ll apply a mild high-pass filter to add slightly more contrast, or a median filter to reduce any unwanted residual noise. Now I consider my work done, so I save the image in Photoshop Document (PSD) format. Before I can share the image via e-mail or on a website, I must flatten the layers (Layer > Flatten Image) and convert the image to 8-bit data (Image > Mode > 8 Bits/Channel), finally saving it in JPEG format.
Remember that this advice on planetary imaging is based on my own telescope, camera, and seeing conditions, so my preferred settings may not apply perfectly to your situation. Experiment with these settings to find a routine that works best for you.
The planets are always changing, so planetary imaging these bodies can be a very rewarding experience. While capturing and conducting planetary imaging techniques can be time consuming, the result has scientific value. Even in this exciting age of solar-system exploration by spacecraft, amateurs still can make significant contributions to planetary science. With today’s steady improvements in both cameras and software, I’m sure that the amateur’s place in planetary astronomy is secure for many years to come.
Donald C. Parker has been photographing the "major" planets for more than 30 years, including one that became a dwarf.


Comments
gregf61
April 10, 2014 at 2:04 pm
I wish these commentaries/instructionals on astrophotography would focus more on average sized scopes, ie 8" rather than much larger ones which most people don't have. I've had medium success with my nextimage 5 on my celestron 8inch scope, in fact my first attempt at Saturn were amazing. But most of the images and information for amateur astrophotographers are using 12" or larger scopes, which is not realistic for most of us.
You must be logged in to post a comment.
jerry-barr
April 14, 2014 at 2:30 pm
I do have to agree with greg and also point out i cant afford a program like maxim dl for 600 dollars/ so working with freeware like registax works for me /
You must be logged in to post a comment.
BUk
June 1, 2017 at 2:02 pm
With respect to your 30yrs of planetary imaging, you couldn't describe how to turn a piece of paper over with digressing into a discussion of acronyms versus initialisms; and completely omitting to mention that you have to physically handle the paper.
You say: "After opening an AVI file from my webcam, I first select a reference frame of average quality,", but the is no mechanism in Registax6 to allow you to "pick a frame"; you can import a registration frame; but that means you must previously have split the avi into its separate frames.
And then there is the issue of how you choose a "frame of average quality"? By what criteria do you judge that?
And the rest of the article is equally missing of salient details that had you included them, would have made this a really interesting and useful article.
For a h'pth of tar.
You must be logged in to post a comment.
You must be logged in to post a comment.