 3
3Chances are you already own a great planetary imaging camera, but didn’t know it.
To capture the best planetary images these days, the preferred technique is known as “lucky imaging.” This method records thousands of frames in a high-speed video stream, which you can later sort for the best frames to stack into a final high-resolution image. This is where two video modes on your DSLR camera, Live View and high-definition video, come into play.
Live View vs. HD Video for Planetary Imaging
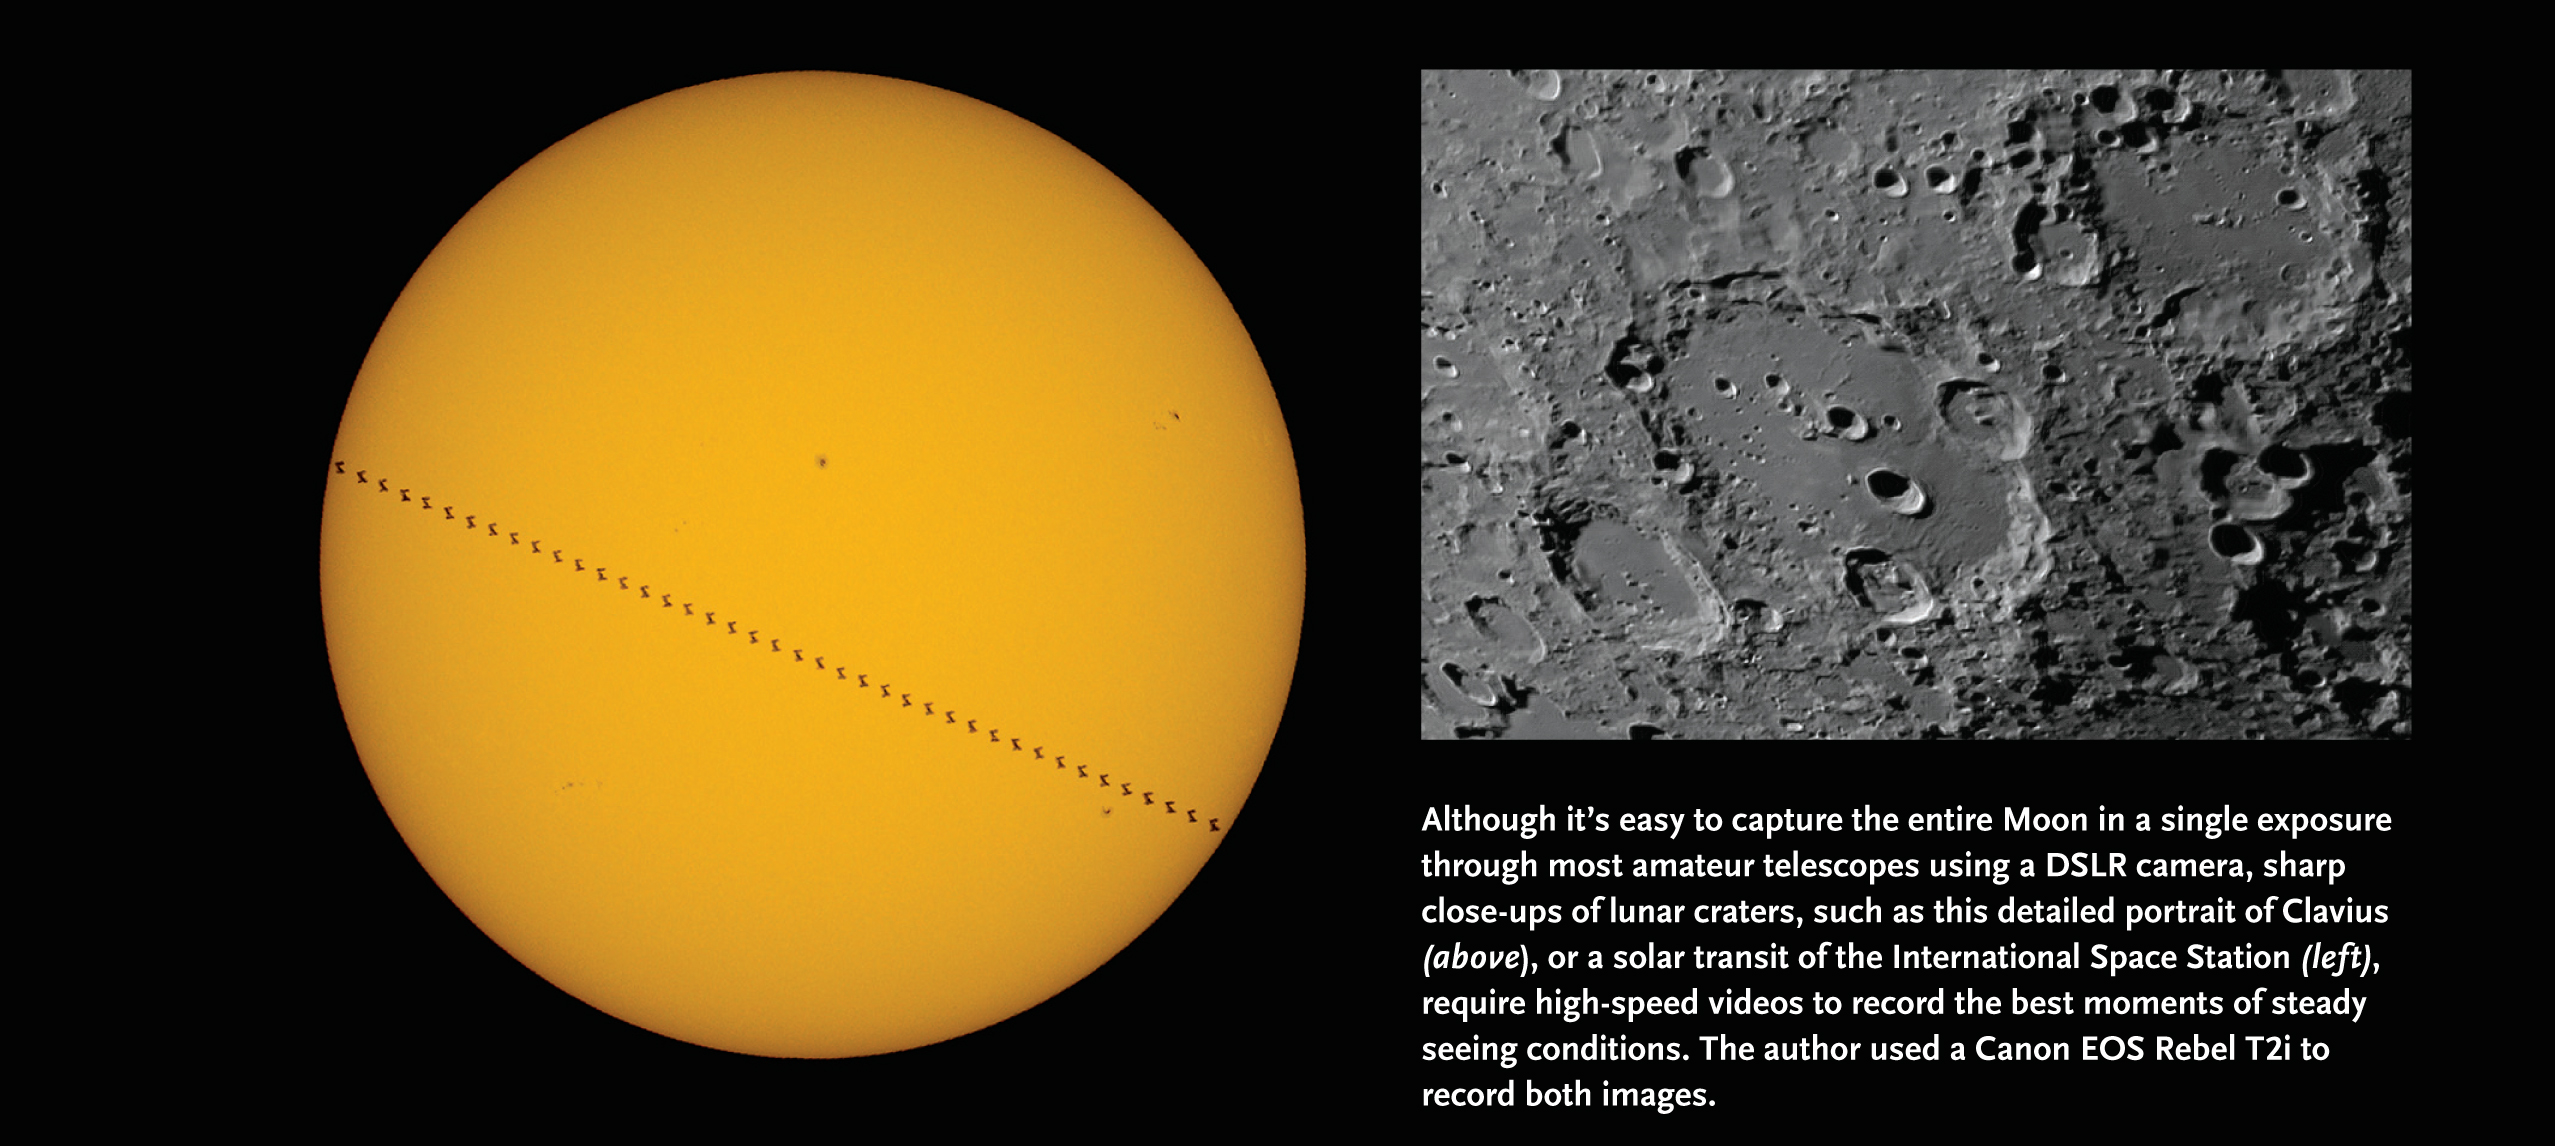
The trick to capturing the highest-resolution, planetary imaging details with a DSLR is to use a mode that allows you to record the image off the camera’s sensor at its native pixel resolution. Cameras with Live View offer the easiest route, using the zoom preview mode to get to a 1:1 crop of the central portion of the camera’s detector. Although you can use normal high-definition 1080p or 720p video modes for lunar and solar imaging with great results, you generally don’t want to use this mode for planetary work because it resamples the image recorded by the camera’s detector, and you will lose fine detail.
For example, the sensor in the Canon EOS Rebel T3i (also called the 600D) has an array of 5,184 by 3,456 pixels. In 1080p high-definition video mode, the camera records an image that is only 1,920 pixels wide by 1,080 pixels high. This down-samples every frame, reducing the resolution of the image.
Collimate Your Optics
Newtonian reflectors, Schmidt-Cassegrains, and other mirror-based telescopes need to be precisely collimated to perform at their best. Use a star near your target to collimate your scope just before you shoot to ensure your best collimation.
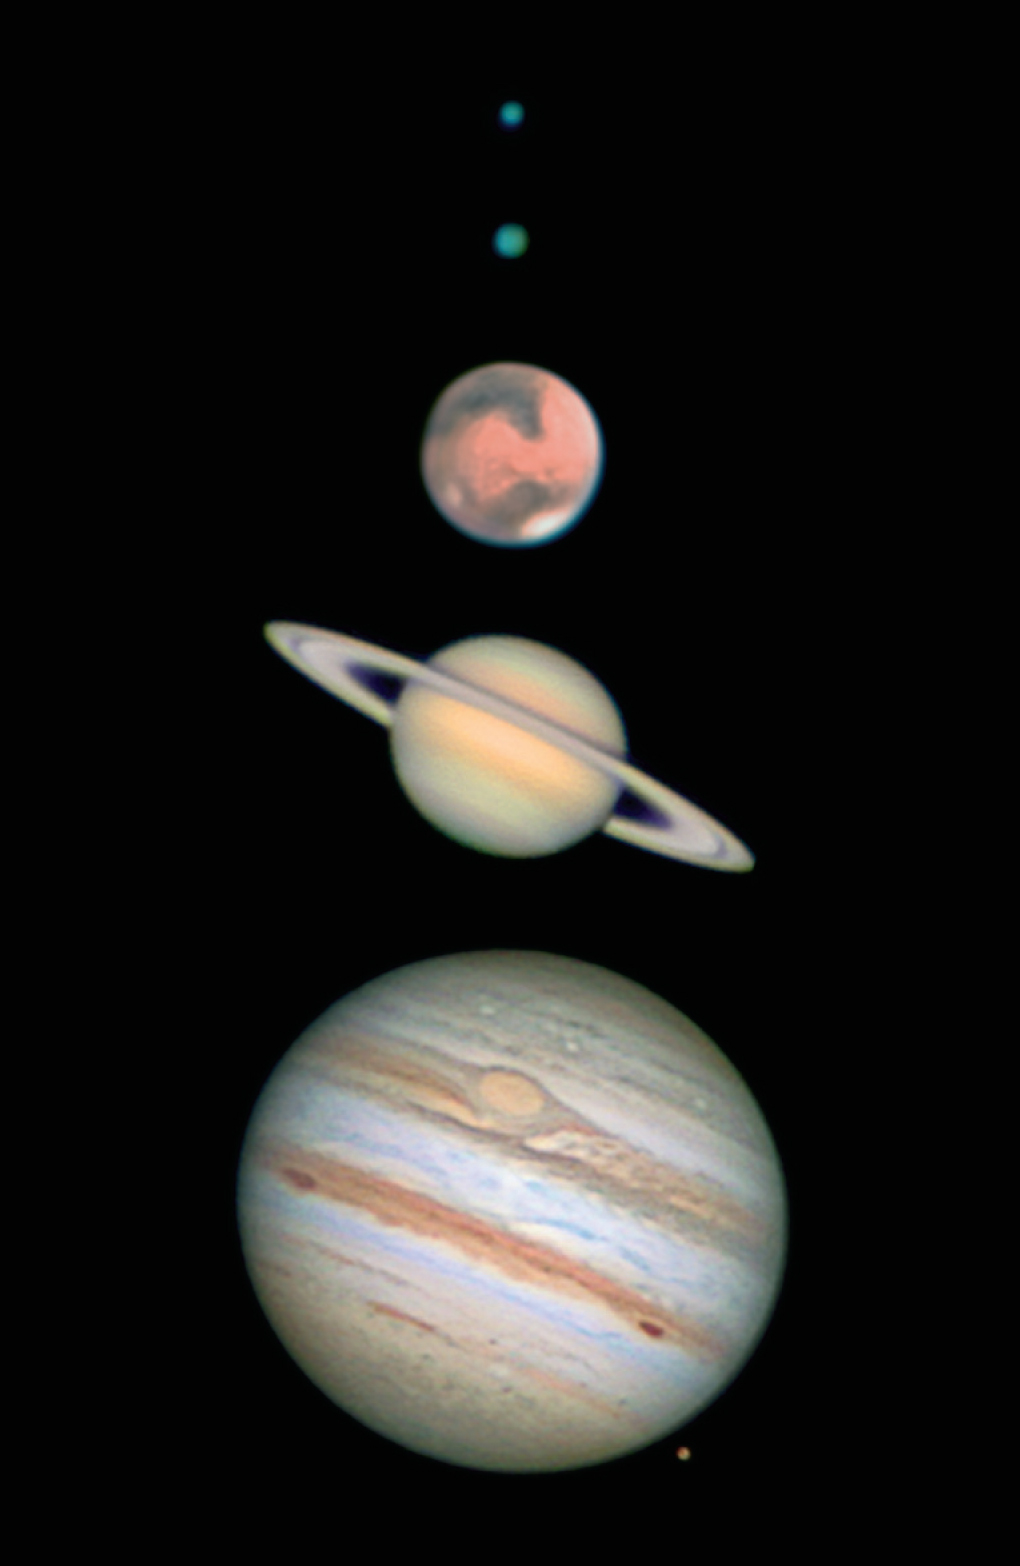
It’s surprising what DSLR cameras are capable of these days. It’s not uncommon to see deep photographs of nebulae and galaxies taken with a stock DSLR, or the Milky Way captured over a picturesque landscape. But you can also use your DSLR as a high-speed video camera to take great high-resolution images of the Sun, Moon, and planets like the fine examples above of Neptune, Uranus, Mars, Saturn, and Jupiter. The author captured each of these images using a Celestron C11 EdgeHD operating at f/29 and a Canon EOS Rebel T2i in Live View mode.
There are two planetary imaging ways to record planetary videos with a DSLR at a 1:1 pixel ratio. The first is to capture the Live View video feed with a computer using a USB connection. The other is to record a cropped video with the camera itself, if your camera model has this feature. Not all cameras have the latter option, but most cameras that include Live View can be used with the first method. Live View displays the video image from the sensor to either the screen on the back of the camera or to a computer monitor. You will, however, need additional software to record the Live View video feed on your computer.
Although Canon cameras come with EOS Utility software that allows remote control of the camera, the program will only record video onto the memory card in the camera using its standard video modes, not Live View. The framing rate you get with video shot in the camera is usually 24 or 30 frame per second, and it won’t drop frames because all of the processing is handled by the camera’s internal processor.
Increasing Your Focal Length
Due to a planet’s small apparent size, you’ll need to magnify the image so that it’s sufficiently sampled by the pixels in your camera. The amount of magnification should be based on the camera’s pixel size. Use a high-quality Barlow or eyepiece projection to increase your effective focal length. A simple rule of thumb for high-resolution work is to shoot at about f/20. If you have a night of superb seeing, you can push the magnification up to about f/30. On nights of mediocre seeing, you can use less magnification and get a wider field, but expect to record less detail.
Software programs including EOS Movie Recorder, Images Plus, Backyard EOS, and Astro Photography Tool allow you to capture the Canon Live View video signal on your computer, even if the camera doesn’t shoot video. When recording planetary videos with your DSLR, use the camera’s exposure-simulation mode if available. Adjust the shutter speed and ISO to control the exposure. If you underexpose, your stacked result will be noisy, and might not be salvageable. Use the daylight white-balance setting. Images Plus will also capture the Live View signal from Nikon DSLRs. One word about Nikon — its Live View only allows limited manual adjustment of the exposure, so it may require more experimentation to use it for planetary imaging.
The frame rate you can capture will depend largely on the write speed of your computer and operating system. EOS Movie Recorder and Backyard EOS will record AVI files that can be directly opened in the planetary imaging-stacking program RegiStax. Images Plus records uncompressed data from Canon and some Nikon cameras in a custom SID format that can then be converted into individual bitmap images to be stacked in your preferred program. Astro Photography Tool records high-quality JPEG images from Live View that can also be stacked in RegiStax.
Beating the Seeing
High-resolution planetary imaging photography is all about the seeing. Seeing describes how much the image of a celestial object is blurred by turbulence in Earth’s atmosphere. With good seeing, an image can be sharp and steady, revealing fine details. Although nothing will compensate for very poor seeing, high-speed videos combined with advanced stacking software will increase your chances of a sharp image by throwing away the blurriest frames and stacking only the sharpest ones.
To access 1:1 pixel data, depending on the camera, use either the 5× or 10× zoom-in software while recording Live View. Some software also gives you the ability to zoom in 200%, but this is just the preview being magnified, and it provides no real gain in resolution. The Live View SID files recorded using Images Plus are uncompressed, but the frames per second (fps) is subject to the speed of your computer.
Movie Crop Mode
Some cameras, such as the Canon EOS Digital Rebel T2i and 60D, for example, offer a special 640 × 480 “Movie Crop Mode” under the video movie recording menu option. This function records only the pixels in the center of the sensor, giving us the 1:1 pixel data that we need. Additionally, this mode will also record 60 fps. The Canon EOS Digital Rebel T3i offers a slight variation on Movie Crop Mode where you can select 1080p high-definition video mode and use 3× digital zoom to get 1:1 pixel data at 30 fps, which is particularly useful on wider fields of view such as the Moon and Sun.
Using Movie Crop Mode, the video is recorded directly to the camera’s memory card and doesn’t require an additional computer at the scope. The high 60-fps rate in Movie Crop Mode allows you to take lots of frames in a short period of time before your target planet rotates enough to blur detail. This gives you more frames to pick from, and thus more of a chance to get really sharp results.

Jerry Lodriguss
Most DSLR cameras record high-definition video using H.264 video compression in MOV format to maximize the length of video that can be recorded to the media card. Unfortunately, popular stacking programs, such as RegiStax and AutoStakkert! 2, can’t open these MOV files directly. Free, open-source programs such as VirtualDub can convert these files to an uncompressed AVI format that my stacking program can then open. Be warned though: uncompressed AVI files can be gigantic compared to the compressed MOV files out of the camera.
The newest DSLRs utilize the latest technology to produce low-noise images with smaller pixels at higher ISOs, such as the Canon T2i, T3i, 60D, and 7D. This allows you to shoot at a shorter focal length while still achieving optimum pixel sampling. After you’ve succeeded in recording hi-resolution planetary videos, processing them is relatively easy. A selection of current planetary imaging stacking programs is listed in the May 2011 issue of Sky & Telescope, page 51.
If you normally shoot long-exposure, deep-sky images with your DSLR, it can be a lot of fun to try some really short exposures on some relatively bright objects for a change of pace. With Live View and the video capabilities of today’s DSLR cameras, you can take some great planetary images!
Jerry Lodriguss is a DSLR aficionado with planetary imaging and more whose latest book is A Guide to DSLR Planetary Photography. See more of his pictures at www.astropix.com. This photo is the author with his Celestron C11 EdgeHD and Canon DSLR camera.
This article originally appeared in Sky & Telescope's May 2012 issue.
Editor's note: On September 29, 2020, the article was updated to remove a reference and link to the Super program, which converts MOV files to AVI format. This program also contains malware. VirtualDub is a good (malware-free) program to replace it, though other open-source programs exist as well.
About Jerry Lodriguss
Jerry Lodriguss has been an amateur astronomer and astrophotographer since 1972. He worked professionally for more than 30 years as a photojournalist and sports photographer. Today, Jerry is an author, photographer and contributing editor to Sky and Telescope magazine. Check out Jerry's images and astrophotography at http://www.astropix.com.


Comments
Pedro A.
July 29, 2015 at 6:08 am
I think you should consider the use of bursts instead of video. For example using camera Panasonic DMC-GH4 ( despite the fact that you can take video UHD) I've had bursts of 120 frames (2336 x 1752 pixels ) at 80 frames per second. The result obtained by stacking these bursts is very good (moon photography).
You must be logged in to post a comment.
jenion
April 9, 2017 at 8:24 pm
I just tried getting a photo of an ISS solar transit, and my problem was that I couldn't time a burst of shots when I couldn't see it coming. I have a T3i and my bursts are only about 6-8 clicks. So using video mode with these adjustments will help me get a few images of it by recording maybe a minutes worth of video.
You must be logged in to post a comment.
mollycule
June 21, 2017 at 9:58 pm
I've had success converting my Nikon .MOV files to .AVI using VirtualDub (and no viruses). You may need some encoder packs too - I use K-Lite Codec Pack. Also works with my ZWO ASI120MM, since RegiStax didn't seem to like those AVI files either.
Better yet, VirtualDub is also excellent at making timelapse videos. And it's free 🙂
You must be logged in to post a comment.
You must be logged in to post a comment.