 1
1Learn how to make a sundial by using our simple template, some tape, and a pencil! You can easily make a sundial good enough to keep track of the daytime hours.
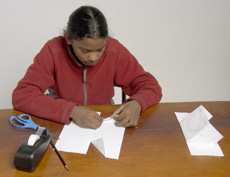
You can create a working sundial in just a few minutes using S&T's downloadable template.
S&T: Craig Michael Utter
Learning how to make a sundial provides you with an amazingly simple yet effective devices. They range from sticks planted in the ground to precision-machined marvels costing thousands of dollars. The DIY sundial design shown here can be constructed in minutes from materials lying around your house, but it’s surprisingly accurate. Perfect for beginner astronomers to get started, a sundial makes a great introduction to learning about the wonders of our universe - and they're pretty cool!
Supplies for Sundial Making
You're just 15 minutes away from having a working DIY sundial! Here's what you need to create it:
- Scissors, transparent tape, and a long sharpened pencil
- A printout of our sundial template. Download the Northern Hemisphere template (there's also one for use in the Southern Hemisphere), and print it out.
- Your approximate latitude. (Sundials need to be adjusted according to how far you are north or south of the equator. If you don’t know your latitude, find it on a map — or find it on Google maps, our interactive star chart or Heavens Above.)
How to Make A Sundial
-
- Step 1: Cut and fold the printout according to directions printed on it. (You might want two copies so that you can work with one while reading the directions on the other.) The only hard part is pushing the pencil point through the center of the small circle. It helps to twirl the pencil as you push.
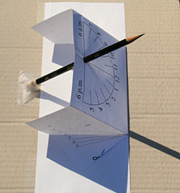
During autumn and winter, the Sun shines up from below the readout face, and the shadow is visible through the paper.
S&T: Tony Flanders
- Step 1: Cut and fold the printout according to directions printed on it. (You might want two copies so that you can work with one while reading the directions on the other.) The only hard part is pushing the pencil point through the center of the small circle. It helps to twirl the pencil as you push.
-
- Step 2: When you’re done, the pencil should be perpendicular to the sundial’s face (not to the base). If the pencil wants to topple over, try taping the whole thing to another piece of paper or (better) to a sheet of cardboard. Mounting the sundial on cardboard also makes it easier to carry around. Cereal boxes are a great source of free cardboard.
-
- Step 3: Now turn the sundial so that the pencil points due north (or due south if you live in the Southern Hemisphere). You can use a compass or a map to determine the proper direction, or you can just orient the sundial so that it agrees with your local time. (Don't forget to subtract one hour from clock time if you’re on daylight-saving time.)
- That's it! Now you can watch the shadow on the sundial change as the Sun moves from east to west over the course of the day.
How Equatorial Sundials Work
You've probably seen lots of horizontal sundials, which have a readout face parallel to the ground. It's the design that’s often found in garden stores. They're easy to use — but tricky to design and build.
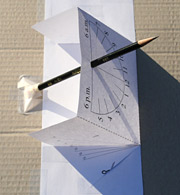
During the spring and summer, the Sun shines down on the readout face, and the shadow falls on the top.
S&T: Tony Flanders
This design for learning how to make a sundial is called an equatorial sundial because the face with the numbers is parallel to Earth’s equator. Conceptually, it’s the simplest design.
However, it suffers from one practical disadvantage: Depending on the season, the pencil’s shadow might fall either on the top or the bottom of the readout face. (It’s easiest to use at midwinter and midsummer, and hardest near the equinoxes around March 20th and September 23rd.) Fortunately, because the face is made of translucent paper, it’s easy to see the shadow even when it’s on the underside. (Reading off the solar time would be extremely awkward if the face were made of metal!)
To see how this sundial works, imagine first that you lived at the North Pole or South Pole. In that case, a stick planted upright in the ground would form both a horizontal and an equatorial sundial — the two designs being identical at those locations.
During spring and summer at the pole, the Sun would rotate a full 360° around you every day, staying the same height above the horizon all the time. The stick’s shadow would behave exactly like the hour hand on a 24-hour clock, staying the same length all day long while rotating at a constant rate. During autumn and winter, the Sun would never rise, and your sundial would be useless — but you'd be too cold to care!
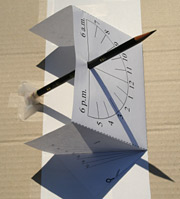
Near the equinoxes, around March 20th and September 23rd, the Sun’s rays hit the readout face edge-on, and the shadow only forms off the readout face.
S&T: Tony Flanders
The pencil in the sundial you’ve just built is parallel to that stick at the Pole, and the readout face is parallel to the ground there. So the pencil’s shadow behaves exactly like the shadow of the stick at the Pole—except that your sundial's shadow is visible even in the winter. That’s because unlike our planet, the sundial is hollow, allowing the Sun to shine up from below.
Building a Better Sundial
Do you find that your sundial isn’t as accurate as you would like? This might be partly due to construction problems. Paper isn’t very rigid, and no matter how carefully you do the folds, the sundial won’t hold its shape perfectly. But there are also some more fundamental reasons why sundials and clocks tell different time. For more information, see our article Time and the Amateur Astronomer.
About Tony Flanders
Contributing editor Tony Flanders has been working with S&T in some capacity since 2003.


Comments
You must be logged in to post a comment.