 0
0Many astrophotographers skip flat fields because they seem complicated. But the flats can greatly improve your images — here’s how to do them.
In my last blog I wrote about the differences and importance of dark and bias calibration frames. Proper image calibration makes your job much easier once you start stacking, stretching, and tweaking your images for an aesthetic presentation (pretty pictures). Calibration is also essential step to quantitative scientific work. However, dark or bias frame calibration is only half of our data reduction process, and we need to talk about our third and often neglected calibration frame, flat-field images.
Richard S. Wright, Jr.
Recording proper flat-frame calibration frames can be tricky, so many casual imagers just skip them entirely. The perception is that flats only correct vignetting, the way that light falls off as you move from the center of the frame. Many image-processing packages have vignette-correction tools with easy-to-use sliders that make short work of the darkening you see around the edges of most optical systems. But flats actually do far more than this!
While a dark or bias frame corrects your image for artifacts introduced by the camera electronics, a flat frame corrects your image for illumination artifacts primarily introduced by your optics. This includes not only vignetting but also other shadows and obstructions in the light path as well as yet another noise source, photo response non-uniformity (PRNU), which cannot be removed by stacking alone.
How to Take Flat Fields
Unlike darks or biases, which are taken in the dark, flats are fully illuminated images that must have uniform lighting across the entire frame. Flats do not have to be in perfect focus, so a little change in focus position due to temperature the next day isn't going to cause problems.
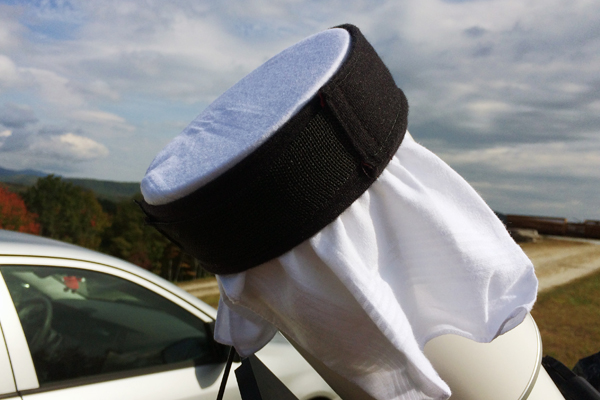
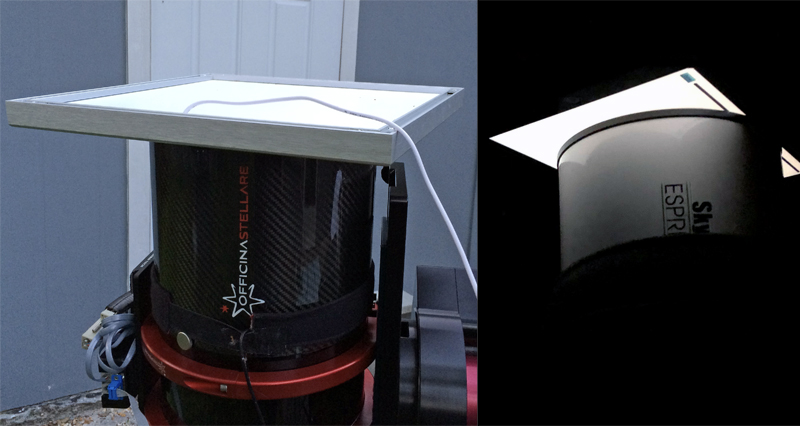
You can record a flat by shooting the blue sky, using a flat panel (a white laptop or tablet screen will work with small apertures), or by covering the end of the scope with a white blanket or cloth to cut down on the light intensity. If you shoot flats during the day, you may need to wrap the focuser and filter wheel with aluminum foil to eliminate light leaks which can contaminate your flats with hot spots.
Richard S. Wright, Jr.
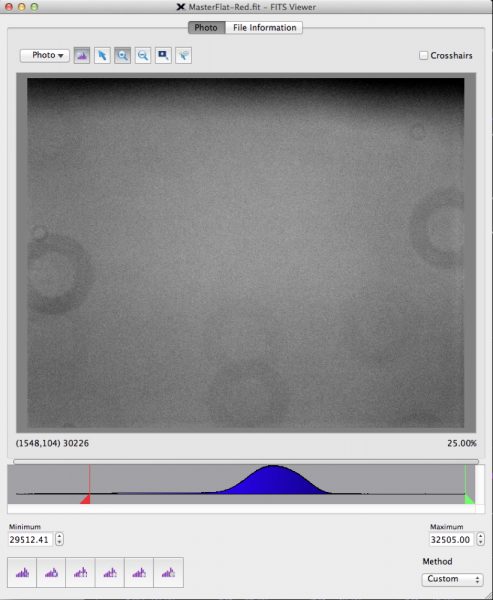
High-signal flats are best, with two provisos. First, you must avoid saturating the pixels of your detector; a solid, white field where every pixel is the same maximum value is no good.
Second, your flats must be kept within the signal range where your sensor is linear. There’s some math that I’m going to spare you, but flats won’t work well if the sensor is not recording data linearly. Nonlinear flats were one of the reasons images from early CMOS cameras were so difficult to calibrate — they go non-linear very quickly. A good rule of thumb is that the middle of your flat-field image should be about half the maximum ADU value that your camera can provide. The histogram reading for a properly exposed flat field looks like a big hump right around the middle.
Richard S. Wright, Jr.
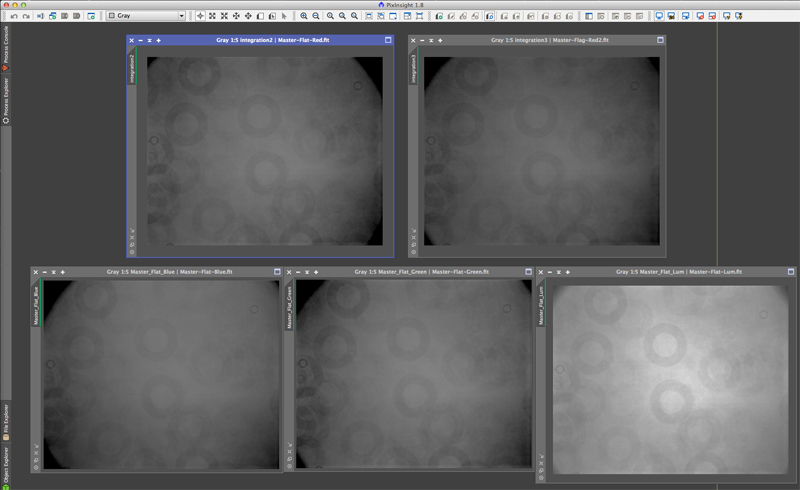
Just like darks and bias calibration frames, you should take as many flats as you can tolerate and stack them together to make a master flat field. This reduces the camera's read noise and shot noise.
Another, often-overlooked requirement for your flats is that they must be dark subtracted in order to work 100% properly. "Dark flats" is a term I use and have seen other use. If your flats are 3-second exposures, take some 3-second dark frames at the same temperature. Make a master dark, subtract that from the flats, and stack them. Doing all this should result in excellent flat-frame calibration, with scientifically accurate signal values all over your frame when your favorite astro-image software does the calibration of your light frames.
Richard S. Wright, Jr.
Why Bother with Flats?
As noted earlier, many imagers skip flat fields altogether and correct vignetting manually with software. This is fine aesthetically, but for scientific work, such as photometry, you can’t just eyeball it.
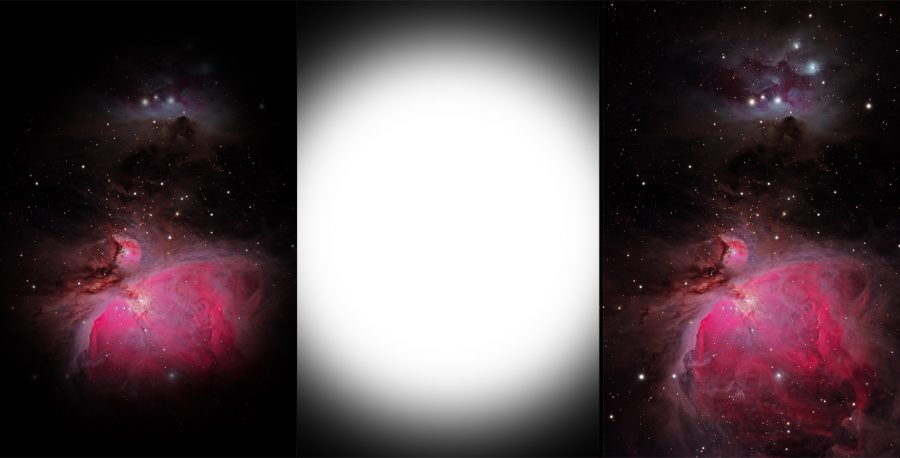
In addition, small grains of dust on the cover slip over your camera’s sensor will leave small, darker-colored spots. These shadows grow larger and fainter depending on how far they are from the sensor. Dust on a filter wheel, for example, will create large circular features, often called dust donuts. Dust on the primary mirror or front objective of your telescope, on the other hand, is so far from the sensor that its overall effect can’t be seen. So you can stop furiously cleaning your telescope or camera lens — the spots you see are from the camera cover glass, your color filters, flatteners, coma correctors, and other elements up near the camera. Some readers have written to me about these dust donuts, and blamed them on the image sensor, the telescope, or both. Regardless where they come from, though, applying a good flat will make them disappear like magic!
Richard S. Wright, Jr.
The final reason to take good quality flats is the PRNU noise I mentioned earlier. This is similar to the mottling you get from dark-pattern noise, but this noise source is specifically caused by small variations in sensitivity to light from one pixel to another. Flats literally “flatten out” this mottling. Because the strength of this unwanted pattern goes up with increased signal, it becomes especially bad under light-polluted skies. If you're carefully guiding on a star, you are not just aligning the stars, you are aligning the PRNU, and that pattern won't go away with stacking. Dithering will help considerably, but it’s still better to remove this pattern noise from the very beginning.

Richard S. Wright, Jr.
Remember too that your optics are not the only source of gradients or illumination artifacts in your image. Light pollution, for example, can introduce a gradient that flats will not correct for. Nevertheless, for the scientifically minded, image calibration or data reduction is an essential first step in any workflow. For the astrophotographer trying to squeeze the most out of their images as possible, flats, along with proper darks or bias frames will remove a lot of unnecessary baggage early on and help you make a clean well-processed image.
About Richard S. Wright Jr.
Contributing Editor Richard S. Wright Jr. is a software developer by profession specializing in computer graphics technologies at LunarG Inc. Richard is also a consulting engineer and imaging specialist for Software Bisque. A lifelong amateur astronomer, Richard first experimented with a webcam and black-and-white film images of the Moon in the 1990s, and he subsequently became hopelessly addicted to astrophotography. Currently, he seeks treatment at his dark sky camp/observatory in Okeechobee, Florida, whenever he can. Check out his online photo gallery.


Comments
You must be logged in to post a comment.