 1
1If you have clouds in your forecast, don’t give up! There’s plenty of astronomy to be enjoyed even on overcast nights.
Clouds have always been the nemesis of astronomers, blocking out the sky on nights that otherwise could’ve been used for serious work. And clouds affect all types of astronomers: planet watchers, asteroid hunters, nova chasers, deep-sky astrophotographers — all of them have to pack up when the clouds move in.
So, traditionally, cloudy nights are used for other chores — catching up on astronomy reading, attending to telescopes and other gear, image processing, cataloging astrophotos and notebook pages, or even sleeping! But I’d like to encourage you to try out some of these fun astronomy projects during times of partial or full clouds, extending your observing times into nights that you might otherwise write off as hopeless. If I’m successful, you just might never have an excuse to sleep again!
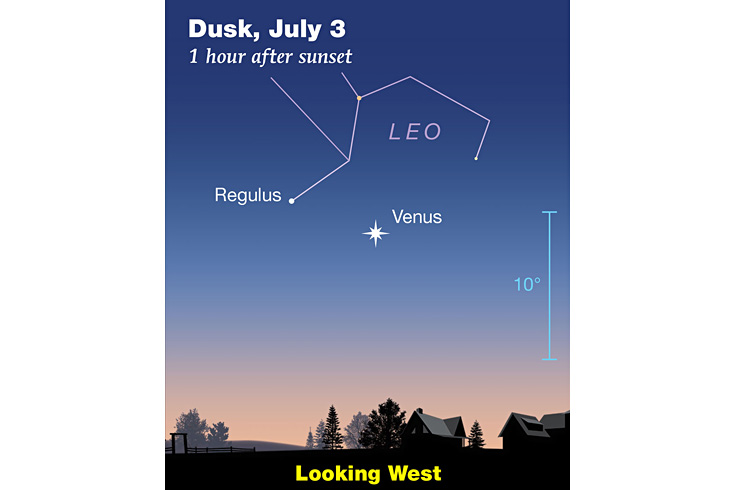
Identify Stars through the Clouds

Daniel Johnson
This activity is easy and fun, and makes a good game for families and other groups. Broken cloud cover is always on the move as high-altitude winds push the clouds around, obscuring and revealing different segments of constellations at different times. During conditions like these, the identification of stars and planets becomes a fun challenge, as H.A. Rey pointed out in his classic stargazing book, The Stars.
Some questions to consider for your group: Can anyone still identify a half-obscured constellation? Can you make out Canis Major if Sirius is missing? Can you identify specific stars without their neighbors visible?
Watch for 22-degree Lunar Halos

Daniel Johnson
It’s rare to find an astronomer who isn’t at least casually interested in meteorology — and sometimes you can combine the pursuits.
During the winter months, cirrostratus clouds occasionally form as moist air rises to great heights, creating a thin layer of hexagonal ice crystals that’s suspended in the atmosphere. These thin clouds spread out over the whole sky, but they are semi-transparent. Conditions like these are usually detrimental to almost any serious astronomy — even if stars or planets are visible through the weak clouds, any telescopic view will undoubtedly suffer.
But on the upside, these are absolutely ideal conditions to form a halo around the Moon —specifically, a glowing ring created by the Moon’s light refracting through the hexagonal ice crystals.
The most likely angle of refraction is 22°, so these are known as 22-degree halos. The name comes from the fact that the radius of the ring covers 22° of sky; for comparison, the Moon itself is about half a degree across. It’s not a terribly common phenomenon, but visually impressive and worth seeking out.
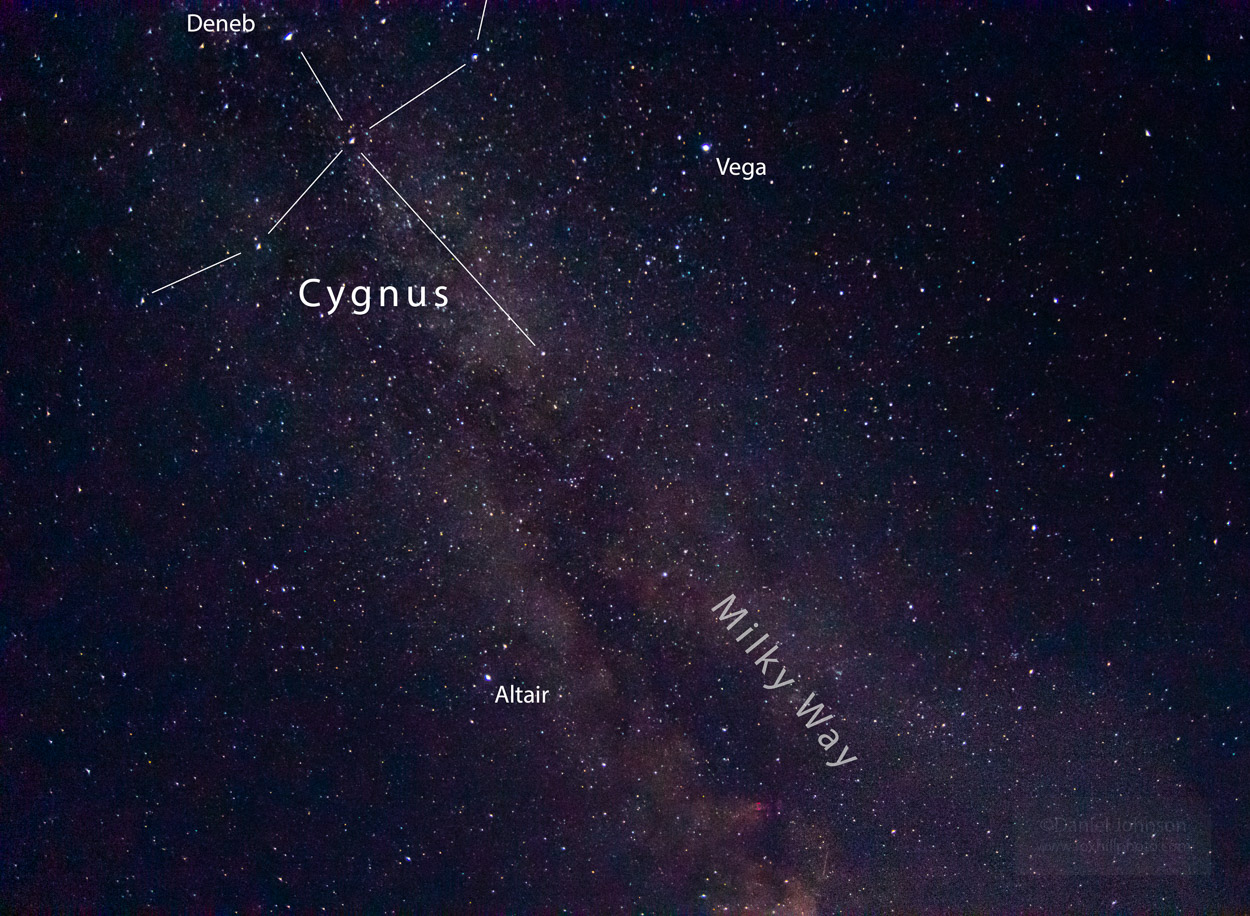
Photograph Cloudy Constellations

Daniel Johnson
As a photographer, I’m always looking for new ways to put a fresh spin on an old subject. One way is to photograph constellation portraits on partly cloudy nights. Long exposures will render cloud movements as artistic streaks. This technique works especially well on moonlit nights, as the extra illumination brightens the clouds and sky (so the project turns two nuisances into a positive).
If you’d like to try it, the photographic process is actually fairly easy, although the more effort you put in, the better your results will be:
- Place your camera — preferably a DSLR or modern mirrorless — on a tripod.
- Focus your lens at infinity (not so easy; you might want to do this ahead of time during the day).
- Choose your lens carefully: Lens choice has an effect on the image. Using a focal length around 75mm (or 50mm on a “crop sensor” camera) can create a tight view of a single constellation. Wide-angle lenses like 24mm (or 18mm is common for crop sensors) take in more of the sky, and can encompass multiple constellations.
- Aim the camera at your constellation of choice. This can be challenging to do in the dark if it’s new to you. Using a wide-angle lens can make the results less dependent on camera aim.
- Use a manual exposure mode to set your shutter speed to between 20 or 25 seconds. Set the ISO to 1600 and the lens aperture as open as it will go (probably something like f/2.8, f/3.5, or f/4). (If you are using a longer focal length lens like 50mm or longer, you’ll need to shorten the shutter speed to keep the stars from smearing. Richard S. Wright Jr. has written a fine tutorial about this topic.)
- Take a photograph. For best results, use a cable release, since touching the camera can blur the long exposure. On a DSLR, consider using a mirror lock-up feature to minimize vibrations.
- Review the photo and then adjust as necessary. If the clouds are moving really fast, you may want to drop the shutter speed down to 8 or 10 seconds, to avoid capturing a severely blurred streak. If the moonlight is too bright, you may need to lower the ISO. Experimentation is key.
- Naturally, high-quality optics will provide better images. Photographing with the lens at its widest aperture may exacerbate the shortcomings of lower-quality lenses, which may suffer sharpness or distortion issues around the edges of the frame.

Daniel Johnson
Try Radio Astronomy
Admittedly, all three of the previous suggestions rely on moments of at least partially transparent skies, and they don’t work on nights when the sky is totally overcast. But you’re still not out of luck. Clouds may stop visible light, but they’re no match for the radio end of the electromagnetic spectrum. These longer wavelengths easily penetrate clouds. Why not spend a few of your cloudy nights building and using some simple radio astronomy equipment?
When you think of radio astronomy, you probably envision something huge, like the Very Large Array or the broken and now-dismantled Arecibo telescope. But that’s like comparing your binoculars to the Hubble Space Telescope! Radio astronomy can be explored with simple equipment and low monetary investments.
Some of the things you can explore with radio astronomy include:
Jupiter
Energetic particles zipping along Jupiter’s strong magnetic fields result in radio emission. With practice, it’s possible to observe these electrical “storms” using equipment that can be built at home.
Jupiter produces frequencies ranging from about 10 to 40 MHz, which are not compatible with a typical AM/FM radio. Instead, you’ll need a radio receiver specifically capable of tuning to these frequencies, along with an antenna capable of collecting those signals in the first place. NASA’s Radio JOVE Project is a great place to source information and parts, and they have a citizen-science community that can help you as you go.

A project like this is squarely within the reach of the amateur, but, as with other aspects of astronomy, there is a learning curve. Also, the necessary antenna is large, so you’ll need an outdoor space to house it. Still, the logistics of building and learning how to use this equipment probably isn’t any more complex than a solid astrophotography station — it’s just a different end goal — and exploring the universe at these wavelengths is an exciting alternative.
The Sun
We’re talking about cloudy nights, but it’s worth noting that you can also use a homemade radio telescope to observe the Sun, which is a major source of radio waves.
One popular tool for this is the “Itty Bitty Radio Telescope,” which recycles a home satellite television receiver and a few other household items into a fun and small tabletop radio telescope. This telescope is a great first step into radio astronomy, though more of an introduction to the concept than a serious tool in itself. The small telescope can also be used to observe signals from artificial satellites in orbit, day or night.
Meteor showers

Sean Walker
If something like Radio JOVE or solar radio observing is too complex for your interest, you can “observe” meteors with much simpler equipment. When a meteor enters the atmosphere, it creates an ionized trail that can reflect radio waves. You can use a basic FM radio to “listen” to these meteors during a shower, even if clouds prevent you from observing them visually.
The key is to tune the FM radio to a frequency of “dead air,” where no human broadcasts are operating. When a meteor strikes the atmosphere and forms an ionized tail, distant terrestrial radio stations from hundreds of miles away will briefly become audible on your device.
As simple as this project is, it’s still real radio astronomy, though on a budget- and skill-friendly scale.
Cloudy nights are a given, so it can be fun and useful to have a few alternatives in mind, ready to try out until you can return to your optical telescope on a clearer night.
About Daniel Johnson
Daniel Johnson is a Wisconsin-based freelance writer and professional photographer and the co-author of over a dozen books. He’s a longtime amateur astronomer and fortunate enough to live in a rural region with excellent seeing conditions. You can view some of Dan’s photography at www.foxhillphoto.com.


Comments
John Schnupp
February 28, 2024 at 12:14 pm
Amateur (ham) radio has many common interests with astronomy. It's all electromagnetic, it just requires different receivers. If you can track down a local amateur radio operator or club, they may be able to help you and will be a great resource. I must confess, while I do hold an Extra class license (the highest level US licensing, other countries have different designations) I am not active on the air...perhaps it's time for me to take my own advice an set up a small receiving station for radio astronomy.
John Schnupp, N3CNL
You must be logged in to post a comment.
You must be logged in to post a comment.